


About
Pocket Valentine Tutorial
I'm so excited to share my very first tutorial with you. This came about as a result of a pathetic "craft-fail" that occurred earlier this week while trying to make Valentines with my daughter for her preschool class. I won't get into the details, but let's just say it wasn't pretty.
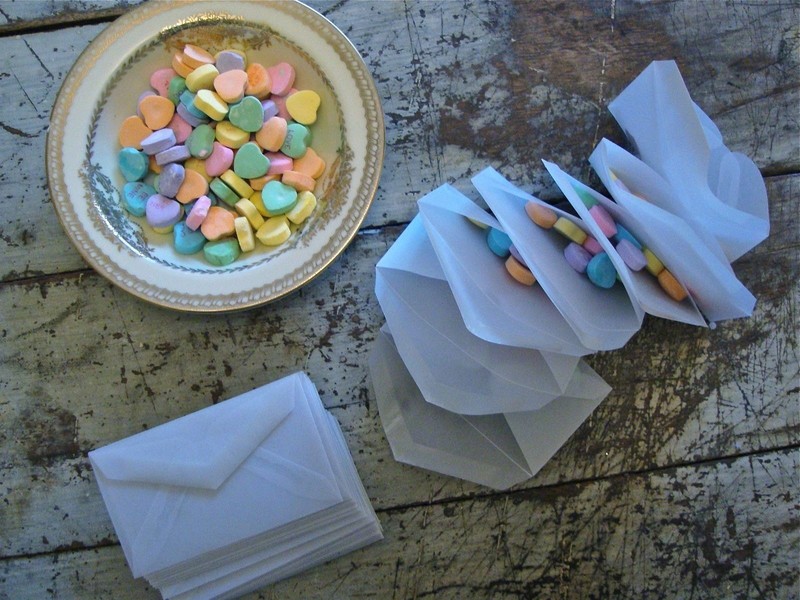
With the clock ticking and no idea what to do next, I briefly entertained the idea of buying ready-made Valentine's. **Horrors!** Then I had a brainstorm...conversation hearts! I picked up an 8-pack on sale at the drug store for $1.99 and headed home to redeem myself. My original intent had been to hot glue the hearts to a card, but when I got them home, I started thinking pockets. I never throw anything away, so I have tons of extra materials on-hand. Aside from the conversation hearts, everything else I used for this project was found around my house...mostly scraps and left-overs from previous projects.
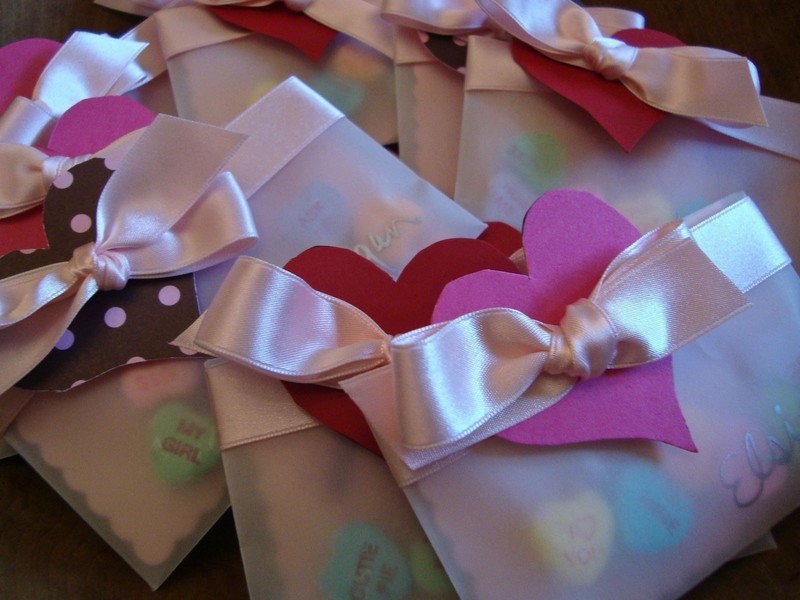
Here is the finished pocket with tutorial to follow...
Tags
-
 Cindy D. favorited Pocket Valentine
09 Apr 13:12
Cindy D. favorited Pocket Valentine
09 Apr 13:12
-
 Hannah F. favorited Pocket Valentine
21 Aug 14:37
Hannah F. favorited Pocket Valentine
21 Aug 14:37
-
 Amaya K. favorited Pocket Valentine
28 Jan 19:39
Amaya K. favorited Pocket Valentine
28 Jan 19:39
-
Monica G. favorited Pocket Valentine
13 Jan 20:05
-
Christie L. favorited Pocket Valentine
08 Aug 06:55
-
 Step 1
PREPARE YOUR MATERIALS
Cut mini-cards to fit inside your pockets. (Mine are fold-over notes, but you could also do flat, mini-books, etc. Whatever your heart desires.)
Use decorative edged scissors to trim the edges of your cards. (Optional. I did scalloped.)
Cut heart-shaped tags to decorate your envelopes as shown in the photos. You can cut these free-hand like I did or use a punch. The size is up to you - it will depend on the size of your pocket and the width of your ribbon. (Mine were left overs from my earlier craft-fail.)
When you are done cutting out the hearts, punch a hole in the center of each heart.
Cut lengths of ribbon long enough to be able to wrap around your envelopes length-wise and then tie a knot or bow.
-
 Step 2
DECORATE YOUR CARDS
Decorate the outside of the cards. Coloring, stamping, collage...whatever works. These are for my daughter's preschool class, so I had her color them with crayons and sign her name inside. I also helped her write a short note to each person - she dictated and I wrote. :)
-
 Step 3
STUFF ENVELOPES
Fill your pockets with a few conversation hearts. I used 6 per envelope - one of each color. (My 3 year old was able to help with this part too...when she wasn't eating the candy!)
Place your cards in the pockets behind the hearts so the hearts show through on the front.
-
 Step 4
WRAP IT UP
Flip your envelope face-down and sandwich your ribbon under the envelope flap, but don't seal it yet.
Turn your envelope over and bring the ribbon ends together in the front. Thread your heart over the ribbon ends and pull it snug against the envelope.
Tie a knot or bow. Trim ribbon edges if you want a clean edge.
Adjust the ribbon and heart to where you want them - then seal your envelope flap to hold it in place.
-
 Step 5
FINISH IT OFF
Use a pen to write the recipient's name on the pocket or the heart tag. (I used a silver sharpie to write on the pocket.)
-
 Step 6
TAKE IT ONE STEP FURTHER:
This little pocket was just begging for a wax seal on the back, so...
-
 Step 7
There you have it...simple and sweet.
EASY ADAPTATIONS:
If you don't have vellum or glassine pockets, try using this tutorial from the Eco Etsy Street Team Blog to make your own pouches from parchment, freezer or waxed paper.
Here's a great tutorial from The Spotted Sparrow for making your own envelopes.
Skip the heart tags and use a small silk flower, large button or other embellishment on the front.
Instead of a wax seal, leave the back plain or add a little sticker...maybe even a big fat lipstick kiss?? SWAK!
These little pockets would also be great for weddings...I can see them filled with lavender buds or rice to throw after the ceremony. They would also be sweet gift enclosures for just about anyone...so many possibilities! Maybe I'll do another post on wedding adaptations...
If you end up making some please let me know how they turn out and be sure to share links to your pictures! I'd love to see what you come up with!
Happy Valentine's Day!
XOXOCindi


Versions

Comments


