


About
plush toast keychain tutorial
I made this in MS Paint, so it might be a bit pixelated.
This tutorial is made for those ppl who wants to start plushie making in an easy way.
That's why I choose to do a piece of toast XD It's fairly simple & straight forward.
Well...actually, I am planning to start a breakfast keychain plushie series, but school is starting TOMORROW!
So, I don't know when is the next time I can start making plushies again T-T and I probably won't have time to finish the "Nyanko Fries" to go along w/ the Nyanko Burger for the junk food contest either....oh well
-
 Sveta favorited Plush Toast Keychain
27 Jan 10:36
Sveta favorited Plush Toast Keychain
27 Jan 10:36
-
 olivoyle favorited Plush Toast Keychain
29 May 09:20
olivoyle favorited Plush Toast Keychain
29 May 09:20
-
 Xfluffy_unitatoX favorited Plush Toast Keychain
17 Nov 18:17
Xfluffy_unitatoX favorited Plush Toast Keychain
17 Nov 18:17
-
 Emma H. favorited Plush Toast Keychain
27 Jun 22:36
Emma H. favorited Plush Toast Keychain
27 Jun 22:36
-
 B B. favorited Plush Toast Keychain
21 May 18:47
B B. favorited Plush Toast Keychain
21 May 18:47
-
 Hgosn1 favorited Plush Toast Keychain
04 Mar 10:15
Hgosn1 favorited Plush Toast Keychain
04 Mar 10:15
-
abigail r. added Plush Toast Keychain to other
06 Feb 06:57
-
 Terka V. added Plush Toast Keychain to Plány
24 Dec 04:53
Terka V. added Plush Toast Keychain to Plány
24 Dec 04:53
-
Cortona P. added Plush Toast Keychain to khbg
10 Dec 18:02
-
 Rose K. favorited Plush Toast Keychain
19 Aug 02:28
Rose K. favorited Plush Toast Keychain
19 Aug 02:28
-
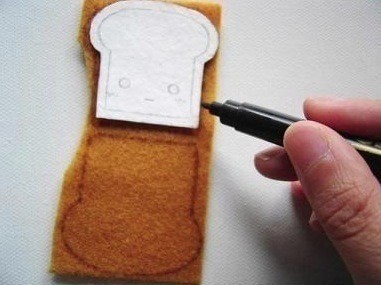
 Step 1
First, make a sketch for your plushie on card paper. Then, cut out the pieces. The bigger one for the crust, and the smaller one for the bread. The point of making patterns for your plushie is so that it's easier for you to trace onto the felt. Also, in the future, if you plan to make the same plushie again, you don't have to redraw it from scratch.
-
 Step 2
Now, trace the pattern on to the felt using a washable color marker. Try to use colors that are close to the felt, so it blends in and when you finish the plushie, the trace lines won't be so obvious, but make sure the color is easy to see on the felt so it's easier for cutting. Do the same for the smaller pattern.
-
 Step 3
After tracing the patterns onto the felt, cut them out.
-
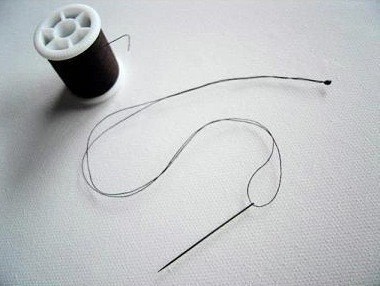
 Step 4
When you knot your thread, make sure the knot is big enough so that when you sew, it won't go through the felt. So you might have to tie a few knots.
-
 Step 5
Now, sew the face onto the bread, starting with the eyes. First, choose where you want the eyes to be, then sew a straight line down and one across, making a "+/x". Now you have the center point for the eyes, then sew around the "x" making a circle. Then just finish sewing the remaining eyes by filling in the center.
-
 Step 6
Next, sew on the mouth. You can do whatever expression you want for the face. Like (o.<) (>.<) (^-^) (6.6) (^3^) (/.\)
For the cheeks, just sew zig-zags \/\ OR sew an oval OR if you have blush, just put some under the eyes.
-
 Step 7
After sewing the face on to the bread, you can start sewing it on to the crust. Leave around 3-4mm space between your stitching for neatness. If you sew too close, it will look messy and you'll end up having more to sew.
-
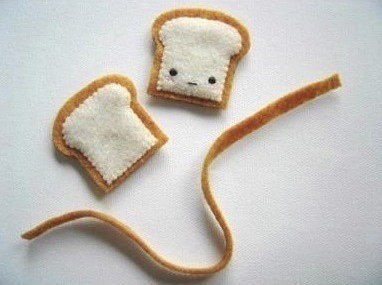
 Step 8
Sew the other side of the bread onto the other crust. Then cut out a long and thin piece of felt around 2/3 of a centimetre in width. Just make sure it's long enough for it to go around the bread. Adding this piece will give the bread more dimension.
-
 Step 9
Sew the thin, long piece of felt around the bread using a hemming stitch. (same as one before) by going \ \ \ \ or | | | |
Important: Only sew up to around the top of the bread and stop!!
-
 Step 10
You have to make sure you remember to leave room for the keychain holder. You may use a piece of thin, clear plastic which you can get from packaging of stuff you buy (must be bendable & flexible, not those hard plastic). If you don't have any clear plastic, you may use a neutral colour of felt fabric of whatever color you think goes well with your plushie. The keychain holder should be around 2.5cm long and 5mm wide.
-
 Step 11
Fold the clear plastic/felt in half to make a loop and tuck it in between the piece of bread and the thin, long piece of felt around the top. Leave around 6-7mm of the keychain holder showing (enough room for the metal-bead chain to go through).
-
 Step 12
Then, with one hand holding it tightly in place, sew across the clear plastic/felt. Since you want the keychain holder to steadily attached to the plushie so it doesn't come off, you have to sew a bit closer than you did for the rest of the bread (around 2mm apart between stitching). Then, once you sew across the keychain holder, you may continue to finish sewing the rest of the bread leaving 3-4mm between your stitching again.
-
 Step 13
Once you finish sewing the thin, long piece of felt around the bread and you still have extra length, just cut it off with scissors.
-
 Step 14
Before you tie a knot, don't forget to sew around the edges of the bread (2-3 stitches).
-
 Step 15
Now that you've finished sewing one side of the bread...
-
 Step 16
add on the other side of the bread and continue sewing until around half way.
-
 Step 17
After yo sew half way through, leave room for stuffing. If you don't have cotton, you can use left over felt scraps from the plushie. Just make sure you cut up the felt into small pieces so it won't make the plushie look bumpy on the outside. Stuff evenly around the plushie. As you continue sewing the rest of the bread, you may continue sewing the rest of the bread, you may continue stuffing extra felt/cotton as you need to.
-
 Step 18
After you finish sewing the bread together, tie a big knot. Then stick the knot in between the stitching with the needle until the knot is hidden inside.
-
 Step 19
Add in the metal-bead chain/keychain and you're done!
You may also experiment with other types of plushies using the same techniques.


Versions

Posted by
Beanchan


Posted by
hello kitty * kitty chan*

Posted by
Kristine


Great tutorials!
Great tutorials!