


About
Pillowcase How-To
Super cute pillowcase pattern with only TWO exposed seams!
This is for one pillowcase - double your fabric for a matching pair.
p.s. Geez, the fabrics I used in the tutorial photos are so NOT me!
-
 rihanna M. favorited Pillowcase
26 Mar 08:27
rihanna M. favorited Pillowcase
26 Mar 08:27
-
 Barbara D. added Pillowcase to sewing
22 May 05:28
Barbara D. added Pillowcase to sewing
22 May 05:28
-
 rebblebb favorited Pillowcase
28 Aug 00:12
rebblebb favorited Pillowcase
28 Aug 00:12
-
Step 1
Trim and square fabrics to the following measurements:
Fabric A (body): 41"high x 27"wide( watch those directional patterns!)
Fabric B (cuff): 41" high x 10" wide
Fabric C (trim): 41" high x 3" wideEven if your fabric measures correctly, you will want to square up the fabric with your rotary cutter, mat and ruler. If your measurements are off by a tiny bit, don't worry -- just make sure that, if you are making a pair, BOTH pillows pairs match (so if you have 26.5" for one pillow, cut the second to 26.5" -- you can make up for the lost half inch by adding it to your cuffs!)
-
Step 2
Fold and press the trim fabric (3" x 41") in half longwise; wrong sides (WS) together
Set aside
-
 Step 3
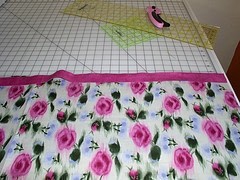
Spread out fabric for your cuff (41"x10" in this photo, green fabric) right side (RS) up.
Place body fabric (in this photo, flowers) RS up on top of cuff fabric. Match raw edges and pin.
-
 Step 4
Place folded and pressed trim fabric on top of body fabric, raw edges matching.
Remove pins and repin all three fabrics (four layers) together)
-
 Step 5
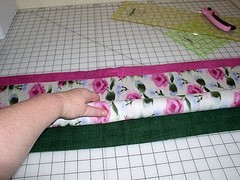
Roll body fabric (this is the cool part!). Stop when approx. 4"-5" of cuff fabric is exposed. DO NOT ROLL CUFF FABRIC.
-
 Step 6
Fold cuff fabric over "roll" and match raw edges of cuff and trim fabrics. Remove and replace pins...
-
 Step 7
Your fabric 'sandwich wrap' should look like this!
-
 Step 8
Sew a 3/8" seam along the long edge, removing pins (BEFORE your machine gets near them, of course).
Always SET YOUR SEAMS by pressing (lift and press with your iron on all newly stitched area - don't "rub" it on the fabric) Don't ask why you should set your seams, just do it - you'll love me for it later when you get amazing, professional results.
-
 Step 9
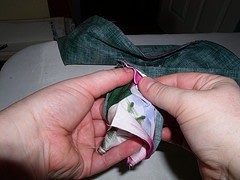
Flip it baby! It's as easy as 1...
-
 Step 10
2...
-
 Step 11
3!
The super-keeno reason to use this technique is that the four raw edges where the various fabrics from the body, cuff and trim meet are now enclosed inside of the cuff! No unraveling, no seams to finish! Woo Hoo!
-
Step 12
Press all of your seams open and flat, using the tip of your iron and steam, if desired. Watch your fingers!
-
 Step 13
Fold WS (yes, wrong sides!) together and match all raw edges for a French Seam!
-
 Step 14
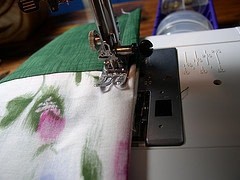
Beginning at cuffed edge, stitch down pillow using a 1/4" seam allowance, turn at corner and sew to folded edge
-
Step 15
Set your seams!!!!!!
Press seams open
Turn your pillowcase inside out and press (yes, again!)
-
 Step 16
Using a 5/8" seam allowance, sew around the case side and bottom, encasing the raw edges (this is the inside of your pillowcase and will not be seen)
-
 Step 17
Here's what the seam looks like inside the finished pillowcase.
Of course, you can use French seams on all kinds of stuff (so why don't you?).
Flip it right side out (I didn't need to remind you to set your seams first, right?) Put it on a pillow and enjoy!
If you have a fancy machine, you can add decorative stitches to the trim fabric in between steps 11 and 12. One x-mas I made my nieces each a pillow case in their fave color with their names stitched on the trim fabric (yay for programmable machines with text stitches!) I've found that one or two layers of light to medium weight dissolvable stabilizer works well for me.
-
 Step 18
Here are a couple of the custom pillowcases I've made for our home.


Versions

Comments


