

About
I Spy Pi
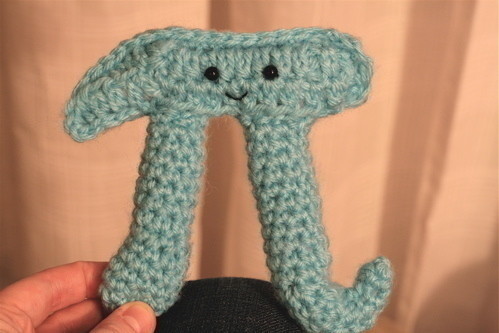
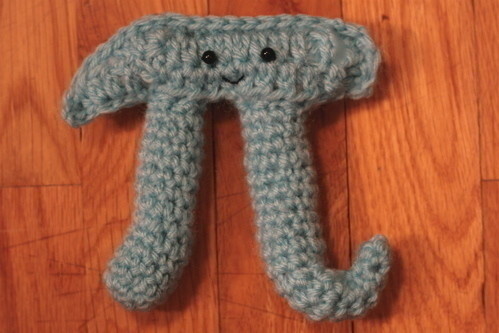
Usually I’m partial to pie, especially shoofly and berry varieties, but in honor of approaching 3/14, I decided to make a Pi…you know, without the “e” at the end? The curious number with an infinite amount of digits to the right of the decimal point? Yep! It’s almost Pi Day! If you happen to be a crocheter AND a numbers’ nerd, you’re in luck, because you TOO can make your very own plushy Pi. I always did think of Pi as a little dude, what with his two differently shaped legs and all.
Tags
-
 ZombieUnicorn favorited Pi Plushie
14 Jan 23:02
ZombieUnicorn favorited Pi Plushie
14 Jan 23:02
-
 Lizi D. favorited Pi Plushie
15 Sep 02:21
Lizi D. favorited Pi Plushie
15 Sep 02:21
-
 Neko-San K. favorited Pi Plushie
31 May 20:46
Neko-San K. favorited Pi Plushie
31 May 20:46
-
 Skyliva favorited Pi Plushie
23 Apr 21:41
Skyliva favorited Pi Plushie
23 Apr 21:41
-
 Allison B. favorited Pi Plushie
29 Aug 16:19
Allison B. favorited Pi Plushie
29 Aug 16:19
-
 VeeMaris favorited Pi Plushie
23 Mar 15:07
VeeMaris favorited Pi Plushie
23 Mar 15:07
-
 Kathy D. favorited Pi Plushie
07 Mar 02:39
Kathy D. favorited Pi Plushie
07 Mar 02:39
-
Julia C. added Pi Plushie to Fun Decor
31 Jan 01:58
-
Svetlana C. favorited Pi Plushie
28 Jan 19:51
-
darcel d. favorited Pi Plushie
13 Dec 22:30
-
 Step 1
This forms the horizontal part)
**With G hook and yarn, ch 13.
Make a hdc in the 3rd ch from hook and all the way across.
Ch 1 turn and hdc across.
Do not turn work: Ch 6 and make a hdc in the 3rd ch from hook, hdc in next ch, dc in next ch, dc in next ch, dc in next space, which is the edge of the 2nd row made, then tr in the next space, which is the edge of the 1st row made, hdc in this same space. Skip a hdc on the top row and sl into the next. Finish off.**Repeat between ** ** one more time so that you have two pieces.
On one of the pieces, sew on eyes and a mouth, using pictures as a guide. Put two pieces together, face facing you, and join with yarn at the bottom right-hand corner. Sc together until you hit the pointy part of Pi on the far left, to where you made the first hdc, in bold above. Ch 3 here and slip in next space (to make it pointier!). Continue to sc pieces together until it looks like the below picture:
-
 Step 2
With G hook and yarn, now it’s time to make the left “leg”!
Ch 2 and make 6sc in 2nd ch from hook.
Make 2sc in each (12sc).
Sc for 3 rounds.
Decrease once, sc the rest.
Decrease once, sc the rest.
Sc for 7 rounds (or until it’s about 3.5 inches tall).
Finish off leaving a 6-inch tail for sewing.With G hook and yarn, right “leg” time. Leave a 6-inch tail at beginning slip knot.
Ch 2 and make 3sc in the 2nd ch from hook.
Sc for 2 rounds.
*Make 2sc in first sc, sc the rest* (4sc).
Repeat * (5sc).
Repeat * (6sc).
(2sc, sc) around (9sc).
Sc for 1 round.
Decrease once, sc around (8sc).
Sc for approximately 10 rounds.
Finish off, leaving a 6-inch tail.You should have the following three pieces (which I took a bad picture of) and can now stuff them with fiberfil:
-
 Step 3
Sew on left leg using leftover tail by joining the open sides of the horizontal part to the 2nd round from the leg’s top:
-
 Step 4
(Leave tail hanging there for now).
-
 Step 5
Using the long tail at the beginning/bottom of the right leg, you will now do some gathering so that the point right “foot” sticks up: on the inside of the “leg”, stitch from the 4th round to the 6th round and pull really tightly. Is the “foot” going up? Hehe. Finish off and tuck inside.
Using the tail at the top of the right leg, sew onto the horizontal face piece in the same way.
With either one of the leftover tails, sew the few stitches in between the “leg” together, to seal it up!
Celebrate Pi Day with your happy little crochet Pi!


Versions

Comments


