About
Trying new things: phat beets
Pickling is fine. No big thing, right? I mean I’ve quick pickled all kinds of vegetables and even made some apricot jam over the summer. But I have never tried canning and processing because it seemed like such a frightening process. And like all things that seem scary at first, it turned out not to be that scary after all. All you need is a bit of preparation – and equipment. I’m lucky because I scored a canning bath pot and jar rack at a garage sale and I found some canning tongs at a thrift store. I also used a wire cookie rack at the bottom of the pot to make sure that the jars didn’t touch the bottom because if glass jars touch the bottom of the pot, they’ll crack and explode. Hence the cookie rack. If you’re feeling more DIY, just create a rack of your own out of tin foil. Improvisation is key! You will also need 6 pint jars. Thrifted jars are fine but they must be clean and free of nicks and chips, but they don’t have to be brand new. However, your snap lids and rings should be, so don’t skimp there!
Once you’ve got all the equipment handy, all you need to do is make sure you’ve got your ingredients ready and read over the directions at least twice. Seriously, this will help you feel calm and prepared. If you’ve never canned anything before, peruse some online guidelines to get familiar with the task at hand. It will sound more scary than it actually is. Trust me.
You know you’ll have escaped the threat of botulism once you hear a very satisfying pop-pop-popping from each jar as they cool. It’s the best sound you’ve ever heard and it goes so well with that sigh of relief. To be sure that your jars have processed correctly, you can tap the lids with a spoon to hear a high pitched ring. The lids will also be slightly concave, so the visual clues with the audio clues will have you totally relived. Phew!
Now, regarding this beet recipe….while it was very tasty, the recipe itself was a bit totally off. One, it calls for a crap-load of beets – 4.5 lbs to be exact. And there’s no way that that amount of beets could have fit into my 6 pint jars (or the 5 pint jars + 2 half-pint jars I used). I had a ton of beets and onions leftover, not a problem since I love beet salad, but a complication nonetheless. In the recipe below you’ll find that I reduced the amount of beets and onions, but I just guessed at the amount figuring 3 lbs and 1 onion should do just fine (if this is not the case, please let me know). I loved the taste of the cinnamon and ginger and rosemary together but I also tend to enjoy a sweeter pickled beet. So bump up the brown sugar from 1/3 cups to 2/3 cups if you want your pickles a wee bit sweeter. Your call.
These pickled beets make fine gifts. I’ve given away a few of the jars already and have received rave reviews. While the beets make a fine side dish, I think they are pretty perfect on their own. Adding a drizzle of local honey and a handful of salty crumbled feta certainly does things up right.
-
 Alyshia S. favorited Phat Beets
28 May 15:51
Alyshia S. favorited Phat Beets
28 May 15:51
-
 leticia m. favorited Phat Beets
23 Jun 17:21
leticia m. favorited Phat Beets
23 Jun 17:21
You Will Need
-
 Step 1
In a large pot, bring beets to the boil and let simmer for about 30-45 minutes until they can easily be pierced with a fork. Drain and cool beets. This step can be done the day before. Remove skins and cut beets in half lengthwise and then cut crosswise into 1/4 inch slices. In a large bowl, mix together the onions with the beets. Set aside.
-
Step 2
Place 6 clean 1-pint jars right side up on a rack in a boiling-water canner. Fill the canner and jars with hot water, about 1-inch above the tops of jars. Boil jars over high heat for 10 minutes. Remove and drain hot sterilized jars one at a time. Keep the water simmering away in the canner for later. Place jars on a wire rack set over a rimmed baking sheet.
-
Step 3
Meanwhile, in another pot filled with water, bring water to a boil and reduce to a simmer. Add cleaned lids and lid rings and let simmer lids for 10 minutes – do not boil, as this may cause problems in sealing jars. Drain lids and set aside.
-
 Step 4
Fill each sterilized jar with 2 pieces of ginger and 1 sprig rosemary. Pack each jar with onion and beet mixture up to within 1/2 inch below the rim of the jar.
-
Step 5
In a tea strainer or make a baggie out of a piece of cheesecloth, place allspice, cinnamon stick, and cloves inside a medium sized saucepan. Pour over cider vinegar, 2 cups water, lemon juice, and brown sugar and bring to a boil over medium-high heat. Reduce heat and cover – let mixture simmer about 10 minutes. Meanwhile, check to make sure that the water in the canner is brought up to a boil.
-
Step 6
Immediately pour hot spiced vinegar mixture over the beet mixture in each jar. Press down with a small rubber spatula to release any air bubbles. If you drip any liquid on the tops of the jars, wipe dry with a clean cloth. Put lids and rings on jars and tighten but do not over-tighten.
-
Step 7
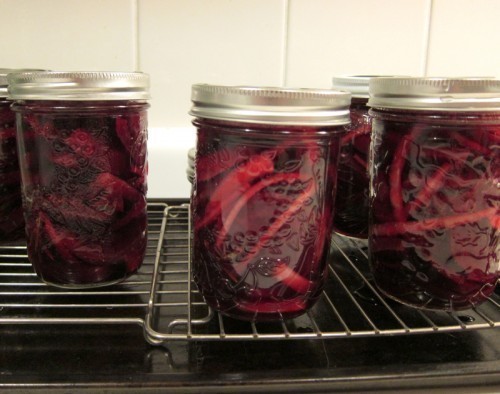
Within 10 minutes of filling the jars, place them back into the canner one at a time, using a jar lifter that is securely positioned below the neck of the jar. Keep jars upright at all times. Add more boiling water from a kettle if needed so that the water covers the jars by one inch. Boil the jars for 7 minutes. Turn off heat and gently transfer jars to a wire rack set over a rimmed baking sheet, taking care not to tilt jars and spacing each jar at least 1 inch apart. Avoid placing jars on a cold surface or near a cold draft.
-
Step 8
Let jars sit undisturbed until fully cooled, 12 to 24 hours. You will begin to hear a popping noise. This is a very good thing, meaning that your jars have sealed. Hooray! No botulism for you! Do not tighten ring bands on the lids or push down on the center of the flat metal lid until jar has cooled completely.
-
 Step 9
Once jars have cooled completely, test to make sure each jar is completely sealed. Press down on the middle of the lid with a finger. If lid springs up when finger is released, the jar is unsealed. Store sealed jars in a cool place for at least 2 and up to 4 weeks to allow flavors to thoroughly combine. If any of the jars are unsealed, store in the refrigerator and used within several days.