About
A contraceptive cover with hand stitched details
My birth control lives in my purse so no matter where I am I can take it at the correct time. The cover that comes with it is a blue plastic slip that is pretty noticeable every time I open my bag... I decided to make a cover for it that will be pretty and subtle.
Tags
-
 Emmyann07 entered her project Personal Item Cover to Singer Christmas Contest
11 Nov 06:05
Emmyann07 entered her project Personal Item Cover to Singer Christmas Contest
11 Nov 06:05
-
 silentband favorited Personal Item Cover
19 Jul 19:00
silentband favorited Personal Item Cover
19 Jul 19:00
-
 craftgirl14 favorited Personal Item Cover
02 Apr 02:18
craftgirl14 favorited Personal Item Cover
02 Apr 02:18
-
 Birgit favorited Personal Item Cover
05 Feb 09:39
Birgit favorited Personal Item Cover
05 Feb 09:39
-
Emmyann07 entered her project Personal Item Cover to Jump From Paper
06 Jan 21:17
-
Emmyann07 entered her project Personal Item Cover to Kitschy Digitals
05 Nov 02:36
-
 Trana-Rebecca G. favorited Personal Item Cover
16 Sep 20:15
Trana-Rebecca G. favorited Personal Item Cover
16 Sep 20:15
-
 Deliliah* favorited Personal Item Cover
13 Aug 01:22
Deliliah* favorited Personal Item Cover
13 Aug 01:22
-
 Naza Z. favorited Personal Item Cover
03 Aug 01:59
Naza Z. favorited Personal Item Cover
03 Aug 01:59
-
 Alezita G. favorited Personal Item Cover
29 Jul 00:36
Alezita G. favorited Personal Item Cover
29 Jul 00:36
You Will Need
-
 Step 1
You Will Need:
-----------------------------
For this project, because of it's size, I decided to use scrap fabrics I had from other projects (note the floral fabric that was used for my ruffle collar tank)
-----------------------------
- Scrap of printed fabric
- Scrap of plain lining
- Fusible interfacing
- Matching thread
- Decorative thread
- One large button
- Cut out of your contraceptive traced on plain paper -
 Step 2
Cut out Fabric:
----------------------------
- Take your cut out and place on your fabric
- Measure out (either with a ruler or just using your cut out) approximately 2 1/3 x the length of the cut out
- Measure a 1/2" on either side of the cut out
-Cut all three pieces of printed fabric, plain lining and fusible interfacing to the same size -
 Step 3
Interface and Basting:
------------------------------
- Apply interfacing to printed fabric following manufacturers instructions
- Place printed fabric face side down (with interface showing) on top of plain lining piece
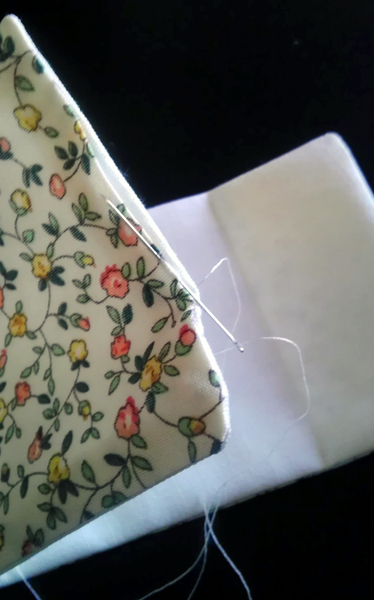
- Pin in place and hand baste stitch around the perimeter of the rectangle close to the edge, removing pins as you go -
 Step 4
Stitching:
-----------------------------
-Machine stitch with matching thread around the rectangle just inside your baste stitch
- Leave a gap at the top so the rectangle can be turned, back stitch your starting and finishing stitches for security
- Carefully cut and pick the baste stitches to remove thread -
 Step 5
Turning the Case:
------------------------
- Clip the corners on a diagonal
- Turn rectangle inside out through the opening you left, use a rounded end object (I use a crochet hook) to poke the corners out
- Press flat
- Use your cut out to measure where you will fold your cover and press flat -
 Step 6
Slip Stitch:
--------------------------
- Use a slip stitch in matching thread to close opening used to turn rectangle
- Bury the ends
- If you don't have the patience or time to hand stitch use your machine to sew close to the edge, back stitching at the beginning and end of the stitch line -
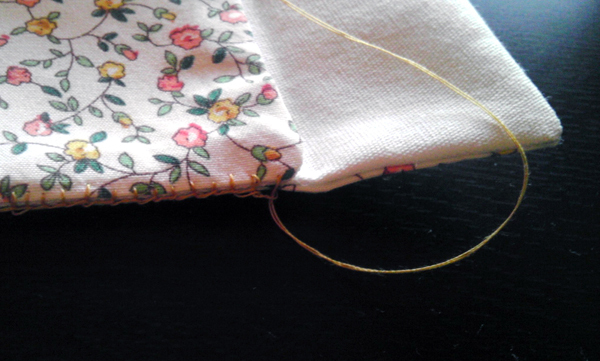
 Step 7
Seams and Edges:
------------------------
- Using the decorative thread use a blanket stitch to join the front and the back of your pouch
- Once you reach the edge of the pouch continue stitch around the edge of the flap all the way to the other side of the pouch -
 Step 8
Adding a Button Hole:
--------------------------
- I was in the mood to sit down and hand sew so I used the machine to stitch a button hole sized rectangle, sniped open the inside and used a button stitch to make this
- If this is to time consuming (it kinda is) thread your machine with your decorative thread and use the button hole foot and stitched to create a machine made hole. -
 Step 9
Finishing your cover:
--------------------
- Last step to finish your cover is to sew your in your button
- Place your contraceptive inside and enjoy having a pretty case that doesn't let everyone see your business