


About
So easy to make, these little guys are created from the fingertips of a black glove.
These Penguins make gorgeous ornaments on a Christmas Tree, look very cute in a glass bauble and could even be used as a cake topper (I did!).
Downloads
- penguin_face_pattern.png 4.59 KB [ Download ]
-
 Cindy H. commented on Penguin Ornaments
16 Jan 13:20
Cindy H. commented on Penguin Ornaments
16 Jan 13:20
-
Cindy H. favorited Penguin Ornaments
16 Jan 13:16
-
 rene c. favorited Penguin Ornaments
30 Nov 07:28
rene c. favorited Penguin Ornaments
30 Nov 07:28
-
 vicky.mcnair.1 favorited Penguin Ornaments
20 Oct 18:45
vicky.mcnair.1 favorited Penguin Ornaments
20 Oct 18:45
-
Rebecca M. favorited Penguin Ornaments
19 Jun 03:34
-
 wondertide favorited Penguin Ornaments
21 Feb 23:36
wondertide favorited Penguin Ornaments
21 Feb 23:36
-
Lucie G. favorited Penguin Ornaments
04 Oct 18:35
-
 Lesia P. favorited Penguin Ornaments
28 Sep 06:48
Lesia P. favorited Penguin Ornaments
28 Sep 06:48
-
 Mable H. favorited Penguin Ornaments
26 Sep 06:38
Mable H. favorited Penguin Ornaments
26 Sep 06:38
-
 Jae R. favorited Penguin Ornaments
19 Aug 08:07
Jae R. favorited Penguin Ornaments
19 Aug 08:07
-
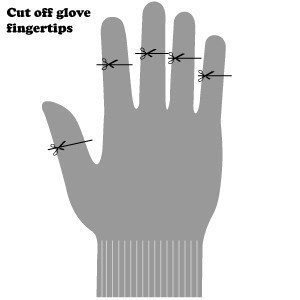
 Step 1
Start by cutting the glove fingers off, approximately 5cm or 2" down from the top.
-
Step 2
Fill each of the fingertips with toy stuffing (polyfibre fill, eco fill or recycled PET fill) until each penguin nice and plump, the key here is to make them fat! Finish by massaging out any lumps.
-
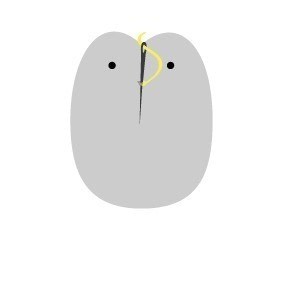
 Step 3
To close the Penguin, thread a needle with black cotton and put a knot in the end. Fold over the raw edge of the glove and begin drawing opposite sides in together, gathering and stitching in each of the edges as you go (see diagram). Secure the thread, trim and set aside.
-
 Step 4
Cut out your little white felt pieces for the body and face using the Penguin Face Pattern provided. Print at 100% and cut to fit your penguins - they'll all be slightly different sizes so the face pattern is graded for you. Using chalk, mark the position of the eyes and beak onto the felt. Satin stitch, with embroidery floss, the little eyes and beak. Alternatively you can use a black and yellow fabric marker to draw these onto the felt.
-
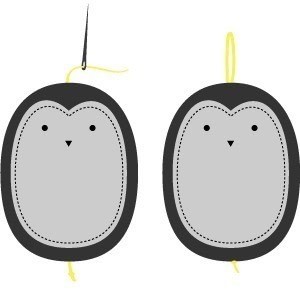
 Step 5
Pin the felt faces onto the black bodies of the penguins. Take your needle, threaded with matching white cotton, and begin a row of tiny stitches right around the felt to secure.
-
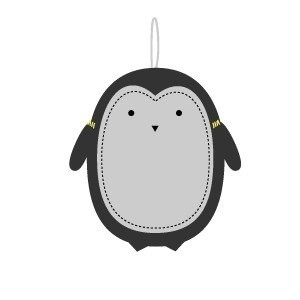
 Step 6
Here's how your penguin should look like now.
-
 Step 7
To create a loop for hanging the penguin, take a 15cm (5 inch) length of your embroidery perle (or floss), threaded into a needle with a knot in the end. Take the needle through the base of the penguin straight up and out the top of his head. Tug to make sure the knot is secure. Take the needle back down throught the penguin and out of the base. Adjust unit you have the desired loop length and tie off with a knot at the base.
-
 Step 8
Next we'll add the wings and feet.
Cut little wing pieces and triangle feet out of the black felt.
-
 Step 9
Position and stitch these onto the sides and base of each penguin using whip stitch.
-
 Step 10
You're done!
-
 Step 11
Optional: Carefully squeeze your little penguin into a glass bauble.
-
 Step 12
Hang him from the nearest tree.


Comments


