

About
How to Make a Paperback Picture Frame
This little project was born on a recent trip to the Goodwill Outlet, locally known as The Bins. I stumbled onto a huge pile of paperback books with nice, lurid covers, and thought they’d make great picture frames.
-
 Vanessa B. added Paperback Picture Frame to Home DIY
20 Feb 06:24
Vanessa B. added Paperback Picture Frame to Home DIY
20 Feb 06:24
-
 kelly.koopman added Paperback Picture Frame to To do
14 Apr 17:19
kelly.koopman added Paperback Picture Frame to To do
14 Apr 17:19
-
 the little crafty mermaid <3 favorited Paperback Picture Frame
24 Jul 20:29
the little crafty mermaid <3 favorited Paperback Picture Frame
24 Jul 20:29
You Will Need
-
 Step 1
Start by measuring the book. Then, use that measurement to size a couple photos in your computer. They should be a little smaller than the page size. Print them out on photo paper.
Take your paperback and divide the pages in half.
-
 Step 2
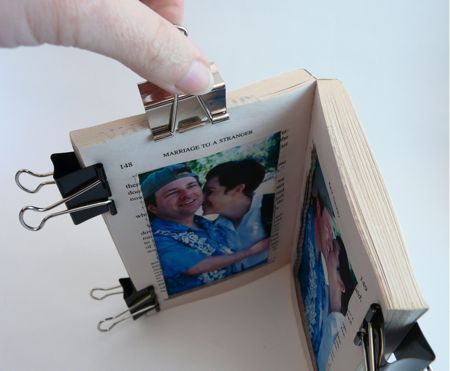
Secure the top and bottom of each half with binder clips, as shown here.
Cut yourself a template for the frame opening. The size will depend on how your book is laid out, and whether you want any of the text to show around your photos. When you have a template you like, center it on each page and trace it in pencil.
-
 Step 3
Use a metal ruler and a nice, sharp craft knife to cut along your traced lines. Cut into the book a couple times – you want the blade to pass about 1/8? to 1/4? deep through the pages.
The beauty of this little project is, you can cut as many openings for photos in various sizes and shapes as you like.
-
 Step 4
Carefully remove the centers of the cut pages until you have a well as deep as you like. Save those cut-outs for collages!
-
 Step 5
Remove the binder clips. Position your photo under the window, and glue it in place with some glue stick.
-
 Step 6
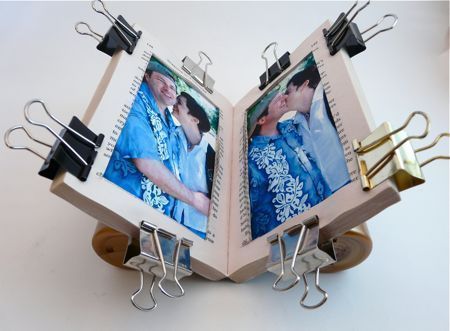
Now, open the book at about a 45-degree angle. Put the binder clips back on, but in this configuration.
-
 Step 7
Depending on the condition of your book, you may need to place a binder clip in the top edge of each side, as shown. How can you tell if this is necessary? Take a look at the right-hand side of the book here. See how the pages are bowed out a bit in the center? We need them to lie flatter against each other. As you can see on the left-hand cover, a binder clip presses them together nicely.
-
 Step 8
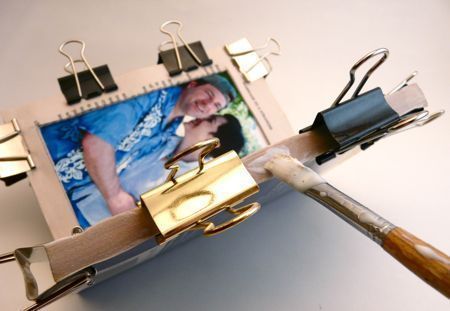
Now, brush a generous coat of Mod Podge over the edge of the pages. The glue will seep into the pages a bit and bind them together. Let this coat dry, and add a second coat.
Don’t worry about brushing any glue under that binder clip. Instead, put on two coats around the clip first. Once they dry, slide the clip to one side and brush two coats on the remaining area.
-
 Step 9
If you have enough binder clips, and a something to prop the sides of the book up with, then you can Mod Podge the top and bottom edges of the book simultaneously.
-
 Step 10
When the top and bottom edges are dry, then repeat the process to coat the sides in Mod Podge. Again, work around the binder clips initially, and then slide them aside to finish up.
Allow this step to dry, and then remove all the binder clips. The book is now rigid, and holds itself open at an angle. Voila!
-
 Step 11
The book cover/photo combination possibilities are endless. And you could also use this frame for artwork. Oddly, I can also see these frames, made from romance novels, bearing a photo of a bride and groom – and being used as table decorations at a (rather hip) wedding.