About
I saw these Tree Templates by Kelleigh Ratzlaff in The Digi Chick store and I HAD to use them!
I know it’s only November…but Christmas is right around the corner! It’s time to start getting those decorations and gifts made.
I saw these Tree Templates by Kelleigh Ratzlaff in The Digi Chick store and I HAD to use them!
Tags
-
 Sue S. favorited Paper Tree Picture Holders
13 Aug 14:37
Sue S. favorited Paper Tree Picture Holders
13 Aug 14:37
-
 Ariel G. added Paper Tree Picture Holders to Craft This <3
11 Dec 12:16
Ariel G. added Paper Tree Picture Holders to Craft This <3
11 Dec 12:16
-
 OH! Its the Domo :3 favorited Paper Tree Picture Holders
01 Dec 03:11
OH! Its the Domo :3 favorited Paper Tree Picture Holders
01 Dec 03:11
You Will Need
-
 Step 1
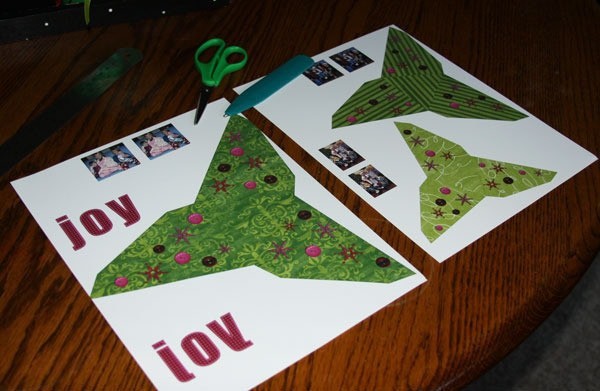
So the first step is to design your trees in you photo editing program. It’s easy just clip your papers to the layers in the template. Then decorate with your digi elements. Then you need to size your pictures down to match up with the trees and re-size your letters also. I wanted the word JOY. One letter for each tree. You will want 2 copies of each picture and 2 of each letter. Make sure you flip one letter backwards so you can glue the 2 back to back. Here are my printed goodies.
-
 Step 2
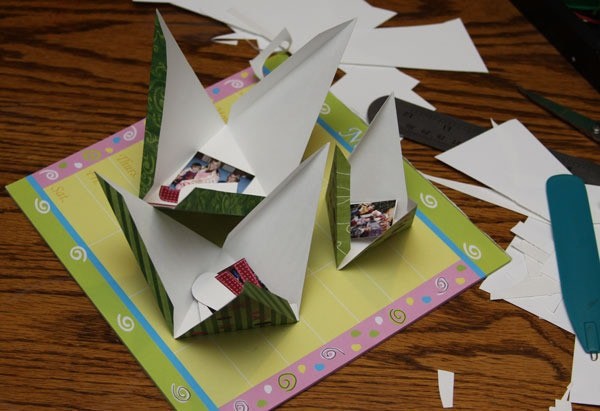
Next you cut out your printed images. Kelleighs templates are easy, you cut on the solid lines and fold on the dashed lines. Cute out all your trees, pictures and letters, you will have to use a craft knife for the middle of the O. Here they are all cut out.
-
 Step 3
Now you need to score and fold on the dashed lines of the trees.
-
 Step 4
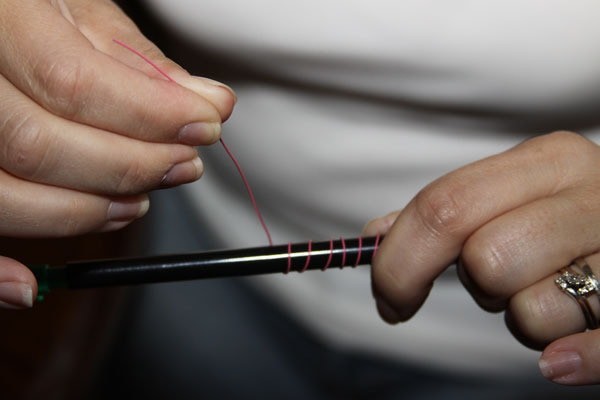
So now lets put our little picture doo-dads together. You have your 2 little pictures cut out and ready to go. You need to curl you wire. All you need to do is wrap it around a pencil or pen, like this.
-
 Step 5
Then pull it off and its all curly.
-
 Step 6
Then you will put glue on both sides of your picture and flatten on edge of the wire, stick it in-between the 2 little pictures, press it down real good. I like to press them together with my bone folder. you will do this same process with your letters.
-
 Step 7
When they are all dry you can put them together with your trees. Just glue on the tabs of the tree templates.
-
 Step 8
And stick your fibers and wire picture and letter do-dads in the top of the tree.
-
 Step 9
Here’s a close up:
-
 Step 10
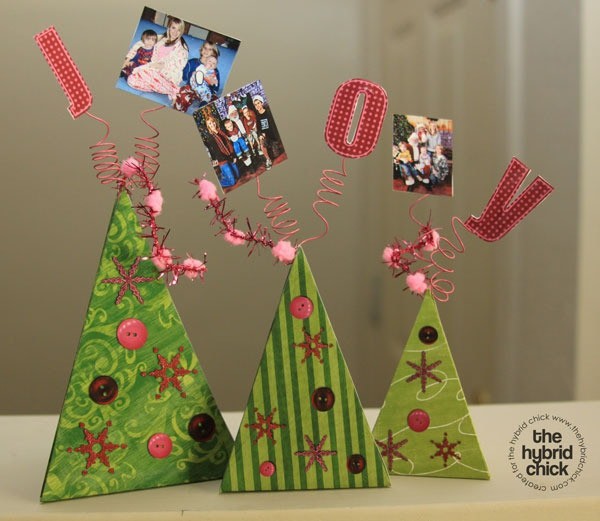
Now you can sit back and enjoy your Tree Picture Holders!