About
a sweet gift
wanted to make a cute gift to congratulate a friend.
Tags
-
 Jennie I. added Paper Roses to Addams Ladies
05 Oct 14:42
Jennie I. added Paper Roses to Addams Ladies
05 Oct 14:42
-
 RareJewel favorited Paper Roses
08 Jun 05:49
RareJewel favorited Paper Roses
08 Jun 05:49
-
 Pramodini Arela entered her project Paper Roses to Couture Keepsakes
22 May 03:58
Pramodini Arela entered her project Paper Roses to Couture Keepsakes
22 May 03:58
-
 artpanda18 favorited Paper Roses
06 Mar 17:04
artpanda18 favorited Paper Roses
06 Mar 17:04
-
 Pimke added Paper Roses to Blumen
27 Jan 11:04
Pimke added Paper Roses to Blumen
27 Jan 11:04
-
 Kim O. favorited Paper Roses
21 Jan 19:03
Kim O. favorited Paper Roses
21 Jan 19:03
-
 Angela H. favorited Paper Roses
11 Dec 21:25
Angela H. favorited Paper Roses
11 Dec 21:25
-
 MamaMindy added Paper Roses to Paper Tutorials
11 Nov 22:51
MamaMindy added Paper Roses to Paper Tutorials
11 Nov 22:51
-
 teresa.vance.129 added Paper Roses to PRETTY AND AWESOME PAPERCRAfts DIY MUST MAKE! !!
30 Oct 22:12
teresa.vance.129 added Paper Roses to PRETTY AND AWESOME PAPERCRAfts DIY MUST MAKE! !!
30 Oct 22:12
-
 blufairy favorited Paper Roses
18 Oct 03:14
blufairy favorited Paper Roses
18 Oct 03:14
-
 Step 1
THE TEMPLATE. You can find the template at http://meholder.blogspot.tw/2009/03/paper-flower-tutorial.html. Just transfer it to word, resize it to however big you want your rose to be, and print it out. Or, if you have a large six-petal punch, you can use that too. This just gives you the freedom to change the size.
-
 Step 2
TRACE AND CUT OUT OF COLORED PAPER. Trace your template on your colored construction paper. With my A4 sized paper, I was able to get about 6 cut out by folding in half and then folding into thirds. But it will depend on the size of your paper and template. You need 3 to make a whole flower.
-
 Step 3
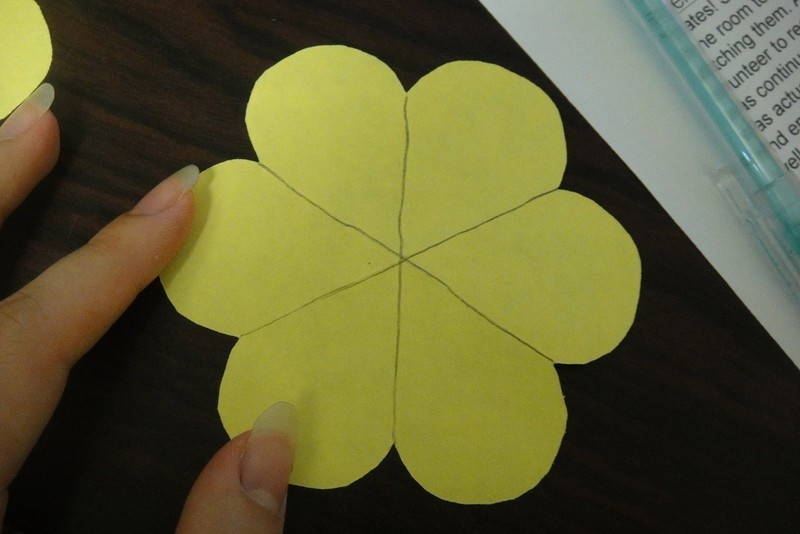
FOLD. from indent to indent, fold the flower shapes. DON'T TRACE THE LINES. I just did that so it is easy to see.
-
 Step 4
COLOR EDGES WITH PASTELS. Using your oil pastels, find a color that is slightly darker than your paper and rim the shape. The more you use, the darker the edges will be and the more prominent the color will contrast.
-
 Step 5
SMUDGE THE PASTEL TO FADE THE COLOR. Using the cotton swab or Q-tip, fade the pastel inward, rubbing firmly. You will want to start from the edge and pull toward you, following the curve of the arch so that you don't have any straight lines. mostly, you just keep rubbing until you get the ombre effect.
-
 Step 6
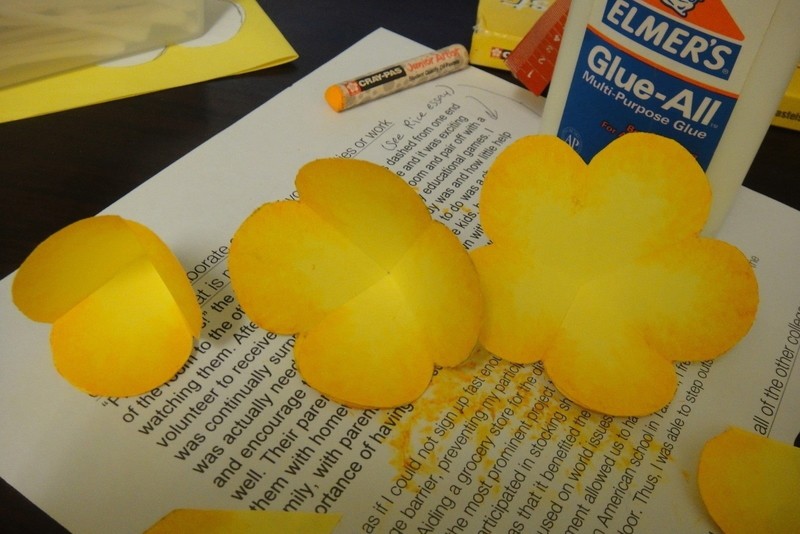
CUT THE FLOWER PETALS. with one, cut up one of the fold lines stopping at the middle. for the second. cut out one of the petals, again stopping at the middle. and for the third, cut out TWO petals.
-
 Step 7
GLUE. glue together the two "petals" on either side of where you cut, making a 5 petal, 4 petal, and 3 petal 3D shape.
-
 Step 8
CURL BACK THE PETALS. Using a toothpick or the end of a skinny paintbrush, curl back each petal on each flower. the toothpick creates tighter curls so I chose a paintbrush because i wanted looser curls.
-
 Step 9
SNIP THE POINTS OFF THE TWO SMALLER FLOWER PARTS. This will help it rest better when they are put together.
-
Step 10
GLUE THE PIECES TOGETHER. glue the second biggest to the biggest, using a generous amount of glue and gently press them in place. It will pop up a little, but it will rest better when all of the pieces are in place.
-
 Step 11
CREATE THE CENTER. take the two petal piece you cut out earlier, curl the petals back like you did with the big flower parts. then uncurl them and tightly roll the tips. place a tapered paintbrush flush with the long side of the petal and roll away from you, creating a funnel. keep adjusting the curls as you roll so they don't flatten. The inside petal should be taller than the outside petal. glue in place. Once the glue is dried, snip off the point and glue it to the rest of the half-assembled flower. refer to http://meholder.blogspot.tw/2009/03/paper-flower-tutorial.html for more help.
-
 Step 12
with the pastel side facing away from you, curl both sides toward you. they should be roughly even. glue to secure. Then snip off the end, about half, so that it fits in the funnel you made earlier.
-
 Step 13
ADD THE FLORAL WIRE. Take the floral wire and curl the end into a spiral. Add glue to that end. Then, finding the place where there is the most contact between layers, insert the uncurled end into the flower, poking all the way through.
-
Step 14
SET ASIDE TO DRY. you can make leaves if you want and add them later.