


About
DIY: Panja, or Back-of-the-Hand Jewelry
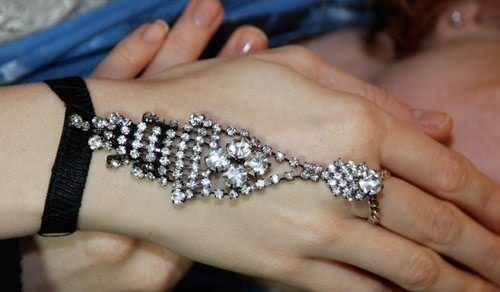
I became obsessed with making myself a Panja [i.e., back-of-the-hand jewelry piece] since seeing the above in Vogue October 2009. For all it's highbrow designer, impossible-to-make-yourself fashion spreads, once in awhile the magazine showcases an idea that's just mindblowingly awesome. How cool is this rhinestone-and-chain Alyssa Norton piece that the model above is wearing? (All her jewelry is really eclectic and covetable...to sum it up to its lowest common denominator, she likes wrapping silk thread around rhinestone chains; making rhinestones "cast" in metal and set into jewelry as if precious stones; barettes with dangling cords and rhinestones; and chain mail. Def. check out her site if you get a chance!)
But I've had Panjas on the brain since about 2005, when I saw the above Hahn An Su (sp?) design in a Vivi Magazine. I didn't know what they were called then, but I definitely wanted one!
And then recently I saw this photo posted at Maverick Malone. She's such a cool girl - and has great style - she just wrapped this broken necklace around her hand and wrist and called it a day. Love.
I don't really know much about Panjas, so I am unable to educate anyone about them (and if they have religious significance I'm very sorry for my desecration and sacrilege) but....
Perhaps you can feel a DIY coming on?? LOL
I'm not paying $805 for the Alyssa Norton piece! So here's the DIY:
-
 asia.pearce favorited Panja, Or Back Of The Hand Jewelry
14 Jul 02:04
asia.pearce favorited Panja, Or Back Of The Hand Jewelry
14 Jul 02:04
-
 Rattiemama added Panja, Or Back Of The Hand Jewelry to Jewellery Tutorials
05 Oct 14:22
Rattiemama added Panja, Or Back Of The Hand Jewelry to Jewellery Tutorials
05 Oct 14:22
-
Rattiemama favorited Panja, Or Back Of The Hand Jewelry
05 Oct 14:22
-
 Nadja L. favorited Panja, Or Back Of The Hand Jewelry
16 Mar 05:30
Nadja L. favorited Panja, Or Back Of The Hand Jewelry
16 Mar 05:30
-
 Lauren J. favorited Panja, Or Back Of The Hand Jewelry
23 Feb 00:35
Lauren J. favorited Panja, Or Back Of The Hand Jewelry
23 Feb 00:35
-
 Claire M. favorited Panja, Or Back Of The Hand Jewelry
20 Dec 18:21
Claire M. favorited Panja, Or Back Of The Hand Jewelry
20 Dec 18:21
-
 zoegirl221 added Panja, Or Back Of The Hand Jewelry to Jewelry
15 Sep 05:40
zoegirl221 added Panja, Or Back Of The Hand Jewelry to Jewelry
15 Sep 05:40
-
 elarablair favorited Panja, Or Back Of The Hand Jewelry
23 Feb 17:31
elarablair favorited Panja, Or Back Of The Hand Jewelry
23 Feb 17:31
-
 Alex Poser added Panja, Or Back Of The Hand Jewelry to Accessories
10 Jan 22:50
Alex Poser added Panja, Or Back Of The Hand Jewelry to Accessories
10 Jan 22:50
-
 Tiffany S. favorited Panja, Or Back Of The Hand Jewelry
09 Oct 06:03
Tiffany S. favorited Panja, Or Back Of The Hand Jewelry
09 Oct 06:03
You Will Need
-
Step 1
Push the earring post through the center link in your chain piece. Using pliers, bend down and around the chain so the earring is secured and there's no scratchy post end sticking out.
-
Step 2
Wrap the chain around your index finger - cut to size. Secure with a jumpring.
-
Step 3
Fold both long sides of mesh interfacing in towards center. Fold again in the center so you have a long rectangular strip with all raw edges enclosed. Iron flat - the heat of the iron will fuse the mesh together.
-
Step 4
Sew along long edge of mesh to secure the folds you made.
-
Step 5
Fold each shorter end over and secure with hand-stitching.
-
Step 6
Place earring flat and stitch bottom rhinestone dangle to center of black mesh. This is the tricky part - you just need to weave in and out of the rhinestones with your needle, securing them both together and down. You don't want the rhinestone dangles to move too freely across the back of your hand - so sew together inbetween the settings, and be carefuly of the thread catching on the rhinestone prongs.
-
Step 7
Wrap the thread around the black mesh for a textural effect. (Here, to make it exactly like the Alyssa Norton piece, you can smudge silver fabric paint at intervals onto the black mesh, and decorate with rhinestones. I chose not to because I wanted more simplicity.
-
 Step 8
Hand-stitch a snap and its counterpart to each end of the black mesh.
You're done! Super-easy, right???
-
 Step 9
Feeling the backs of my hands are sad and naked now without my Panja....
Happy DIY'ing!
xoxo
Carly


Thanks for looking-
xoxo
Carly