


About
time to organize your accessories with this easy and classy jewelry stand
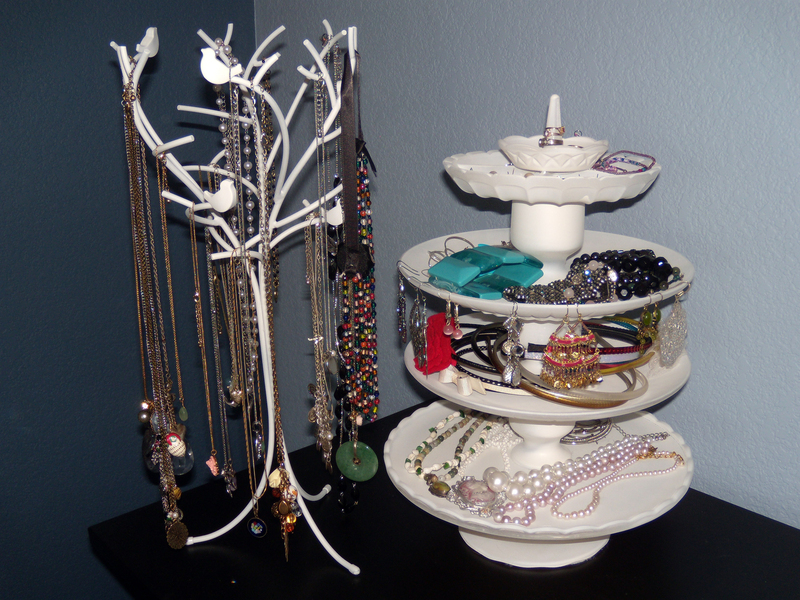
This is a Pinterest find that I tried out last fall. It was originally supposed to be a treat stand, but I thought a few changes and it would work great as a jewelry stand on my dresser. My budget was low for this one so I went to the local thrift shop to get stocked up on unique glass items. BTW the bird necklace holder is available at Target.
Tags
-
 Tracey H. favorited Painted Jewelry Stand
15 Dec 00:16
Tracey H. favorited Painted Jewelry Stand
15 Dec 00:16
-
 Sofia favorited Painted Jewelry Stand
10 Oct 18:12
Sofia favorited Painted Jewelry Stand
10 Oct 18:12
-
 Lee Rose added Painted Jewelry Stand to hollywood
16 Mar 04:02
Lee Rose added Painted Jewelry Stand to hollywood
16 Mar 04:02
-
 M1CHAEL5H1RLEY added Painted Jewelry Stand to HAUS
03 Nov 03:27
M1CHAEL5H1RLEY added Painted Jewelry Stand to HAUS
03 Nov 03:27
-
 Serena added Painted Jewelry Stand to Summer Money
02 May 22:39
Serena added Painted Jewelry Stand to Summer Money
02 May 22:39
-
 CroShayShay favorited Painted Jewelry Stand
10 Aug 14:41
CroShayShay favorited Painted Jewelry Stand
10 Aug 14:41
-
 GabriELLE favorited Painted Jewelry Stand
08 Aug 16:10
GabriELLE favorited Painted Jewelry Stand
08 Aug 16:10
-
 destinytlong favorited Painted Jewelry Stand
03 Aug 21:07
destinytlong favorited Painted Jewelry Stand
03 Aug 21:07
-
 Becsta! favorited Painted Jewelry Stand
28 Jul 05:07
Becsta! favorited Painted Jewelry Stand
28 Jul 05:07
-
 Kari L. favorited Painted Jewelry Stand
28 Jul 00:53
Kari L. favorited Painted Jewelry Stand
28 Jul 00:53
-
 Step 1
Obviously, you do not have to use the same items as I did to create your jewelry stand. Above is just a suggestion list, so get as creative as you can to make your own custom stand. Something similar to a cordial glass like a candlestick holder will be necessary though to give your jewelry some space vertically.
-
Step 2
Before painting or gluing, spend some time stacking your items (carefully) to see what arrangement suits your needs best. Make sure that the base layer (cake stand in my case) will support the weight of your other items before getting too invested. Be sure that your spacer items (cordial glasses/candlestick holders) are strong enough to also prop up the remaining items.
-
Step 3
Now that you have a mental plan of the jewelry stand's construction, take it all apart and space out on your drop cloth or newspaper in a well ventilated area like a garage. Shake that spray paint like a crazy person and start to cover all the exposed surfaces of your items. Let dry for an hour or two if you coated the paint on thick. Turn over your items and spray any other surfaces that need covered and wait for that to dry.
-
Step 4
Be sure that your items are completely dry before proceeding. Prep your glue gun with a glue stick and plug it in. Align a spacer item on your base layer, and even lightly mark it in place if you do not dare eye it. Take the glue gun and cover any bottom surface of the spacer item and push down in the center of the base layer. After a few minutes to let the glue harden, align the next item, cover the connecting surface with glue, and push it down in place. Continue this pattern until you have the top piece glued in place.
-
Step 5
It is easier to see any bits you may have missed with the paint at this point. Do some touch ups if need be after the glue has completely secured the items.
-
 Step 6
Arrange your jewelry on the flat surfaces as you like, and the edges are great to hang your dangly earrings. I even keep my headbands wrapped around the center on one level. Whatever accessory you have, I'm sure you can find a place for it on your new stand.

Comments


