


About
adorable electric squirrel
This year at Sakura Con I was Pachirisu. It was fun since I did have a tail and used it to hit friends with. However, people kept coming up behind me to touch it. In the pic it isnt stuffed but it was for the Con. I got glomped so many times.
The ears and stripe are not permanently so they can be adjusted to better suite head shape and so you can use the head band later too.
Tags
-
 Jaquelynn B. favorited Pachirisu Ears
12 Dec 21:53
Jaquelynn B. favorited Pachirisu Ears
12 Dec 21:53
-
 Rawr.Rawr.x added Pachirisu Ears to Pokemon Related
24 Feb 05:29
Rawr.Rawr.x added Pachirisu Ears to Pokemon Related
24 Feb 05:29
-
Rawr.Rawr.x favorited Pachirisu Ears
06 Oct 08:44
You Will Need
-
 Step 1
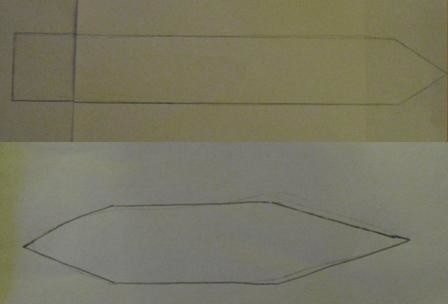
On blank paper sketch out the shape of the ears and an arrow. I just looked at the pics of Pachirisu and got an general idea of the shape.
My stripe arrow is 12.5 inches from tip of the point to the other end and 2 inches wide. You can make the stripe longer if you want.
My ears are 1.75 inches wide and 8.25 inches from top tip to bottom tip -
Step 2
Cut out the out lines from the paper and trace onto blue felt. You will need 4 for the ears and 2 for the stripe. Cut the traced outline from the felt too.
-
 Step 3
Sewing the Stripe is rather easy. Place the two felt cutouts on top of each other and pin in place.
You want to start from at the pointed end first.
I gave about 1/8th of an inch edge allowance.
Start to sew 1/2 inches in front of the pointed end and sew toward the point and around it. (if looking at the pic from one green arrow to the other green arrow).
Since my headband was thin I left 1/2 inch gap for it to slide thru.
So 1/2 inch or whatever your measurement is start to sew the back end of the stripe. (if looking at the pic from one red arrow to the other red arrow). -
 Step 4
Sewing the ears is a bit tricky for me to explain but here goes.
Again I gave about 1/8th of an inch edage allowance.
Start to sew about 1 inch from the bottom point (This is the longer pointer of the two). When looking at the pic start at the green arrow and go up to and around the top point tip and back down to the red arrow. Turn the piece inside out and make sure the seams are fine. Stuff the top point with poly fill. At the very edge where the bottom point starts sew around the bottom point (Purple arrow to purple arrow). You need to make a triangle. -
Step 5
Slide the stripe on the headband then the ears. If you look at the pic I put the longer side of the ears on the inside next to the stripe point. This is so the bottom points point out away from the point on the stripe.
So there you have your ears.


gotta love the new gen pokemmon <333