


About
There’s nothing nicer than the gift of a single, pretty rose.
This surprisingly realistic flower blooms out of a simple spiral of paper. Easy and beautiful.
Both sides of this petal show in the finished flower. Lay your pieces out so the side you want inside the spiral is face-up.
Tags
Downloads
- Missing file
-
 DAARSHENI favorited Origami Rose
14 Jul 02:55
DAARSHENI favorited Origami Rose
14 Jul 02:55
-
 Rhiannon R. added Origami Rose to Stuff
09 Apr 05:02
Rhiannon R. added Origami Rose to Stuff
09 Apr 05:02
-
Rhiannon R. favorited Origami Rose
09 Apr 05:02
-
 Jacqulene C. favorited Origami Rose
22 Nov 14:22
Jacqulene C. favorited Origami Rose
22 Nov 14:22
-
 Mae751 added Origami Rose to Origami
23 Oct 13:40
Mae751 added Origami Rose to Origami
23 Oct 13:40
-
 Markee R. added Origami Rose to Kim Novak - Vertigo
26 Jun 08:29
Markee R. added Origami Rose to Kim Novak - Vertigo
26 Jun 08:29
- fay.schouten favorited Origami Rose 16 Mar 15:14
-
 cristinakilljoyway favorited Origami Rose
15 Jan 19:55
cristinakilljoyway favorited Origami Rose
15 Jan 19:55
-
gloria z. favorited Origami Rose
04 Nov 01:27
-
Denesha B. favorited Origami Rose
02 Nov 04:08
You Will Need
-
 Step 1
Spread some glue on the outside end of the spiral, then lay a stem across it as shown.
Fold the end of the strip over the stem...
-
 Step 2
...and press it down. Set this piece aside to dry while you make the base.
-
 Step 3
Spread some glue on the shaded wedge of the rose base. Pull the other edge over so it just covers the wedge. Press the two sides together...
-
 Step 4
...to make a little cup.
Set this piece aside for now.
-
 Step 5
Go back to the spiral now. Wind it around the stem...
-
 Step 6
... until the whole spiral is wound up. It doesn't have to be neat.
-
 Step 7
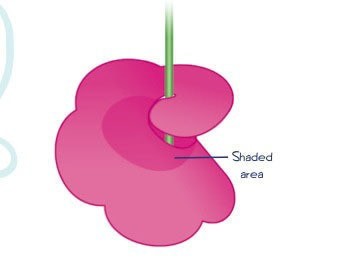
Turn the rose upside down, and hook the end of the spiral around the stem as shown.
Cover the shaded area with glue.
-
 Step 8
Then pull the end of the spiral around so it just covers the shaded area.
-
 Step 9
Hold the spiral in place for a moment while the glue sets.
-
 Step 10
Still holding the rose upside- down, push the base onto the stem so it rests against the flower.
-
 Step 11
Add a locking roll.
Remember:
Measure to be sure the roll starts 1/2 inch (1.3 cm) from the bottom of the flower.Dot some glue on the top of the roll and on the bottom of your flower before you push the roll up.
-
 Step 12
Once the flower is completely dry, use your shaping tool to curve the tips of the base down.


Versions


Comments

