About
A super cute, trendy, and fun ombre look for your wall!
So, we finally decided on a fab design for this little accent wall in our studio. An overlapping scallop pattern using a gradient color palette. And we made sure to take some pics along the way so that you guys could possibly share in the fun and do a wall of your own at home.
Tags
-
 amyistheparty favorited Ombre Scallop Accent Wall Tutorial
18 Apr 21:14
amyistheparty favorited Ombre Scallop Accent Wall Tutorial
18 Apr 21:14
-
 rochelle.c.barton favorited Ombre Scallop Accent Wall Tutorial
25 Jan 22:57
rochelle.c.barton favorited Ombre Scallop Accent Wall Tutorial
25 Jan 22:57
-
 Advitha K. favorited Ombre Scallop Accent Wall Tutorial
04 Sep 10:30
Advitha K. favorited Ombre Scallop Accent Wall Tutorial
04 Sep 10:30
-
 PuddyTat favorited Ombre Scallop Accent Wall Tutorial
11 Aug 01:44
PuddyTat favorited Ombre Scallop Accent Wall Tutorial
11 Aug 01:44
-
 Karen D. favorited Ombre Scallop Accent Wall Tutorial
02 Jun 14:31
Karen D. favorited Ombre Scallop Accent Wall Tutorial
02 Jun 14:31
-
 karmy_2683 favorited Ombre Scallop Accent Wall Tutorial
28 May 08:20
karmy_2683 favorited Ombre Scallop Accent Wall Tutorial
28 May 08:20
-
Joanne J. favorited Ombre Scallop Accent Wall Tutorial
27 May 18:58
-
 Jessica A. favorited Ombre Scallop Accent Wall Tutorial
06 May 14:31
Jessica A. favorited Ombre Scallop Accent Wall Tutorial
06 May 14:31
-
 Nava J. favorited Ombre Scallop Accent Wall Tutorial
21 Apr 13:25
Nava J. favorited Ombre Scallop Accent Wall Tutorial
21 Apr 13:25
-
 craftyfun added Ombre Scallop Accent Wall Tutorial to DIY
24 Jan 17:30
craftyfun added Ombre Scallop Accent Wall Tutorial to DIY
24 Jan 17:30
-
 Step 1
supplies needed:
-a big circle to trace, we used a 12 inch dinner plate
-pencil
-big piece of paper to trace your big half circle onto
-scissors
-1 inch paint brush
-small round detail brush
-a gallon of the paint color of your choice
-a gallon of white paint (for lightening your paint color step by step)
-4 containers for your shades of paintTrace a half circle onto a piece of paper. Our circle is 12 inches in diameter. Cut out your paper template. Find the center of your scallop (either measure with a ruler or fold in half) and draw a pencil line there...this will be your guide line for when you are tracing the scallop pattern onto the wall.
-
 Step 2
Trace the top row of scallops onto the wall. Just make sure the flat end of your template is flush against the ceiling or molding. We wanted our pattern to be symmetrical, so we first measured our wall...it's 8 and a half feet wide. Since our template measures exactly 1 foot then that means there will be 8 and a half scallops in a row. Instead of ending with a half of a scallop...we split the half scallop into 2 quarters. So the row starts with a quarter of a scallop and ends with a quarter of a scallop...and has 8 full scallops in between. Again, we did it this way because we like a symmetrical look. Figuring out the exact measurements is not mandatory. You can simply work left to right and let the row end however it ends.
-ok, in Step 1 you drew a guide line marking the center of your scallop template. When tracing your row of scallops onto the wall, draw a little pencil dash that indicates the center of the scallop. This will be your guide line for the next row. -
 Step 3
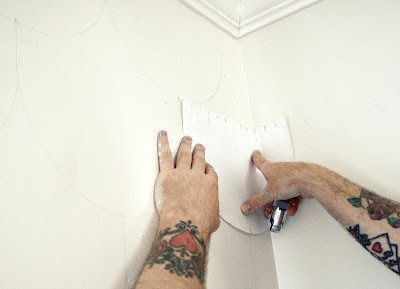
Continue tracing to create the overlapping scallop pattern. Use your top row as your guide and trace your template on the wall from left to right. Line up the end of your scallop with the center guide line from the row above. This will give you a staggered pattern of overlapping scallops. It's really easy this way. You just line up both edges with the center lines of the row above, and then trace.
-
 Step 4
When you get to the corner all you have to do is bend your paper template into the crease of the wall.
Repeat this for four rows. -
 Step 5
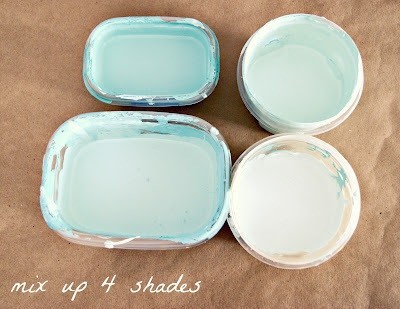
Mix your shades of paint in 4 containers. The first container is the paint color with nothing added. In the second container lighten your color with some white paint. In the third lighten it even more with a little more white paint. And in the fourth lighten it even more with a little more white paint. You'll have four gradient shades of paint...this will give you the desired ombre effect.
*By starting with a color and gradually adding more white, it will give you a perfect gradient effect...the reason we referred to ours as "ombre-ish" is because we went with a gradient color scale but we strayed from the singular color palette a bit. We made sure to get lighter as we worked down the wall but we mixed our own separate colors because we wanted to tie together a range of aquas and pale greens that appear in other areas of the room. Yes, we always have to fiddle with the rules a bit. We don't recommend this for folks who don't mix paint all day every day...it can get tricky. It's best to just start with a color and add more and more white.
-
 Step 6
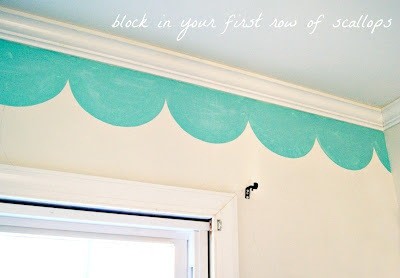
Paint your first row of scallops using your 1 inch brush. It'll probably take two coats to get each row solid.
-
 Step 7
When painting your second row of scallops with your #2 container of paint, first use your small round detail brush to cut in. That little narrow point between the scallops can be difficult to paint with a 1 inch brush...so we recommend cheating a bit, with a little brush.
Repeat this process for four rows...each row getting one shade lighter. -
 Step 8
Hooray!! You are all done! It really was easy and we absolutely love our little wall now. It has a very soothing effect. We could totally imagine doing this in a nursery or kid's room...or a small bathroom. We used to do wall painting in lots of beach houses and in this aqua color palette this would turn any room into a mermaid theme instantly ( back in the day we were hired to do so so many mermaid themed kid's rooms! )
-
 Step 9
Being that this is fairly easy to do, we were thinking that it would be great to do on a makeshift wall of a photo booth at a wedding. A fab way of pulling the color theme into the photo booth backdrop.
Please feel free to contact us with any questions and pretty pretty please send us pics when you do this yourselves.
xo, Jenny