About
Bunnies Gift Bag
Make your own novelty gift bags using paper and punches. This version is for making bunnies, ideal for Easter, but can be adapted to other novelty creatures too e.g. Bats for Halloween
Tags
-
 Bedlam & Butterflies published her project Novelty Gift Bags Bunnies
23 Jun 09:00
Bedlam & Butterflies published her project Novelty Gift Bags Bunnies
23 Jun 09:00
-
 Step 1
For the Bag:
(Measurements are based on using a 7.7cm wide by 12.7cm tall cello bag for the contents, but can be easily adjusted to different sizes).Cut a piece of card stock to 15.5cm x 23.5cm.
• Score short side (15.5 cm) at 3cm.
• Score long side (23.5cm) at 8cm, 11cm, 19cm and 22cmFold over at the 3cm score line along the bottom
of the card stock and punch out the mouth with the extra large oval punch. Cut the box flaps as shown in the picture. -
 Step 2
For the head and face:
Head - Punch a 2 1/2” circle from the same colour card stock as the gift bag. Cut off the bottom to create a straight edge (as shown above). Attach to the front of the box above the mouth.
For the ears:
Use two extra large oval punch-outs and two large oval punch outs in a different colour. Stick together and fold inwards. Stick to the inside of the box - either front or back (it doesn’t really matter).
-
 Step 3
For the teeth:
Use the large oval as the base for the teeth. Cut two triangles out (one either side at the bottom) and then cut up the middle of the remaining section to form the teeth (as shown above). Glue this to the inside of the bag so that only the teeth are showing in the Oval you punched out of the bag.
-
 Step 4
For the Cheeks:
Punch out two 1 3/8” circles from Whisper White. Place one on top of the other and snip off a small section to form a straight edge (as shown in the picture above). Sponge the cheeks with the colour of choice around the edges and then draw on some dots with the co-ordinating marker pen. Attach these to the head of the Bunny (only place the glue in the centre of each), so that the straight edges of both meet and touch in the middle. See picture at top of instruction sheet if in doubt)
For the eyes:
Punch out two ¾” circles from Whisper White and two ½” circles from Basic Black. Mark in the light of the eyes with the chalk marker or gel pen. Attach the black circle on top of the white and attach to the head of the bunny tucked behind the cheeks slightly.
-
 Step 5
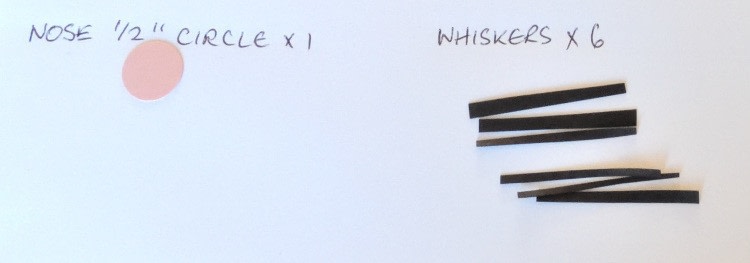
For the nose:
Punch out the desired nose colour using the ½” circle punch, add the white highlight using the chalk marker or white gel pen and attach to the face at the top, centre of the cheeks.
For the Whiskers:
Cut 6 thin whiskers from basic black. Add a drop of glue to one end and tuck behind the cheeks to form the whiskers.
-
 Step 6
Finally:
Stick the box together using sticky strip down the 1.5cm side and then fold in and stick the bottom flaps together with sticky strip.
Attach a Velcro dot pair (hook and eye) either side of the inside of the bag to close it (alternatively you could glue it or use sticky strip).
-
 Step 7
Have a play around with other ideas - I love Batty for Halloween gifts!