


About
Definitely "not a funeral".
Lately Mr. Mad and I had to go to a funeral.
Shortly before we left the house I was desperately seeking for a small, black handbag - I only have the one made from records and a big shopper bag, both not suitable for a funeral, and finally I ended up with all my necessities stuffed into the pockets of my coat and I decided that I really need a small, black, nice bag soon.
I began to draft a pattern and went through my stash, sewed... and here's the outcome:
Definitely "not a funeral".
But FUN surely. Hope you'll have some fun putting this bag together...
Preparation:
* Download the pattern (pdf-file)
* Print out the pattern pages and glue them together, matching the alignment marks
* Cut out paper pattern pieces (all pieces contain 1 cm seam allowance)
* Cut your fabrics and interfacing, mark notches
* Interface the exterior pattern pieces as indicated from the manufacturer.
A note on the interfacing: I interfaced all exterior pieces with fusible interlining first and after joining pattern pieces A and B also interlined all exterior pieces with a thin batting to add some "body". You can see the quilting lines if you have a close look at my bag.
This is not neccessary, so you may skip this step. If you add a batting too, make sure to cut the batting close to the seam allowances after every following step to reduce bulk in the seams!
Downloads
- notafuneral.pdf 110 KB [ Download ]
-
 Key West Witch favorited Not A Funeral Bag
08 Aug 11:06
Key West Witch favorited Not A Funeral Bag
08 Aug 11:06
-
 Joanne B. favorited Not A Funeral Bag
29 May 18:53
Joanne B. favorited Not A Funeral Bag
29 May 18:53
-
The V. commented on Not A Funeral Bag
09 May 23:59
-
 MandyCip_93 favorited Not A Funeral Bag
09 Dec 12:16
MandyCip_93 favorited Not A Funeral Bag
09 Dec 12:16
-
Monica C. favorited Not A Funeral Bag
27 Jun 19:34
-
 laurarrosier added Not A Funeral Bag to Bags
16 Feb 11:11
laurarrosier added Not A Funeral Bag to Bags
16 Feb 11:11
-
laurarrosier favorited Not A Funeral Bag
16 Feb 11:10
-
 Sandra C. favorited Not A Funeral Bag
05 Aug 06:44
Sandra C. favorited Not A Funeral Bag
05 Aug 06:44
-
 Kristy B. favorited Not A Funeral Bag
08 Jul 18:27
Kristy B. favorited Not A Funeral Bag
08 Jul 18:27
You Will Need
-
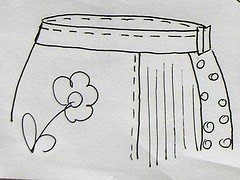
 Step 1
With right sides together sew pieces A and B together.
Press seam allowances towards main fabric (yes, my picture is wrong... sorry about that!).
Topstitch about 1/8" from the seam. -
 Step 2
Pin or baste the sides to the bottom of your bag, aligning notches.
Sew.
Clip seam allowances in the rounded corners.
Press seam allowances to either side, whatever suits you better. -
 Step 3
Sew the short sides of pieces D together with right sides facing.
Press seam allowances open. -
 Step 4
With right sides together, sew piece D to the bag, aligning the seam you just made with the notch on top of pattern piece C (the bottom).
-
 Step 5
Press seam allowances towards the top piece.
Topstitch about 1/8" away from the seam. -
Step 6
If you want to add an inside pocket, do so now. The center of the lining is marked so it's easier for you to place the pocket.
You may add a plain one like I did, a sewn-on-one or a zippered. Feel free to do what you want and what matches your needs.
A tutorial on inside pockets is planned but would go beyond scope for this entry.When you have attached your inner pocket, repeat the above steps with the lining pieces.
-
 Step 7
Cut handles according to the pattern piece or with the given measurements.
Interface and fold like you proceed for a double-folded bias band.
Very close to the edge sew the long side closed.
Topstitch along the other side and down the center of the handle. -
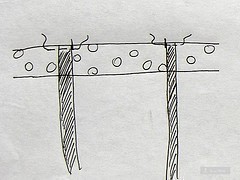
 Step 8
Baste handles to your exterior bag, aligning the inner edge of the handle with the marks on the bag.
Be careful not to twist the handles! -
Step 9
If you want to add a magnetic closure to your bag, do so now.
Marks are found on pattern pieces D.
Make sure the magnetic closure is fixed to the LINING pieces, not to the exterior! -
 Step 10
With the right side of the exterior bag and the left side of the lining bag facing out, slide exterior bag inside lining bag.
Align seams/notches.
Sew across the top, leaving a 4" opening for turning. -
 Step 11
Carefully turn bag inside out.
Press seam.
About 1/8" from top edge topstitch all around, closing the opening gap.
If you want, go back and forth a few stitches where the handles are attached.I apologize for the bad quality tutorial pics, but I made them up after I had my bag finished. I can't draw and I am aware of it, but it was fun making it this way... think I will get back to this!
If I missed something or if something isn't clear, do not hesitate to contact me.
If you liked the tutorial and the pattern - fine! Let me know and feel free to send me a picture of your creation, but most of all: HAVE FUN!Please respect that this pattern/tutorial is for personal use only!


I think it's a Jane Sassaman fabric, but I don't remember the actual name of the design.