


About
NEMO FROM A PLASTIC EASTER EGG
I made this for as part Eggcellent Upcycling competition that starts May 1st at Craftster where you make something creative out of plastic Easter Eggs.
I tried to take pictures as a I went for a how-to, but as I basically figured it out and tweaked it as I went along, there are some instructions without pictures.
He can be used soley for decoration and possibly play for older children over 3 as the 9001 craft glue is pretty sturdy (if you were going to make for children under 3, I would recommend painting the eyes on to avoid a choking hazard).
The egg still opens up, so you could place something inside him and use him as a party favor or even a make and take project at a Nemo themed birthday party, or to hold a special treat; for now, mine is perched on the lid off of laundry soap and holding jewelry findings.
Tags
-
 cindy.godfrey.94 commented on Nemo
24 Feb 17:36
cindy.godfrey.94 commented on Nemo
24 Feb 17:36
-
cindy.godfrey.94 favorited Nemo
24 Feb 17:36
-
 KMOM14 entered her project Nemo to Glue Contest
30 Apr 01:08
KMOM14 entered her project Nemo to Glue Contest
30 Apr 01:08
You Will Need
-
 Step 1
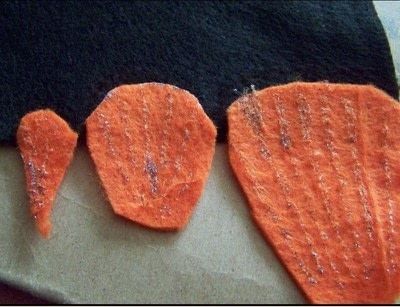
Cut out 2 of each of the following from the square of orange felt
- Small under developed side fin
- Regular side fin
- Tail
- Top fin (not pictured in top picture)Paint lines on each of the fins with the glitter fabric paint and allow them to dry.
-
 Step 2
Lay one each of the fins on the edge of the black fabric and cut around about 1/4 inch from the edge on each.
-
 Step 3
Put glue on the top edge of one of each of the fins
-
 Step 4
Put the glued fin edge on the black piece of felt allowing 1/4 inch to peek over the top.
-
 Step 5
Apply glue to the rest of the fin excep for 1/4 inch at the bottom of each and glue the side together
-
 Step 6
Bend the unglued edges away from each other
-
 Step 7
Apply glue to the bent edge on each fin
-
 Step 8
and glue the fin to the bottom half of the egg.
-
 Step 9
On the top half of the egg, apply black fabric paint around the egde and allow it to dry.
-
 Step 10
Then take white paint and apply it directly above where the black paint was applied as indicated below.
-
 Step 11
I didn't have any white fabric paint, only acrylic paint, so I put a dap on a piece of cardboard and used at popsicle stick
-
 Step 12
to apply a line of white.
-
 Step 13
After the layer of white paint is dry, paint a line of black next to the edge.
Repeat the black, white, black painting sequence on the bottom of the egg near where the tail is attached.
Next place a dab of glue on each googly eye, then apply it to the top of the eggDraw lips on the top of the egg down about 1/2 in and centered between the eyes and allow to dry, then outline with black (the red blends into the orange to much unless you ouline the lips with black).


for a minute i thought it was like the toy my brother got from mcdonalds such a long time ago, it looks so real :]