


About
Sugar Paper’s Needle Book Classic by Seleena Laverne Daye
Give your sewing needles a home of their own.
Seleena Laverne Daye likes to refer to herself as a Felt Artist, which means she likes to spend her days in her closet-cum-studio making things out of felt. She also likes to refer to herself as a Professional Zinester, being co-producer of biannual craft zine Sugar Paper; 20 Things
To Make And Do. When not distracted by her cat, tap dancing and collecting bits of tat, the things she makes can be found on her blog: www.sugarpapergang.blogspot.com.
-
 Miss_Fit favorited Needle Book Classic
07 Dec 19:35
Miss_Fit favorited Needle Book Classic
07 Dec 19:35
-
Miss_Fit added Needle Book Classic to Purses, Bags, and Wallets
07 Dec 19:35
-
 Xfluffy_unitatoX favorited Needle Book Classic
17 Nov 19:53
Xfluffy_unitatoX favorited Needle Book Classic
17 Nov 19:53
-
 Rosie R. favorited Needle Book Classic
19 Sep 12:39
Rosie R. favorited Needle Book Classic
19 Sep 12:39
-
 Christine B. favorited Needle Book Classic
08 Jan 10:27
Christine B. favorited Needle Book Classic
08 Jan 10:27
-
Annika G. favorited Needle Book Classic
30 Nov 00:09
-
Alecia B. favorited Needle Book Classic
22 Apr 04:41
-
michelle d. favorited Needle Book Classic
19 Oct 16:03
-
Step 1
Cut out a rectangle measuring 5cm x 20cm from the white felt – this will be used as the title strip of the book.
-
Step 2
Fold in half. With the fold to your left, faintly mark out in pencil the title, A LOOM OF ONE’S OWN, and the author, VIRGINIA WOOL.
-
Step 3
Cut a length, about 40cm, of black embroidery thread, and split the strands in half: two lengths of three strands. With one three-strand piece, make a knot at one end and thread the other end through the needle. You’re now ready to start stitching the letters: use a backstitch and follow the pencil lines.
-
Step 4
In orange embroidery thread, sew a couple of stitches between the name of the book and the author.
-
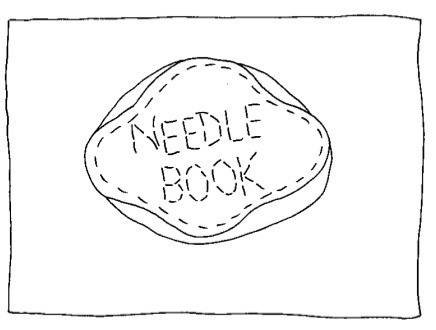
 Step 5
From the remaining white felt, cut out an oval measuring 2.5cm x 5cm, then cut it into a round-edged diamond shape. Pencil on the words NEEDLE B BOOK and stitch in black embroidery thread as before.
-
Step 6
Cut a slightly larger oval shape from the black felt.
-
Step 7
Cut out a rectangle from the orange felt measuring
15cm x 20cm for the book cover. -
Step 8
Pin the white title piece in the centre of the orange rectangle. Using the white thread, sew a running stitch all around the edges of the white panel.
-
Step 9
Place the black oval above the title panel, in the centre. Pin the white “NEEDLE BOOK” piece on top of the black oval, and stitch around the white shape as before.
-
Step 10
Using pinking shears if you have them, cut out a rectangle of white felt measuring 13cm x 18cm.
-
Step 11
Open up the orange book, and pin the white felt in the centre.
-
 Step 12
Along the middle of the white felt, where the book folds, sew the white felt to the orange with a straight line of stitches – the smaller the stitches, the neater the look. Fold in half, and stow your needles away safely.


Or maybe, how hard do you think it would be to install a zipper around the edges of it?