


About
Scraps
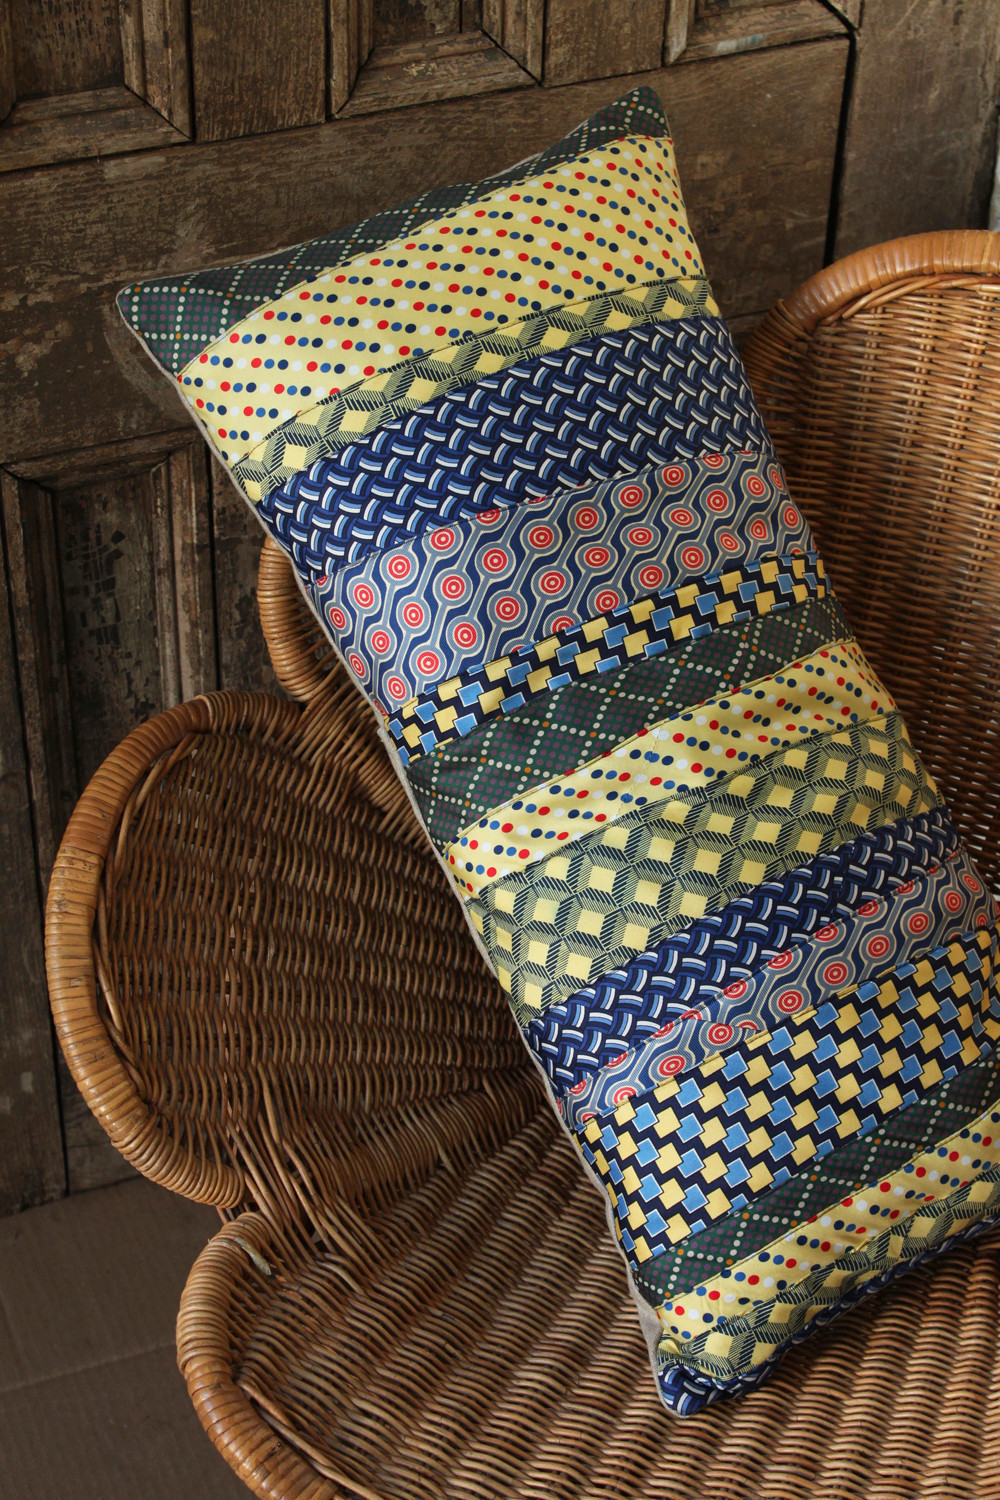
Vintage silk ties have such wonderfully graphic patterns; they are great for mixing and matching together on a decorative bolster pillow, perfect for a midcentury modern décor. Look for the perfect combination of patterns and color at tag sales and thrift stores and let them inspire you. Because tie silk is relatively thin and fragile, I appliquéd the ties to a linen background before incorporating them into my pillow. Groovy, baby!
-
 Diane H. favorited Necktie Pillow
01 Apr 21:53
Diane H. favorited Necktie Pillow
01 Apr 21:53
-
 Marnie B. favorited Necktie Pillow
01 Apr 17:45
Marnie B. favorited Necktie Pillow
01 Apr 17:45
-
 favorited Necktie Pillow
15 Sep 18:08
favorited Necktie Pillow
15 Sep 18:08
-
 Sequoia R. favorited Necktie Pillow
21 Jun 09:02
Sequoia R. favorited Necktie Pillow
21 Jun 09:02
-
 Hester A. favorited Necktie Pillow
11 Feb 17:23
Hester A. favorited Necktie Pillow
11 Feb 17:23
-
 Suzi T. favorited Necktie Pillow
06 Feb 12:30
Suzi T. favorited Necktie Pillow
06 Feb 12:30
-
 rochelle.c.barton favorited Necktie Pillow
26 Jan 20:22
rochelle.c.barton favorited Necktie Pillow
26 Jan 20:22
-
 Pollie P. favorited Necktie Pillow
24 Jan 21:45
Pollie P. favorited Necktie Pillow
24 Jan 21:45
-
 Emma H. favorited Necktie Pillow
19 Jan 15:40
Emma H. favorited Necktie Pillow
19 Jan 15:40
-
 Rosalie T. favorited Necktie Pillow
15 Jan 17:00
Rosalie T. favorited Necktie Pillow
15 Jan 17:00
You Will Need
-
Step 1
Using pencil and ruler, mark an 11-in. by 23-in. rectangle on the linen, and cut out with a 1⁄2-in. seam allowance all around.
-
Step 2
Cut the ties into 12-in.-long pieces. There is no need to undo the stitching of the ties or to remove any lining.
-
Step 3
Pin the first piece on the good side— meaning the unmarked side—of the linen rectangle, starting on the left side. Make sure the tie piece overlaps with the seam allowance.
-
Step 4
Cut the ties into 12-in.-long pieces. There is no need to undo the stitching of the ties or to remove any lining. Pin the first piece on the good side— meaning the unmarked side—of the linen rectangle, starting on the left side. Make sure the tie piece overlaps with the seam allowance. Now pin the second piece on, making sure it overlaps slightly with the first tie. Since the ties are decreasing in width, you will need to alternate directions: wide to narrow, narrow to wide, wide to narrow, and so on.
-
Step 5
Keep pinning until the entire surface is covered with ties.
-
Step 6
Machine-stitch a straight line in every spot where two ties overlap, making sure that the stitching is as close as possible to the edge of the tie. This is somewhat tricky, as the tie silk is slippery, so do this slowly and carefully. Once all ties are stitched down, the pillow front is done.
-
Step 7
Using pencil and ruler, mark two 11-in. by 26-in. rectangles on the linen, and cut out with a 1⁄2-in. seam allowance all around.
-
Step 8
On one of the 11-in. sides, make a hem by folding over the linen twice, first by 1⁄2 in., then by 1 in. Press down this hem and secure with two rows of machine stitching: one right at the edge of your piece and one right at the edge of the hem. Make sure to use a thread that is the same color as your linen fabric. Repeat this process for the other 11-in. by 26-in. piece.
-
Step 9
Place your pillow front on your work surface, good side up. Place both pillow backs on top, good side down, aligning the edges. They will overlap in the middle.
-
Step 10
Pin all pieces together, and machine- stitch all around. Remove the pins.
-
Step 11
Carefully cut off the seam corners diagonally, making sure not to cut into the stitching.
-
Step 12
Press open the seams and turn the pillow cover inside out. Gently push out and shape each corner with the point of your scissors from the inside. Press flat with an iron and stuff with the pillow insert.
NOTE
Once you’ve mastered this project, think of all the other things you could appliqué on a fabric surface and turn into a unique pillow: vintage hand- kerchiefs, pocket squares, doilies . . .
