

About
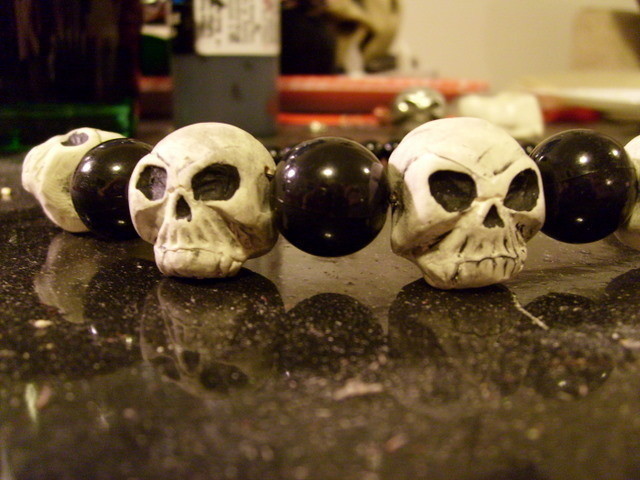
Make some bitchin' jewelry with handmade skull beads
I often find beads or great vintage buttons and know I'll never find another like it. That's when making your own mold comes in handy. You can make your beads identical, or shape and paint each one differently to give them more personality. It took me around 45 minutes to make the mold and 6 beads, not including baking and cooling time.
Tags
-
 Holly J. added Molded Polymer Clay Beads to Jewelry
09 Jul 22:10
Holly J. added Molded Polymer Clay Beads to Jewelry
09 Jul 22:10
-
 Thaty F. favorited Molded Polymer Clay Beads
25 Aug 16:20
Thaty F. favorited Molded Polymer Clay Beads
25 Aug 16:20
-
 olivoyle favorited Molded Polymer Clay Beads
29 May 09:54
olivoyle favorited Molded Polymer Clay Beads
29 May 09:54
-
Keri T. added Molded Polymer Clay Beads to bit n pieces
06 Feb 23:18
-
Ells B. added Molded Polymer Clay Beads to Stuff to make
26 Jul 13:09
-
 tyler t. favorited Molded Polymer Clay Beads
10 Jul 05:44
tyler t. favorited Molded Polymer Clay Beads
10 Jul 05:44
-
 Pennie added Molded Polymer Clay Beads to To-make list
02 Feb 21:45
Pennie added Molded Polymer Clay Beads to To-make list
02 Feb 21:45
-
 Rachael H. added Molded Polymer Clay Beads to Beads/Charms
16 Dec 08:11
Rachael H. added Molded Polymer Clay Beads to Beads/Charms
16 Dec 08:11
-
 Julie O. favorited Molded Polymer Clay Beads
10 Dec 02:29
Julie O. favorited Molded Polymer Clay Beads
10 Dec 02:29
-
Amy J. favorited Molded Polymer Clay Beads
18 Nov 10:53
-
 Step 1
Pick out your button or bead. Make sure it's clean and undamaged. I'll be using this skull bead, which I made awhile back.
-
 Step 2
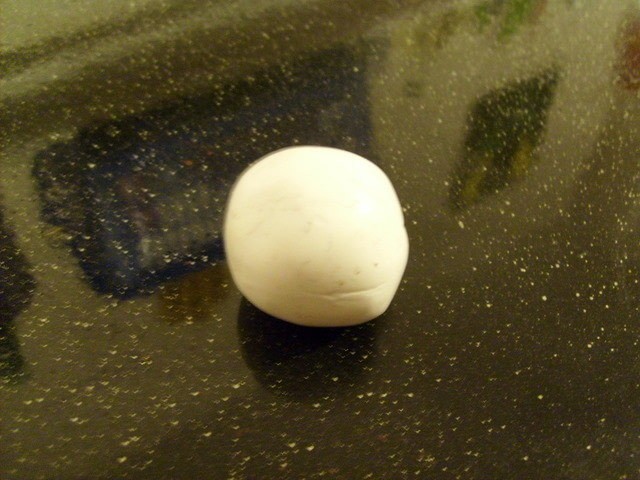
Condition your polymer clay (mush it up until it's soft) and roll it into a rough ball that's a little larger than your bead.
-
 Step 3
Press the bead firmly into the top of your clay, then pull it straight back up to make the impression of the bead. If it comes out wonky on your first try, just roll the clay back into a ball and try again.
-
 Step 4
When you're happy with your mold, bake it according to the manufacturer's directions. Let it cool completely. I then sealed mine with a little spray varnish to help keep the clay from sticking to it, but that's optional.
-
 Step 5
Roll a small amount of clay into a smooth ball. If you have any creases or wrinkles in the ball, you'll have them in your bead. Press it firmly into the mold.
-
 Step 6
Pull the clay out of the mold and smooth out the sides and back, being careful not to distort the front of the bead. *I prefer to drill holes in my beads after they're baked. If you don't have access to a drill or dremel you might want to poke holes through your beads now.
-
Step 7
Bake your beads and let them cool completely.
-
 Step 8
Drill holes in your beads with a small drill bit. Paint them as desired and seal them with a spray clearcoat (varnish).
-
 Step 9
That's it! You're all set to make some bitchin' jewelry with your new handmade beads.


I CAN'T FIND! lol
but these look awesome!
I'm going to try them
thanx
thanx sooo much
now i just need find some polymer clay. lolol
Great tutorial.
x