


About
Misty, the spooky little wax doll.
I made this doll ages ago, so I'm sorry I don't have photos for the steps.
-
 Alissa B. favorited Misty The Wax Doll
27 Aug 04:17
Alissa B. favorited Misty The Wax Doll
27 Aug 04:17
You Will Need
-
Step 1
I started by melting down a small amount of wax, the best way to do this is in a measuring jug placed in to a pan of boiling water.
-
Step 2
I used a wide tablespoon for the mould, but you could use anything round. I poured the melted wax in to the tablespoon and then left to set.
-
Step 3
I removed the wax from the mould and melted down a little more wax. I poured this in to the mould, left it to set for a little white (so that it was still a little sticky) and then placed the first moulded, half circle of wax on top. When the second lump of wax set, I removed the newly created wax ball from the mould. (If there's any cracks or spaces between the two wax halves, place it over a candle until the wax melts and seeps in to the open spaces.)
-
Step 4
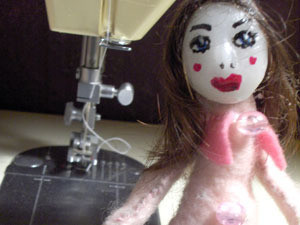
When the wax had completely cooled, I carved the face of the doll to give her a little definition for her eyes, nose and mouth.
-
Step 5
I then took three pipe cleaner and twisted one around the other to form a cross and then twisted another around the bottom of the cross (for her legs). I placed the top of the pipe cleaner cross in to the bottom of the doll's wax head and then melted wax around the pipe cleaner so that it would mould into the dolls neck.
-
Step 6
I made the doll a dress from pink felt, cutting holes for the arms which I slipped the pipe cleaners through. I then stitched sleeves for the dress which I stitched in to place on the doll. I stuffed the dolls body to give her more of a figure.
-
Step 7
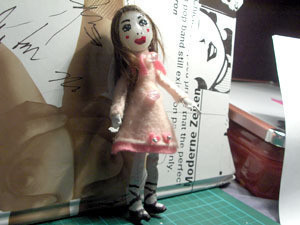
I then cut hands and legs from leather which I stitched over the remaining pipe cleaner ends.
-
Step 8
To attach the hair to the doll, I lightly melted the wax on the top of her head and then stuck the hair in place.
-
Step 9
I finished off by painting the dolls face, embellishing her dress with beads for buttons and making her a pair of shoes.
Comments


