About
You Can Have Your Cookies and Wear Them, Too!
This is a tutorial for polymer clay cookies that you can wear, or just keep for miniatures. They are great as charms, gifts, or jewellery that shows your own style.
I would recommend reading the whole tutorial before starting anything so you know what you need for it, and what you have to do.
The final product (at least my final product) was 2.5 cm (approx 1 in) across, measuring the largest cookie from the largest point, and 4 or 5 mm (approx 1/8 in) tall. You can make them smaller if you want.
Tags
-
 mmotse03 favorited Miniature Cookies
19 Aug 22:23
mmotse03 favorited Miniature Cookies
19 Aug 22:23
-
 Brittany P. favorited Miniature Cookies
18 Mar 06:15
Brittany P. favorited Miniature Cookies
18 Mar 06:15
-
Dee D. added Miniature Cookies to mini
11 Feb 01:07
-
Camille D. favorited Miniature Cookies
14 Sep 22:14
-
 jamiestrasser favorited Miniature Cookies
22 Jul 20:01
jamiestrasser favorited Miniature Cookies
22 Jul 20:01
-
 Becky M. favorited Miniature Cookies
21 Jul 21:59
Becky M. favorited Miniature Cookies
21 Jul 21:59
-
 B* added Miniature Cookies to Clay creations
07 Jul 04:58
B* added Miniature Cookies to Clay creations
07 Jul 04:58
-
B* favorited Miniature Cookies
07 Jul 04:58
-
 Aqua B. favorited Miniature Cookies
26 Jun 21:59
Aqua B. favorited Miniature Cookies
26 Jun 21:59
-
 ale_corason favorited Miniature Cookies
28 May 06:00
ale_corason favorited Miniature Cookies
28 May 06:00
You Will Need
-
 Step 1
Gather your materials. If you want to make the cookies into charms, I would recommend having the headpins and the liquid polymer clay.
-
 Step 2
(If you don't want chocolate chips on your cookies, skip this step)
The brown clay will become our chocolate chips. Roll a bit of brown clay into a cylinder (it doesn't have to be perfect) and prebake it (prebaking means you put it in the oven for a few minutes, but not the whole cook time). Let it cool off.
-
Step 3
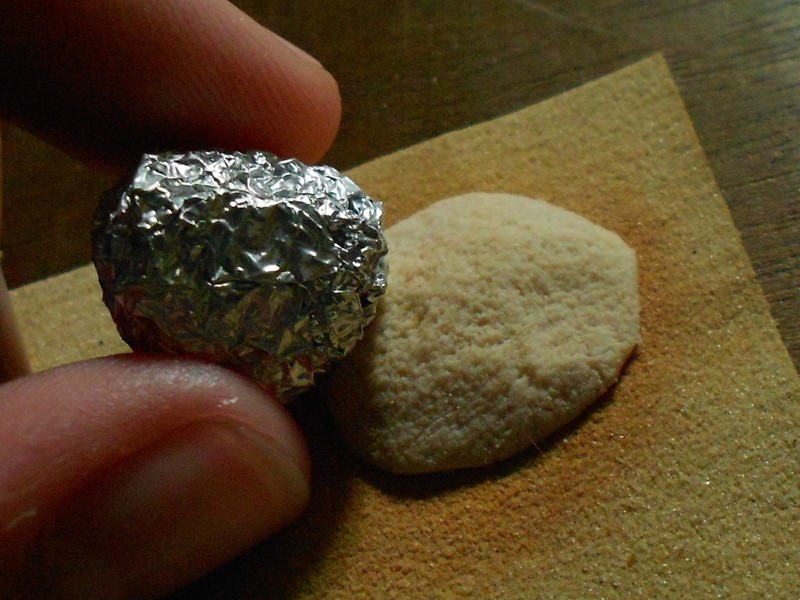
Take your ecru or beige clay (or even a mixture of the two) and make a small sphere of it. Place this sphere on your sandpaper (if you have it or want it). The sandpaper adds texture to the bottom of the clay, like an actual cookie. If you're making charms, you can skip the sandpaper part.
-
 Step 4
Push the sphere down a bit, making it flatter and flatter, especially the edges. Don't completely smooth the cookie down- you want a bit of lumpiness. No cookie is completely smooth.
-
 Step 5
Next, take your toothbrush and start pushing it into the clay with even force. Texture the whole cookie this way. Try to keep the clay lumpy or uneven. Remember, cookies are not perfect.
-
 Step 6
Next, take some tinfoil, crumple it roughly into a ball, and texture the clay further, pressing very lightly in random spaces.
-
 Step 7
Remember the prebaked brown clay? Here's where it comes in again. Take your X-Acto blade and start to chop it into pieces. Slice and dice those pieces until they're the size you want them to be.
-
 Step 8
Now take the small pieces and add them randomly to your cookie. You can be stingy or liberal. If you want extra hold, use some TLS on the pieces (in very small amounts) and then push them into the clay. These will stay in better.
-
 Step 9
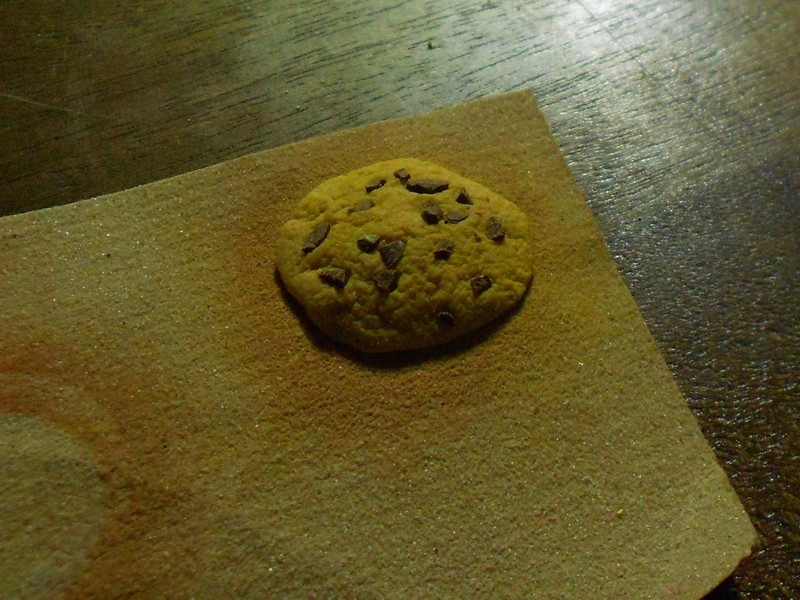
Take your yellow pastels and your paintbrush and gather a good amount. Start to brush your cookie. I was a bit too liberal with my pastels, so it came out VERY yellow.
-
 Step 10
Now the brown pastels. Brush the edges and the higher parts of the cookie with them. Be stingy. Be more gentle. Again, I was very liberal with my pastels. You might want to be more stingy.
-
Step 11
If you want now, gently (GENTLY!) pry the bottom of the cookie away from the sandpaper. Repeat steps 9 and 10 to the bottom of the cookie.
-
Step 12
If you're not making charms or jewellery, skip to step 14. If you want headpins in your cookies, keep going.
-
 Step 13
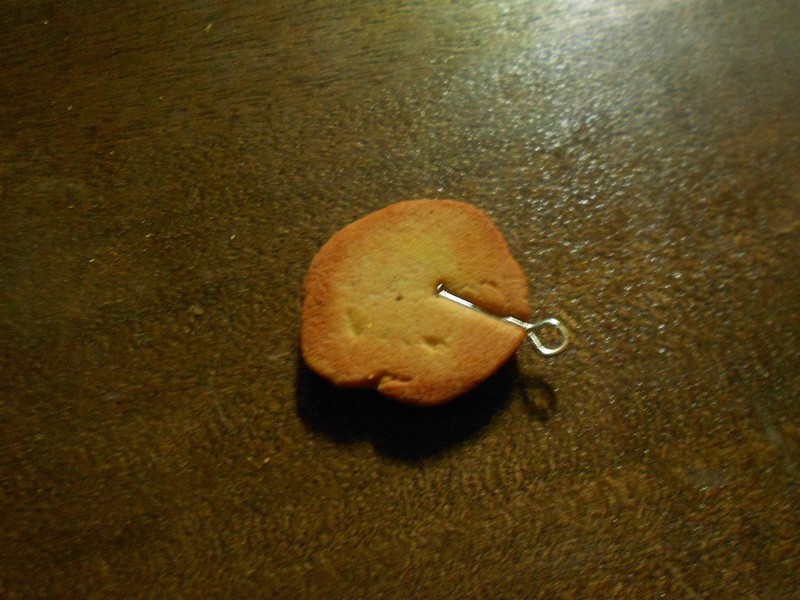
Form a loop in your headpin and GENTLY push your cookie onto it (put the headpin on a surface and the cookie on top of it and push the clay into the headpin)
-
Step 14
Okay, now you can bake it.
Bake according to manufacturers instructionsIf you want extra strength to your cookie's back, add some TLS (or other liquid polymer clay) to the back of the cookie and bake again. Be careful to make the back as even as possible in the oven so the TLS doesn't drip down the front of the cookie.
-
 Step 15
Now apply a thin matte glaze to the top, to seal in the pastels. Add to a bracelet, a chain, make into a necklace, whatever you want! Its yours!
Have fun! :D