


About
Mini wallet tutorial
finished size when folded:
11x7 cm
finished size when opened: 11x14 cm
features 6 card pockets
elastic and button closure
-
 Key West Witch favorited Mini Wallet
12 May 16:10
Key West Witch favorited Mini Wallet
12 May 16:10
-
 Luna D. favorited Mini Wallet
24 Apr 16:23
Luna D. favorited Mini Wallet
24 Apr 16:23
-
 Sveta favorited Mini Wallet
24 Jul 05:51
Sveta favorited Mini Wallet
24 Jul 05:51
-
 Trisha J. favorited Mini Wallet
27 Nov 03:11
Trisha J. favorited Mini Wallet
27 Nov 03:11
-
 Lyndsey A. favorited Mini Wallet
14 Oct 21:25
Lyndsey A. favorited Mini Wallet
14 Oct 21:25
-
 Aishwarya Purohit favorited Mini Wallet
22 Nov 05:09
Aishwarya Purohit favorited Mini Wallet
22 Nov 05:09
-
 Netra H. favorited Mini Wallet
15 Oct 06:09
Netra H. favorited Mini Wallet
15 Oct 06:09
-
 02jhseaby added Mini Wallet to Try
08 Jun 20:11
02jhseaby added Mini Wallet to Try
08 Jun 20:11
-
02jhseaby favorited Mini Wallet
08 Jun 20:11
-
Dee D. added Mini Wallet to bags
04 Jun 20:44
-
 Step 1
Preparing the Fabric:
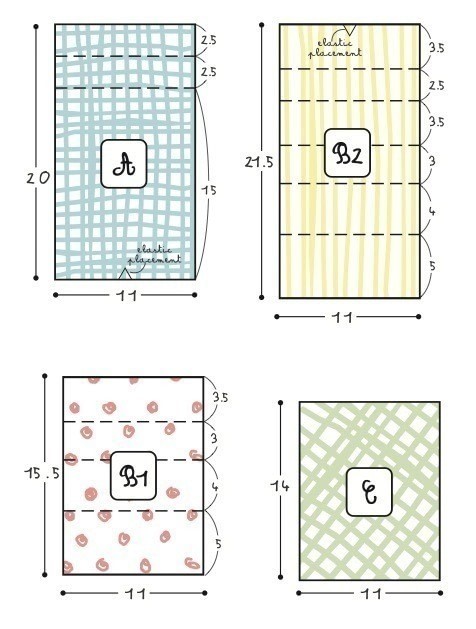
Cut fabric as followed (1 cm seam allowance is included):
Piece A: 11x20 cm
Piece B1 (pockets): 15.5x11 cm
Piece B2 (pockets): 21.5x11 cm
Piece C (lining): 11x14 cml2 pieces of your fabric, each 3.5x 17 cm if you want to make your own binding.
Note: as the edges are straight, you don’t have to cut the bindings on bias.
If the fabric is too thin, iron fusible interfacings to strengthen it. Using fabric marker, mark the lines on fabric pieces.
-
 Step 2
Marking lines on fabrics:
-
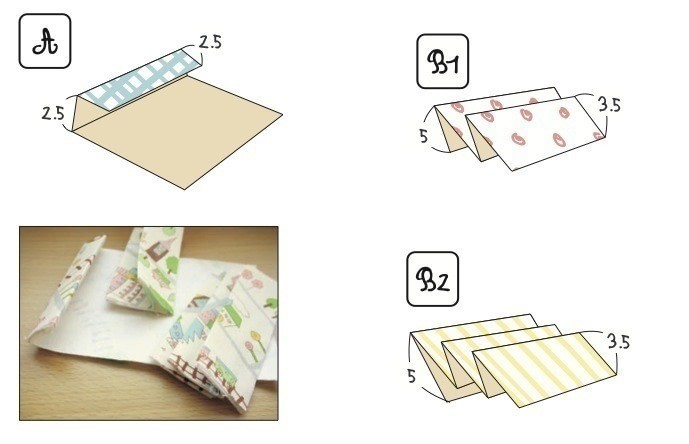
 Step 3
Pockets:
Fold on all lines and iron the crease. Notice the accordion arrangement for B1 and B2. -
 Step 4
Topstitching pockets:
Topstitch all top of pockets about 2-3 mm from folded edges. -
 Step 5
Wallet closure:
Mark elastic placement on the right side of A, on the center point of the edge line.
Put elastic on the mark and place B2 on A, right sides together. Sew with 1 cm allowance. -
 Step 6
Note: this is also the right time to sew embellishment on the outer side of wallet if preferred.
Turn right sides out and iron. -
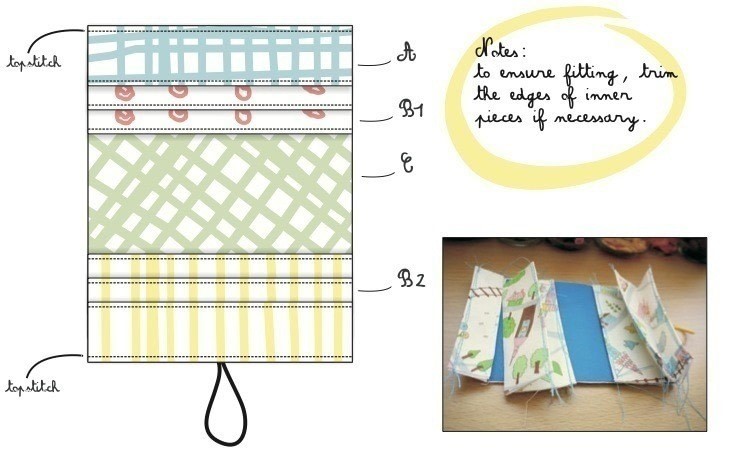
 Step 7
Assemble all pieces and make sure that all edges are aligned to each other.
Topstitch the top and bottom folded edges, catching all layers. -
 Step 8
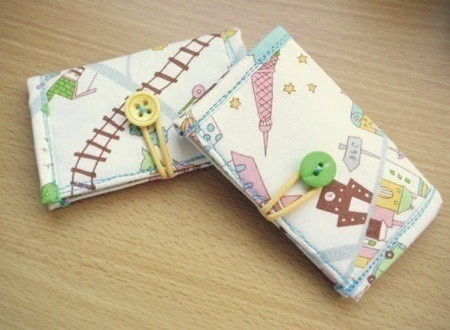
Sew big button securely on the outer side of wallet, about 3 cm from the edge.
-
 Step 9
You’re done!
Now make more! This little project is perfect to finish up those fabric scraps in your stash. Combine different colours and patterns together. You can also opt out the elastic and button and change it to snap-on button, velcro strips, or magnetic closure.


If it isn't You can make one side for cards and the other side you can make a little pocket for coins