About
Everything's better down where it's wetter, take it from meee.
I made this a while ago, so not everything is pictured, but hopefully you'll understand!
*You can also pull it up and wear it as a dress and add a beachy hair clip.
Most of the time is made up of gluing the sequins, everything else is very quick.
Tags
-
 Rachel W. added Mermaid Costume to Beach Party
17 Apr 15:43
Rachel W. added Mermaid Costume to Beach Party
17 Apr 15:43
-
 Deanna G. added Mermaid Costume to Fancy Dress
09 Jan 19:54
Deanna G. added Mermaid Costume to Fancy Dress
09 Jan 19:54
-
Sarah C. favorited Mermaid Costume
22 Jul 18:25
-
 SugarNSpiceLily added Mermaid Costume to costumes
20 Jul 22:37
SugarNSpiceLily added Mermaid Costume to costumes
20 Jul 22:37
-
SugarNSpiceLily favorited Mermaid Costume
20 Jul 22:37
-
 Vanessa B. favorited Mermaid Costume
05 Feb 05:28
Vanessa B. favorited Mermaid Costume
05 Feb 05:28
-
 ShoujoMadness favorited Mermaid Costume
11 Jan 20:48
ShoujoMadness favorited Mermaid Costume
11 Jan 20:48
-
 Grimgirl101 favorited Mermaid Costume
04 Jan 09:38
Grimgirl101 favorited Mermaid Costume
04 Jan 09:38
-
 Zuri favorited Mermaid Costume
26 Dec 09:07
Zuri favorited Mermaid Costume
26 Dec 09:07
-
 brizinga favorited Mermaid Costume
23 Dec 22:20
brizinga favorited Mermaid Costume
23 Dec 22:20
-
Step 1
BRA TOP BASE:
-Strapless Bra
-cardstock
-2 colors of felt*braided sequin ribbon for straps
-
Step 2
Begin by placing one color felt onto the cup of the bra to figure out how much you'll need
-
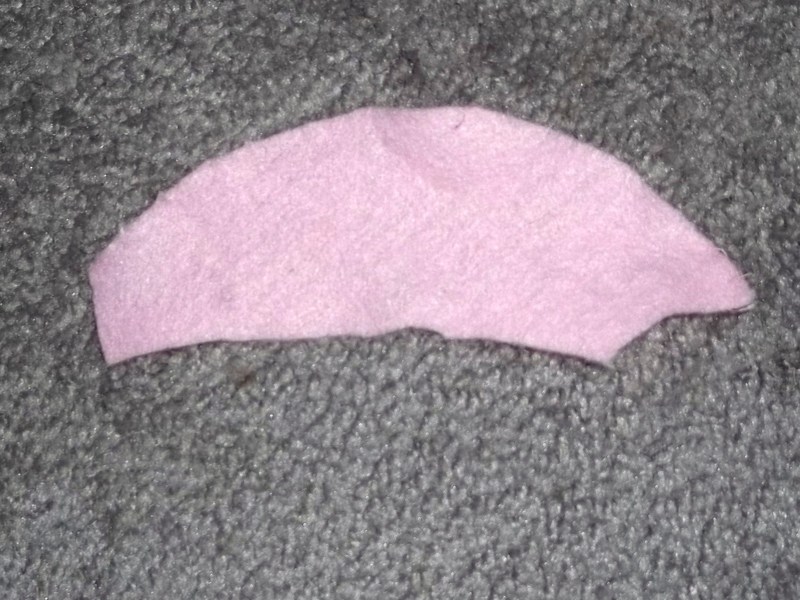
Step 3
Using this knowledge, sketch the outline of a clam shell onto the card stock paper.
*make sure to make it a little bit bigger, you don't want your tata's hanging out!
-
Step 4
Cut out the stencil and, checking to see if the size is accurate first, apply it to the felt and draw around it.
-
Step 5
If you're planning to reuse this bra again, loosely baste the bottom of the clam shell to the bra.
Do NOT go up all the way to the top!
*If you're adding straps baste them on now
-
 Step 6
Round the other piece of felt at the top so it matches the curvature of your bra.
Cut out enough so that you won't see the bra beneath the clamshell and baste it on.
-
Step 7
Now continue to baste on the clamshell.
-
Step 8
DECORATING BRA TOP:
Now here's the fun part!
-Rick rack
-Sequins of a coordinating color
-Anything else you creative people can think of -
 Step 9
I hot glued 3 pieces of rickrack onto the clam shell to give it a little more somethin somethin.
It still seems lacking though. . .
-
 Step 10
BAM, now isn't that lovely?
Glue sequins on in any pattern you wish and whatever else you could think of.
-
Step 11
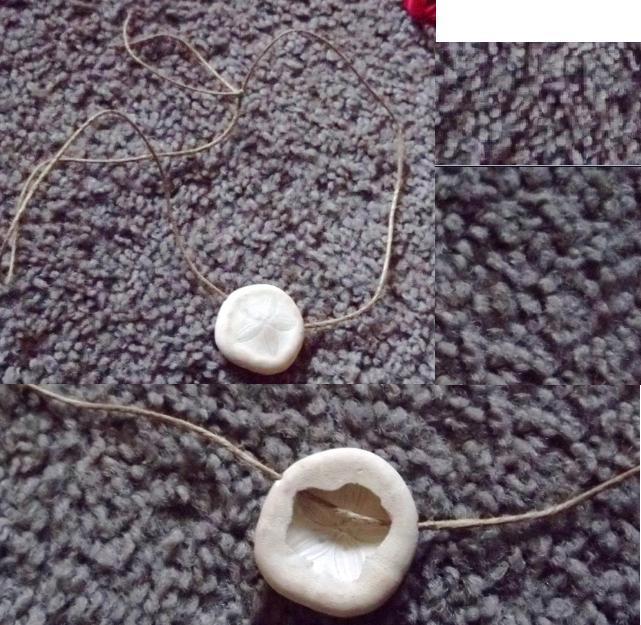
JEWELRY:
-Hemp rope
-Mini starfish
-Earring backs
-Small sand dollar
-shells of various sizes
-needle -
Step 12
Glue the (dried) starfish to the earring backs
*They don't talk to you like they did in the movie Aquamarine :c
-
Step 13
Pierce the needle through the shells and string them along some of hemp rope to make an anklet or bracelet.
*Be very careful, it's harder than it sounds!
-
 Step 14
Do the same with the sand dollar to make a necklace, but be gentle.
I wanted a beachier feel so I didn't use jewelry clasps for either of these, but feel free to!
-
Step 15
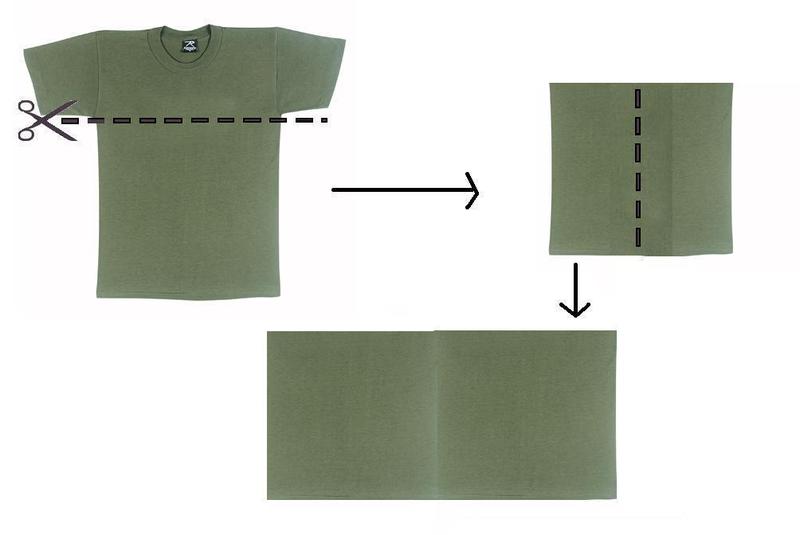
FOR THE TAIL:
-A large or XL green mens shirt
-A darker shiny or glittery fabric
-Braided sequin ribbon -
 Step 16
Cut the shirt horizontally starting from the base of the armpits.
Cut vertically so the shirt becomes one large rectangle.
-
Step 17
Have someone pin it to your body in a flattering way, or do it yourself if you're that badass.
*Leave an inch or a half extra
-
Step 18
Flip inside out and sew along the pins, making a tubular shape.
-
Step 19
Cut the other fabric into 2 even pieces.
Flip tube right side out now
-
 Step 20
Sew these pieces to opposite sides of the skirt in order to cover your legs.
*It'd look cuter ruched, but I was working with scraps. (Attempting to live vicariously through you*)
-
Step 21
Clean up the raw edges on the top
Sew/glue the braided sequin ribbon to the top of the skirt to complemnt the darker bottom.
-
 Step 22
Put it all together and you have a quick and easy mermaid costume!