


About
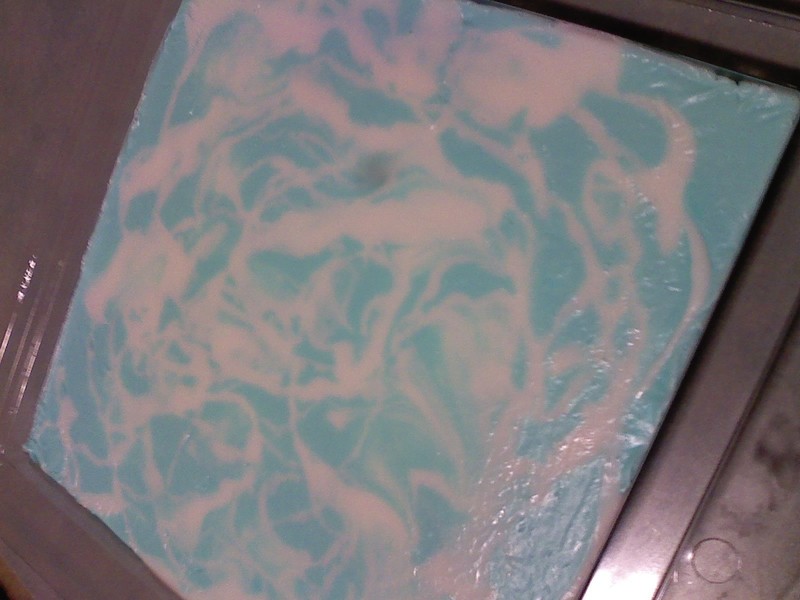
My most recent melt and pour batch. I call them "sky soaps!"
-
 SugarNSpiceLily favorited Melt And Pour Soap
01 Oct 04:52
SugarNSpiceLily favorited Melt And Pour Soap
01 Oct 04:52
-
 Amara A. favorited Melt And Pour Soap
25 Mar 19:15
Amara A. favorited Melt And Pour Soap
25 Mar 19:15
-
 japheel.ledguies favorited Melt And Pour Soap
20 Aug 20:05
japheel.ledguies favorited Melt And Pour Soap
20 Aug 20:05
-
 Adrienne C. added Melt And Pour Soap to Body
02 Mar 05:04
Adrienne C. added Melt And Pour Soap to Body
02 Mar 05:04
-
Adrienne C. favorited Melt And Pour Soap
02 Mar 04:54
-
 Roughwaters44 favorited Melt And Pour Soap
24 Feb 04:57
Roughwaters44 favorited Melt And Pour Soap
24 Feb 04:57
-
 Yasmin M. favorited Melt And Pour Soap
03 Jan 22:51
Yasmin M. favorited Melt And Pour Soap
03 Jan 22:51
-
 BlauPiepmatz favorited Melt And Pour Soap
29 Dec 01:21
BlauPiepmatz favorited Melt And Pour Soap
29 Dec 01:21
-
 Kathi favorited Melt And Pour Soap
09 Oct 10:24
Kathi favorited Melt And Pour Soap
09 Oct 10:24
-
Step 1
Cut melt and pour base (in this case, I used goat's milk base) into small cubes. The smaller the pieces, the quicker and more evenly they will melt. Place your chunks of soap base into a microwave safe container - preferably a Pyrex measuring pitcher and place plastic wrap over the top.
-
Step 2
Place your soap base into the microwave and heat for 30-second intervals. You may not notice much melting going on for the first few zaps, but you should take out your container and gently swirl the melted soap in the bottom to prevent scorching. Once it's mostly melted, you can begin stirring gently between each heating. You goal is for everything to be completely melted - no chunks!
-
Step 3
Remove melted soap base from microwave and pour a little more than half into another container. Add blue soap colorant to this second container and mix thoroughly. Remember to stir gently, or you will create a lot of bubbles.
-
Step 4
Add your fragrance oil of choice. I used an orange sherbet fragrance oil, but you may use essential oils. Just make sure your oil is safe to use in soap. Stir your fragrance into both containers of melted soap base thoroughly until you are satisfied with the strength of your scent.
-
Step 5
Cover your pitcher with plastic wrap again. You will need to reheat it again before you use it, so place it back in the microwave and set your time at about 10-15 seconds. Don't hit start yet!
Now, the goal is not to allow a skin to form over your blue soap. Stir it gently as it cools and thickens. If you don't stir it, a skin will grow and that will make for some ugly soap.
-
Step 6
Once your blue soap has thickened a little, hit start on the microwave.
Keep stirring the blue soap!
When the microwave is done, pull out the white soap and set it near where you are working so you can grab it quickly.
-
 Step 7
Now, pour your blue soap gently into your mold.
Immediately take your container of white soap and begin pouring a thin stream into the blue soap in the mold.
You'll want to pour it from different heights, as the higher you pour from, the further into the blue soap it will go.
-
 Step 8
Once you've poured all your white soap in, it's time to clean up. DO NOT TOUCH YOUR MOLD under any circumstances until the soap has hardened. This should take at least 10-15 minutes.
Once it's hardened enough to pick up, you can place it in the refrigerator for faster cooling/hardening.
Once it's completely cooled and, therefore, hardened, you can pop your soap out of its mold and use it right away.
Note: If you've made more than one bar, you should wrap it in plastic wrap or place it in some other type of air-tight container to keep it fresh. Melt and pour soap tends to dry out rapidly if left in the open air.
Also, if the type of mold you used requires cutting the soap once it's done, you should make sure the soap is room temperature before attempting to cut it! Otherwise it will fracture. That's what happened to me with this batch... I got too excited and jumped the gun. :(
Enjoy your soap!

Comments

