

About
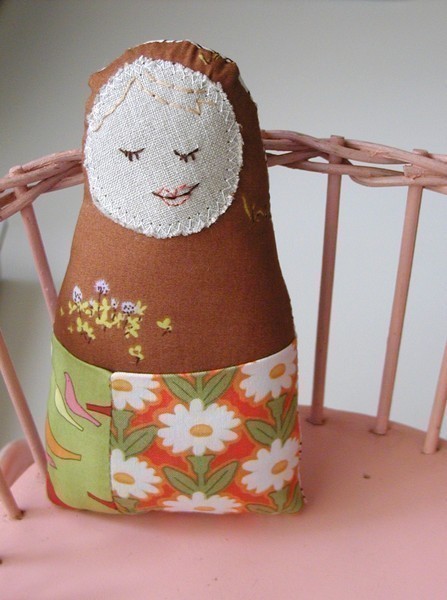
tgif quickie :: matyroshka doll tooth fairy pillow
Everywhere you look, there's matyroshkas these days. Why not have one to tuck into bed with your child's tooth kept safely in her pocket? I think the tooth fairy would definitely approve.
I've got it all right and ready for you. The pdf below has the pattern.
Now for the instructions, witty banter and the secret to life. Which, according to the hub, is 42. Now you know.
Get it:
4 patterns/colors of fabric to mix and match
a scrap of linen, felt or muslin for the face
embroidery floss for the face and hair
stuffing
Tags
Downloads
- toothpillowpattern.pdf 631 KB [ Download ]
-
 joelle.scottmurphy favorited Matyroshka Doll Tooth Fairy Pillow
22 Feb 10:49
joelle.scottmurphy favorited Matyroshka Doll Tooth Fairy Pillow
22 Feb 10:49
-
 Krista W. added Matyroshka Doll Tooth Fairy Pillow to sewing
27 May 17:10
Krista W. added Matyroshka Doll Tooth Fairy Pillow to sewing
27 May 17:10
-
 Kimberley K. added Matyroshka Doll Tooth Fairy Pillow to What I Like
13 Sep 02:29
Kimberley K. added Matyroshka Doll Tooth Fairy Pillow to What I Like
13 Sep 02:29
You Will Need
-
Step 1
Get your pattern pieces all cut out and ready to go. The pockets are to be cut on a fold on top (indicated by the little dots..that's where the fold should be) so they'll be tall enough to double over.
-
Step 2
Sew the pocket LHS to the RHS. Fold over and crease in half with an iron. Who knows how generous that fairy will be..this pocket's big enough for an ipod. Ha. They should be so lucky.
-
Step 3
Stitch the doll face to the body front. I used a zig zag ('cause I love me some zigzaggin') but you can straight stitch or even sew it on by hand.
-
Step 4
Layer your doll sandwich. Back body piece face up, pocket (lining up the raw edges with the body bottom), doll body front face down. Literally face down! I crack myself up. Pin and sew all around, leaving an opening to turn on the bottom.
-
Step 5
Turn and stuff, making sure your pocket ends up on the doll front, not the back. I only say this because I did it. And I freaked. Until I realized I could just flip it over. Whew.
-
Step 6
Sew opening closed.
-
Step 7
Embroider face, going in under the linen circle so you can't see the knot. I used two strands for the hair, eyes and mouth and one strand for the lips.
-
Step 8
Place tooth inside, tuck under a little arm, and send to bed with kisses and hugs.
-
Step 9
Make and share with all the little toothless kids you know, but please do not sell any dolls you make from the pattern. But I would LOVE to see what sweeties you come up with.
Have a great weekend!


