

About
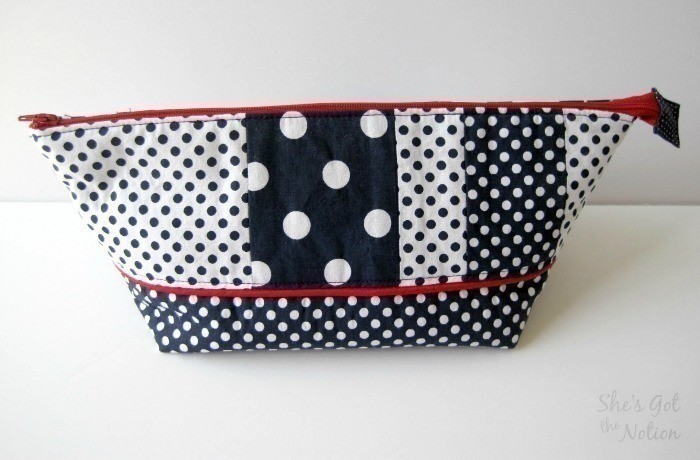
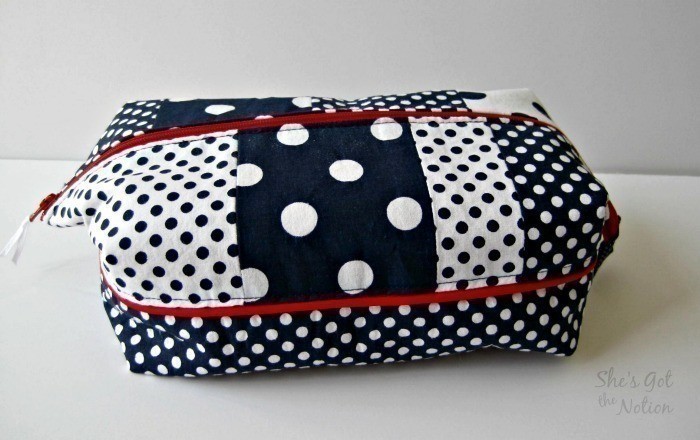
Makeup bag made from coordinating fat quarters
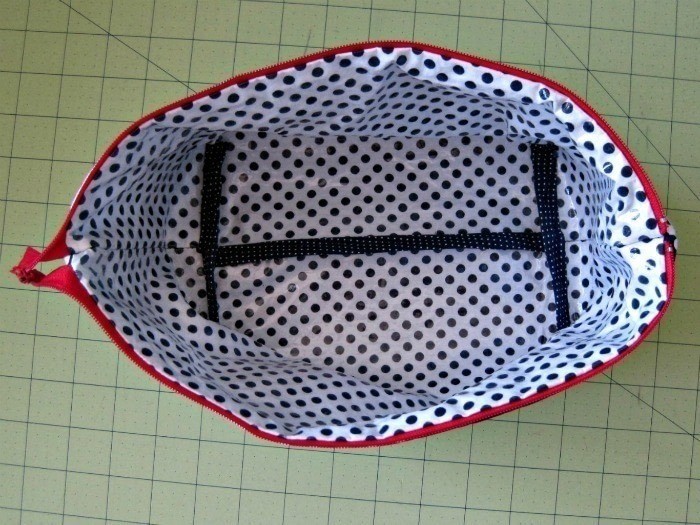
This bag uses up scraps of fat quarters to made the exterior and a fat quarter fused with fusible vinyl to make the easy clean interior. This makeup bag is part of a travel set I made using a pack of 5 coordinating fat quarters. The set includes this makeup bag, a toiletry bag, and a makeup brush roll.
-
 Key West Witch favorited Makeup Bag
08 Aug 03:52
Key West Witch favorited Makeup Bag
08 Aug 03:52
-
 Denise M. favorited Makeup Bag
30 May 06:18
Denise M. favorited Makeup Bag
30 May 06:18
-
 Gina g. added Makeup Bag to Accessories- Sewing
29 Jan 09:26
Gina g. added Makeup Bag to Accessories- Sewing
29 Jan 09:26
-
Rebecca C. favorited Makeup Bag
28 Jul 03:23
-
Rebecca M. favorited Makeup Bag
13 Jun 20:41
-
Caron K. favorited Makeup Bag
23 Dec 08:06
-
Caron K. added Makeup Bag to Zipper Pouches
23 Dec 08:06
-
Li-Kee W. added Makeup Bag to challenges
29 Apr 20:08
-
Lilocket favorited Makeup Bag
26 Apr 16:03
-
 Fyre P. favorited Makeup Bag
12 Apr 03:12
Fyre P. favorited Makeup Bag
12 Apr 03:12
You Will Need
-
 Step 1
CUT THE INTERIOR FABRIC
Cut 2 pieces measuring 14" x 9" for the interior
-
 Step 2
Fuse fusible vinyl to the right side of the interior fabric pieces following manufacturer's directions.
-
 Step 3
CUT THE EXTERIOR FABRIC
Take your fabric for the bottom band of the exterior. Cut two 14" x 5.5" pieces.
-
 Step 4
Cut pieces of fabric measuring 4.5" tall with various widths.
Arrange the pieces how you like them. The final width will need to be 14", so make it a few inches wider to account for seam allowances.
Sew together the fabric pieces with a 1/4" seam allowance.
-
 Step 5
Press seams open. Cut off any excess fabric so that each piece measures 14" x 4.5".
-
 Step 6
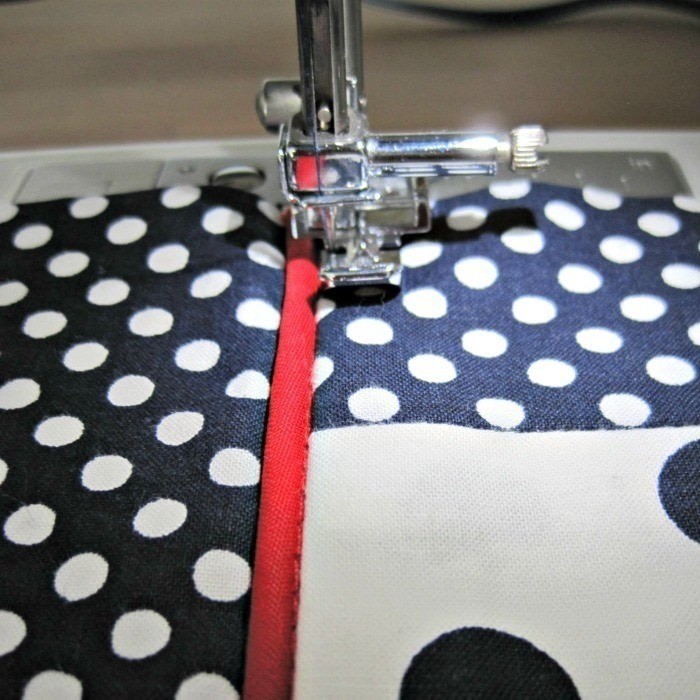
OPTIONAL: ADD PIPING
Find your fabric for the exterior bottom. Mark a line a 1/2" inch down from the top edge of the fabric.
Align the corded part of the piping just below the 1/2" line and pin into place. Baste the piping in place above the 1/2" line (inside the seam allowance). Repeat for the other exterior bottom piece.
-
 Step 7
SEW TOGETHER THE EXTERIOR
Place the exterior top and bottom right sides together. Pin.
With your zipper foot, sew with a 1/2" seam allowance, close to the piping cord (if using). Repeat with the other two exterior fabric pieces.
-
 Step 8
Press seams up.
-
 Step 9
One the wrong side of your exterior fabric, fuse fusible fleece following manufacturer's directions. Repeat with the other exterior piece.
-
 Step 10
Topstitch along piping using your zipper foot.
-
 Step 11
SEW THE ZIPPER
Lay an exterior piece right side up on your work surface. Align the zipper wrong side up as shown, with the zipper pull to the left, 3/4" away from the edge. Finger press or pin the excess zipper tape up. Baste in place, stopping 1" from the end of the exterior fabric.
-
 Step 12
Lay an interior piece wrong side up on top of the zipper. Using your zipper foot, sew in place with a 1/4" seam allowance, starting at the zipper pull end and stopping 1" from the end of the fabric. Be sure to backstitch to lock your stitches.
Press exterior fabric and interior fabric away from zipper teeth. Remember to use a lower iron setting and paper when ironing the vinyl side. Do not topstitch yet, that will be done later.
-
 Step 13
Lay the other exterior piece right side up on your work surface. Align the other side of the zipper tape with the top edge. Make sure to pin or finger press the excess zipper tape up on the zipper pull side.
Baste into place, starting at the zipper pull end and stopping 1" from the end .
-
 Step 14
Lay the other interior piece wrong side up on top, aligned with the edge of the zipper tape. Using your zipper foot, start at the zipper pull end and sew with a 1/4" seam allowance. Start at the zipper pull end and stop 1" from the end of the fabric. Backstitch.
-
 Step 15
Press the exterior and interior fabric away from the zipper teeth. Take care when ironing the vinyl side.
Do not topstitch yet..we'll get to that in a little bit. Unzip your zipper halfway.
-
 Step 16
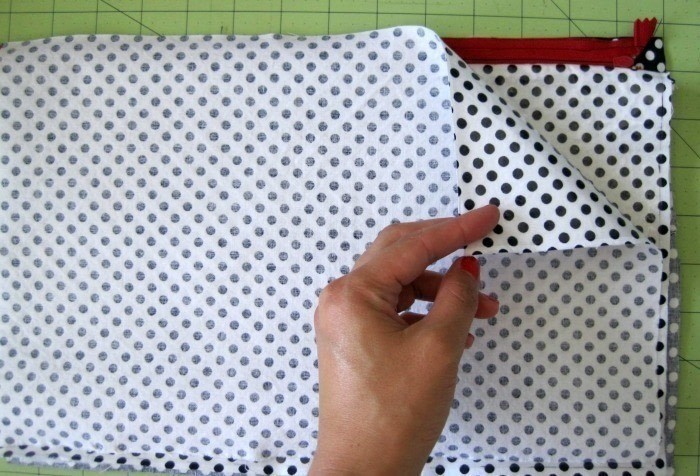
FINISHING THE EXTERIOR
Fold your exterior pieces right sides together. Fold your interior pieces right sides together. Pin the sides only.
-
 Step 17
Sew the sides with a 1/2" seam allowance. When you get to the zipper end, tuck it to the inside, taking care not to sew it.
-
 Step 18
Pin and sew the bottom edge of the exterior with a 1/2" seam allowance.
-
 Step 19
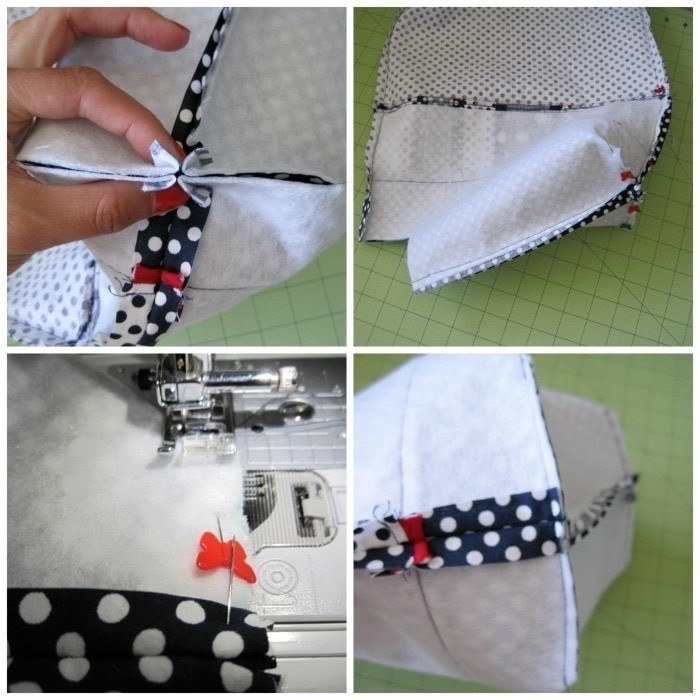
We are now going to box the exterior to give it its shape. Draw square boxes that are 2.5" tall and 2.5" wide on each corner of the exterior. Cut.
-
 Step 20
Pinch the corners together as shown. Pin and sew with a 1/2" seam allowance. Trim the seam to reduce bulk.
Repeat with the other corner.
Turn your bag so that the exterior is right side out. Push out the corners using a dull point, such as a chopstick or knitting needle.
-
 Step 21
FINISHING THE INTERIOR
Box the interior fabric by cutting out a 2.5" square from each corner.
-
 Step 22
Enclose the bottom edge of the interior with bias tape, and sew into place.
-
 Step 23
Pinch together the corners of the interior. Encase the edges with bias tape and pin into place. Sew in place.
Repeat with the other corner of the interior, making sure that the bias tape on the bottom seam is pointing the same way.
-
 Step 24
Push the interior lining to the inside of the bag.
We're almost done...
-
 Step 25
Topstitch below the zipper all the way around the bag. This is important so that the vinyl does not get caught in the zipper teeth. Go slow and take your time, the vinyl has a tendency to stick a little.
-
 Step 26
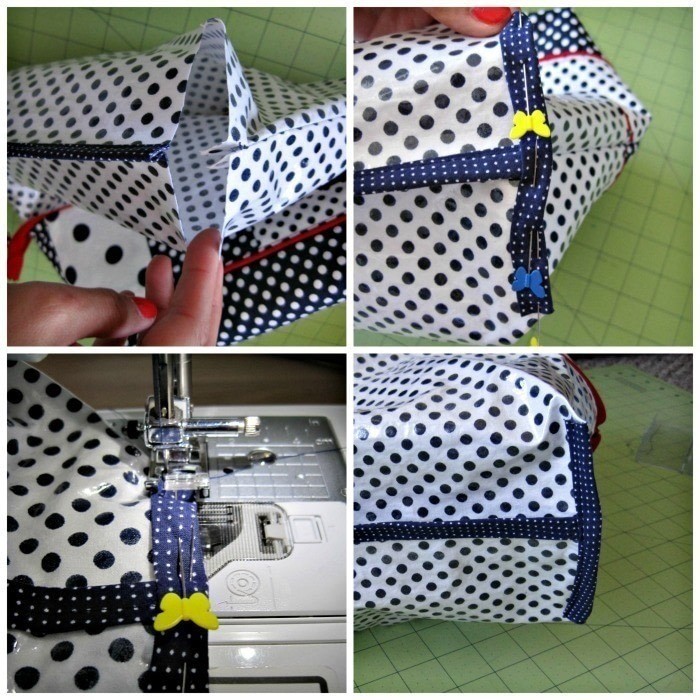
MAKING THE ZIPPER END TAB
Cut off a 3" piece of bias tape and unfold it. Fold in the ends by a 1/2" and iron. Fold in half lengthwise, wrong side out, and sew up the sides along the original crease of the bias tape. Snip the corners.
Turn right side out and press. Trim any excess zipper, so that the zipper extends out about an 1.5". Slip the fabric cover over the zipper end. Sew in place along the edges, taking care not to sew over the metal stop of the zipper.
And you're done!