About
Made By Dad
I was a big fan of the Road Runner cartoons as
a kid. I loved the ACME-branded gadgets that Wile E. Coyote tried to catch the Road Runner with.
So with that in mind, here’s some superpowerful (only joking) ACME-inspired magnets to stop your books in their tracks!
-
 Libby W. added Magnetic Bookends to Homewares
22 Apr 19:50
Libby W. added Magnetic Bookends to Homewares
22 Apr 19:50
-
 Bencaz favorited Magnetic Bookends
21 Jul 19:32
Bencaz favorited Magnetic Bookends
21 Jul 19:32
-
 Kaiulani W. favorited Magnetic Bookends
12 Jun 05:38
Kaiulani W. favorited Magnetic Bookends
12 Jun 05:38
-
 Roughwaters44 favorited Magnetic Bookends
24 Feb 04:46
Roughwaters44 favorited Magnetic Bookends
24 Feb 04:46
-
 mariella.byh.or.die favorited Magnetic Bookends
30 Jan 22:19
mariella.byh.or.die favorited Magnetic Bookends
30 Jan 22:19
-
arina m. favorited Magnetic Bookends
08 Jan 22:50
-
Lyra W. favorited Magnetic Bookends
26 Nov 19:23
-
 Syb' favorited Magnetic Bookends
23 Oct 17:10
Syb' favorited Magnetic Bookends
23 Oct 17:10
-
 Munnazah C. favorited Magnetic Bookends
19 Oct 21:14
Munnazah C. favorited Magnetic Bookends
19 Oct 21:14
-
 Amanda B. favorited Magnetic Bookends
13 Oct 23:15
Amanda B. favorited Magnetic Bookends
13 Oct 23:15
You Will Need
-
 Step 1
Use the craft knife to cut four large panels from the sides of the cardboard box.
-
 Step 2
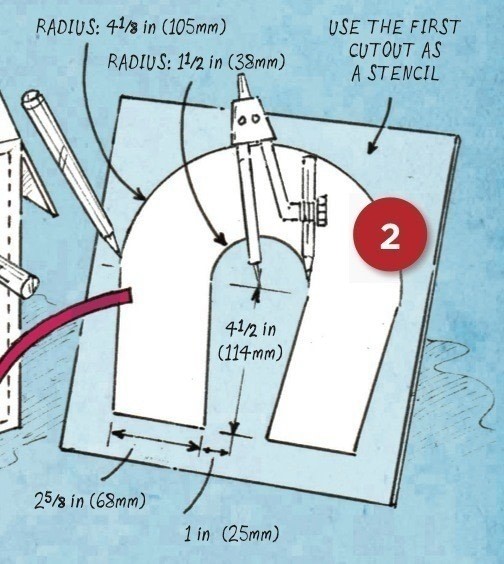
Use the pencil and drafting compass to draw a magnet shape, as shown, on one of the pieces.
-
 Step 3
Cut out the magnet panel on the cutting mat. Use it as a stencil to trace three more magnet shapes on the cardboard, then cut them out.
-
 Step 4
Mark the same side of each magnet panel with an X, as shown. this side will be the front and will help with fit later.
-
 Step 5
Measure, mark, and cut five cardboard rectangles, as shown. Glue one short end of each rectangle to the front side of one magnet shape. Let dry.
-
 Step 6
Apply glue to the exposed ends of the rectangles and press them against the back of another magnet panel, making sure that the X marks face in the same direction and that the sides are aligned. Place books on top to hold them firm as they dry.
-
 Step 7
Measure and mark the cutting plan for the two side strips. cut out the strips with the craft knife.
-
 Step 8
fold the end of strip A and hook it around the inside corner of the magnet panels. Use the pencil to mark the strip at the outside corner, as shown. Remove the strip and crease it along the mark line.
-
 Step 9
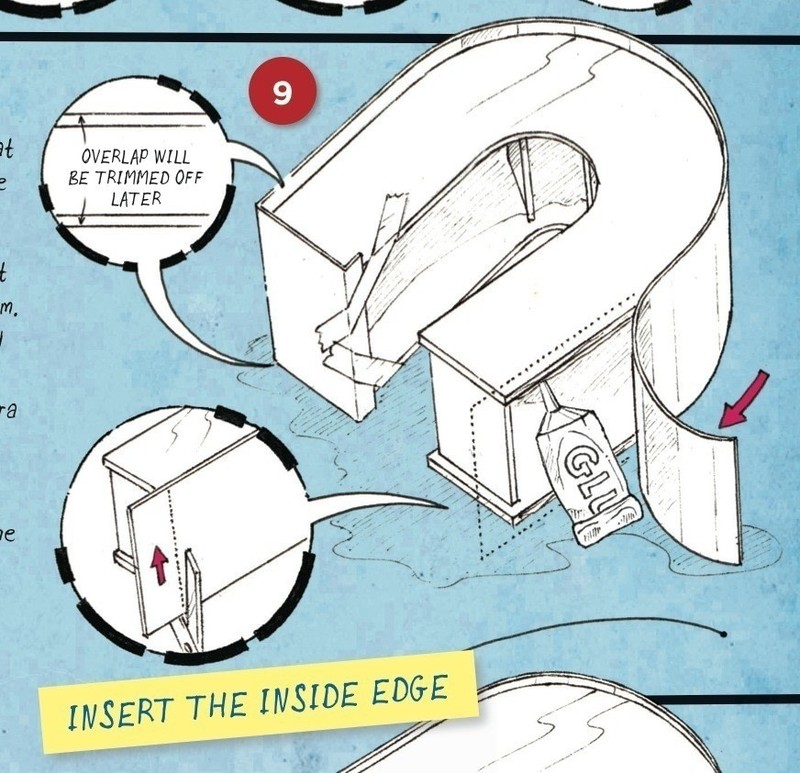
Apply glue to the edges of the magnet panels and fit strip A snugly against them. continue to apply glue all the way around the panels, wrapping strip A around them and securing with tape. trim off any extra length at the corner and let dry.
-
 Step 10
curl strip b into a lowercase n shape. fold the right end of the strip around the remaining end of the magnet panels, as you did in step 9, making two creases.
-
 Step 11
Apply glue to the inside edges of the magnet panels and push strip b into position, as shown. Secure it with tape while it dries, then remove the tape and trim off any extra length at the corner.
-
Step 12
Repeat steps 6_11 to make the second magnet.
-
 Step 13
Use a craft knife or scissors to carefully trim off any excess cardboard.
-
 Step 14
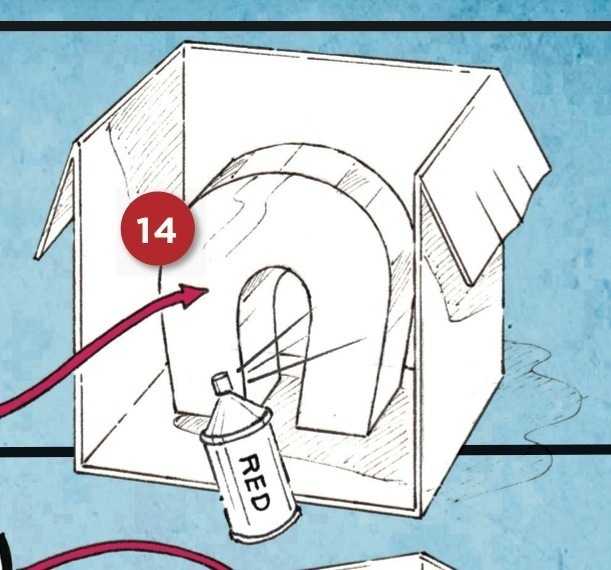
Spray both magnets red. Let dry.
-
 Step 15
Mask all but the ends of the magnet with newspaper and masking tape. Spray the ends of the magnets silver. Let dry.
-
 Step 16
Measure and mark two rectangles from the cardboard and cut them out. fold the rectangles and glue them to one end of the magnet, as shown, to complete the bookends.
-
 Step 17
Position your very attractive magnets on the polar opposite ends of some books!