

About
Let the Magic begin
So this is a fantastic way to fascinate those people you trade with ... a card which is able to change colors ... totally magical.
For the cards please use the sizes of ATC cards, which are 8,9 x 6,4 cm. And if you need some more information, just ask.
-
 Kinhime Dragon favorited Magic Slider Atc Card
30 Dec 15:43
Kinhime Dragon favorited Magic Slider Atc Card
30 Dec 15:43
-
Kinhime Dragon added Magic Slider Atc Card to things to make
30 Dec 15:41
-
 Cheryl S. added Magic Slider Atc Card to Creating Cards
19 Dec 17:05
Cheryl S. added Magic Slider Atc Card to Creating Cards
19 Dec 17:05
-
 Conner W. added Magic Slider Atc Card to craft ideas
07 Sep 18:52
Conner W. added Magic Slider Atc Card to craft ideas
07 Sep 18:52
-
Conner W. added Magic Slider Atc Card to gift ideas
07 Sep 18:51
-
caroline s. added Magic Slider Atc Card to scrapbook
15 Apr 05:14
-
 MysticRose29 added Magic Slider Atc Card to Misc. Papercraft
30 Mar 16:04
MysticRose29 added Magic Slider Atc Card to Misc. Papercraft
30 Mar 16:04
-
Carly H. favorited Magic Slider Atc Card
23 Feb 20:02
- Quirky-Ark favorited Magic Slider Atc Card 23 Feb 00:20
-
 Rachael H. added Magic Slider Atc Card to Want to do!
17 Feb 08:32
Rachael H. added Magic Slider Atc Card to Want to do!
17 Feb 08:32
You Will Need
-
 Step 1
First draw 6 ATC cards in this way on thick cardboard paper
-
 Step 2
Now you need to cut the left and the right cards in the 2nd row.
-
 Step 3
By the way ... here you are able to see the measurements I used.
Because of the several paper layers I used the size of 8,9 x 6,3, so it will fit into the ATC Folders to collect them.
-
 Step 4
Here you can see that I I have cutted the inner part I have marked before.
-
 Step 5
When you are done also cut a hole into the upper part, so you will be able to get the inner part out at the end.
-
 Step 6
Now it is time to glue first put the bottom part up and draw a long glue line at the bottom of this piece.
-
 Step 7
Now fold the left part to this middle part and press it to the glue line you have made.
-
 Step 8
Now you need to do the same with the right part only ... and if you want you can also cut it in this way.
-
 Step 9
When you are done the back part should look like this.
-
 Step 10
Here you can see that now you have got two different pockets.
-
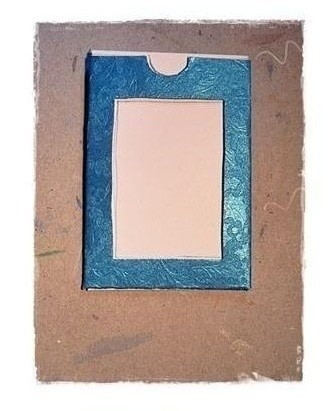
 Step 11
The finished front part.
-
 Step 12
Here I have forgotten to take a picture of the step before.
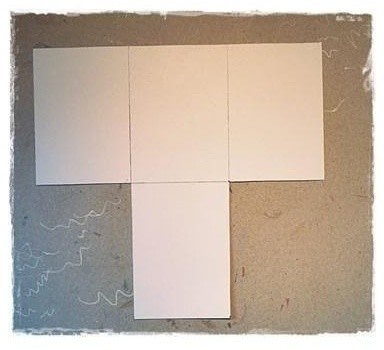
But it is also very simple to explain. You draw a ATC Card on a normal paper and on a tracing paper, too.
Then you cut it into a "T", but please make sure that the T is a bit wider than the hole you cutted before.
Glue both parts together at the lower part of the "T".
-
 Step 13
Now it is time for painting. First start to paint the something on the normal paper and then trace the lines only on the tracing paper.
-
 Step 14
Here you can see how both look like.
-
 Step 15
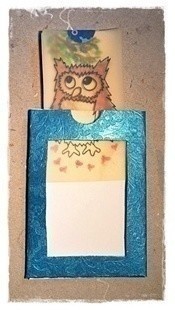
Then you need to put the finished "T" only into the two pockets you have made.
The transparent "T" into the first pocket and the colored "T" into the 2nd pocket.
-
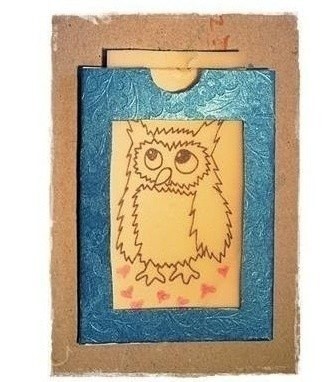
 Step 16
And now you can put it in and out whenever you want ... and you are finished.