About
I love packing a lunch, and I like to do it in style!
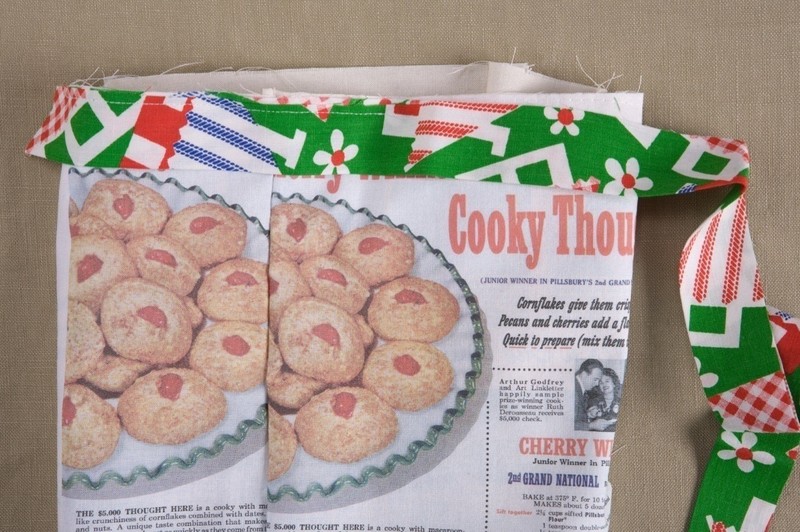
I love packing a lunch, and I like to do it in style. Why use disposable paper bags when you can reuse supercute ones? Adorn this clever lunch bag with your favorite images from magazines or books. The fabric for this bag has an image scanned from a vintage magazine, complete with a cookie recipe. This project uses only three photo fabric sheets (or homemade sheets with Bubble Jet Set 2000), and the pattern cleverly uses 81/2" x 11" (21.5 x 28cm) sheets, so you won’t waste any fabric. Once you make one of these, you’ll be hooked.
Finished size
103/8" high x 61/4" wide x 31/2" deep (26 x 16 x 9cm), unfolded
Materials
Outer bag fabric: (3) 81/2" x 11" (21.5 x 28cm) photo fabric sheets for your printer or copier, or homemade sheets using Bubble Jet Set 2000, cut after printing into:
(2) 61/2" x 11" (16.5 x 28cm) front pieces
(2) 41/4" x 11" (11 x 28cm) side pieces Lining fabric: 1/4 yard (23cm) cut into:
(2) 61/2" x 11" (16.5 x 28cm) front pieces
(2) 41/4" x 11" (11 x 28cm) side pieces
(2) 61/2" x 41/2" (16.5 x 11.5cm) bottom
Binding:
(1) 2" x 20" (5 x 51cm) piece of fabric for homemade binding, or, if using premade binding, (1) package (3 yards [2.7m]) of 7/8"- (22mm-) wide single-fold bias tape
(1) 1" x 2" (2.5 x 5cm) piece of Velcro (optional)
Vintage magazines or other images to copy
Printer
Sewing machine
Seam allowance 1/4" (6mm)
One bottom lining piece is used for the bottom of the outer bag.
-
 Bonnie P. favorited Lunch Bag
19 Jan 06:54
Bonnie P. favorited Lunch Bag
19 Jan 06:54
-
 Julie K. favorited Lunch Bag
26 Oct 12:59
Julie K. favorited Lunch Bag
26 Oct 12:59
-
 FrankieStein favorited Lunch Bag
16 Feb 07:09
FrankieStein favorited Lunch Bag
16 Feb 07:09
-
 Alecia B. favorited Lunch Bag
01 Aug 16:31
Alecia B. favorited Lunch Bag
01 Aug 16:31
-
 Miss_Fit added Lunch Bag to Patches and Things
29 May 02:09
Miss_Fit added Lunch Bag to Patches and Things
29 May 02:09
-
 Maria commented on Lunch Bag
28 May 04:23
Maria commented on Lunch Bag
28 May 04:23
-
 Craffy added Lunch Bag to Para hacer <3
01 Mar 00:54
Craffy added Lunch Bag to Para hacer <3
01 Mar 00:54
-
Craffy favorited Lunch Bag
01 Mar 00:53
-
 elarablair favorited Lunch Bag
23 Feb 18:17
elarablair favorited Lunch Bag
23 Feb 18:17
-
 thelittlevampirebat added Lunch Bag to bags
08 Feb 18:10
thelittlevampirebat added Lunch Bag to bags
08 Feb 18:10
-
Step 1
Prepare your artwork by scanning and printing it onto your fabric at home, or make color copies of it and print it onto color copier fabric sheets at the copy shop. You will need 3 printed sheets total.
-
 Step 2
Cut out the outer bag pieces from your printed fabric. Cut out the lining pieces and binding strip if you are making binding. (Skip this step if you are using premade binding.)
-
Step 3
Make the outer bag:
With right sides facing, sew the long sides
together on the front and side pieces, creating a box without a top or bottom. With right sides together, pin a lining bottom piece onto the front and side pieces. Sew carefully, flaring out the sides and front, stopping and pivoting with your needle down at each corner. -
 Step 4
Repeat step 3 with the lining fabric.
-
Step 5
Turn the outer bag right side out. Place the lining bag inside the outer fabric bag, wrong sides together. This will now look exactly like it will when it is done, minus the binding. Baste around the top edge to keep the layers together.
-
 Step 6
Make binding by ironing your strip in half lengthwise. It will now be 1" x 20" (2.5 x 51cm). Align the raw edges of the binding and the top of the bag and lay out on the printed side of the bag, right sides together. Fold the short end of the tape over so there is no raw edge, and stitch using a 1/4" (6mm) seam allowance from the edge. Flip the folded edge to the inside on the bag, and hand-stitch it to the lining.
-
Step 7
To create the closure, machine-stitch one velcro piece centered just under the binding along the top edge of one front piece. Fold the bag over twice toward the other front piece, and mark where the Velcro touches the other front piece. Stitch the opposite Velcro piece onto the other front piece where the two Velcro pieces would touch.
Tips, hints, and other suggestions
You can make this with a vinyl lining. Plastic-coated fabric like oilcloth can be tricky to stitch with, so try a Teflon® presser foot or use masking tape on the edges and sew through all layers to keep the oilcloth from sticking.Create a cute closure by stitching an elastic band into the binding on one side and adding a button on the outside front instead of the Velcro.