


About
Because cakes are cute on anything. :3
Lolita hats, in my opinion, are the cutest things ever, especially the ones that look like pastries. But they are pricey, so I decided to make my own. I used a Japanese cake box as inspiration and a template. I'm guessing you could get them on eBay, but I used elements from all different ones and gave it my own little twist to make it my own. :3 If I find a link for the cakes I will definitely post them. Keep in mind that they are in Japanese and only have pictures to explain, it's not hard to figure out but you just have to be used to reading from drawings.
Other then that, it's not very hard, it just takes a lot of time. Some tips to move faster:
- Do all of the cutting first. (I didn't do this because I like to break up sewing and cutting, this prevents me personally from getting bored.)
- Make sure you have all of your "ingredients" together and organized.
- Use a strand of embroidery thread, it's less noticeable then a full strand and easy to sew with than two strands of sewing machine thread. (I had to do both because I didn't have white embroidery thread.)
I know there's another Lolita cake hat on here (I checked a little while ago) but I did not use that as a reference, if there are similarities that's simply a coincidence. I worked really hard to make this tutorial as detailed as possible so it's easy for you, so don't be afraid to ask questions.
So let's get started shall we?
Tags
-
 Key West Witch favorited Lolita Cake Headband
28 Jun 23:34
Key West Witch favorited Lolita Cake Headband
28 Jun 23:34
-
 Nankita favorited Lolita Cake Headband
12 Apr 17:26
Nankita favorited Lolita Cake Headband
12 Apr 17:26
-
 Mikeria W. added Lolita Cake Headband to Things to make
26 Apr 00:24
Mikeria W. added Lolita Cake Headband to Things to make
26 Apr 00:24
-
 Chica C. favorited Lolita Cake Headband
14 Jun 03:01
Chica C. favorited Lolita Cake Headband
14 Jun 03:01
-
 Alisa B. favorited Lolita Cake Headband
01 Mar 00:49
Alisa B. favorited Lolita Cake Headband
01 Mar 00:49
-
 B* added Lolita Cake Headband to Cool stuff!
02 Jun 08:07
B* added Lolita Cake Headband to Cool stuff!
02 Jun 08:07
-
B* favorited Lolita Cake Headband
02 Jun 08:06
-
 Yana S. added Lolita Cake Headband to Kawai
22 Mar 11:51
Yana S. added Lolita Cake Headband to Kawai
22 Mar 11:51
-
 Shawnee J. favorited Lolita Cake Headband
12 Feb 07:16
Shawnee J. favorited Lolita Cake Headband
12 Feb 07:16
-
 CookieBird Lover added Lolita Cake Headband to Headbands and hair clips
06 Oct 03:47
CookieBird Lover added Lolita Cake Headband to Headbands and hair clips
06 Oct 03:47
-
Step 1
First things first get all your felt, threads, needles, pins, and stuffing together. You will also need a pencil and scissors.
Here's the line up (In parenthesis is the color I used just so you can follow along):
- One felt color for the inside of the cake (Creamy off white)
- One felt color for a cake layer (Lemon yellow)
- One felt color for icing and various icing dollops and twists (White)
- And felt for the fruits you will add (I used green and yellow for my kiwi and orange for my tangerine) -
 Step 2
Now let's start making the cake! We're going to start with the inside part, where it would have been sliced from the rest of the cake.
For this you'll need your cake felt and cake layer felt.
For my cake the inside part was about 2.3 by 3.5 inches. Draw with a ruler on the felt and then cut out.
Cut the layer to a third of the size of the cake in a strip. Pin it down to the cake.
Now take you embroidery thread and pull out a single strand and use that to sew the layer to the middle of your cake. (You can use just the basic stitch for this.) -
 Step 3
Great! With the layer firmly sewed down you can now cut out the back piece for your icing! (This would be the outside rim of the cake.) This should be another rectangle and should measure around 3.5 inches by 2.5 inches. Start sewing that to one side of your cake.
-
 Step 4
Now sew it to the other side to get a triangle.
-
 Step 5
Now you can stop here and your cake can become a wristband!
Or you could keep going.
-
Step 6
Now you can attach the lace in whatever way you please on the icing.
-
 Step 7
Now to make the top and bottom. For these you need two triangles. The longest sides should be about 9 cm and the shorter side should be about 8.5 cm. (The only reason I jump from inches to centimeters is because for this project you have to be pretty exact.) Now you want to pin those to your cake.
-
 Step 8
Kind of looks like a cake voodoo doll, huh?
Now just start sewing on the icing with, once again, one strand of your embroidery thread. Then the other side, but leave and open space to put the stuffing in! -
 Step 9
Now stuff it. Or you can be like me and get someone else to stuff it because you have an irrational fear of stuffing.
Sew that cake shut! -
 Step 10
Fantastic! Now you've got your cake!
-
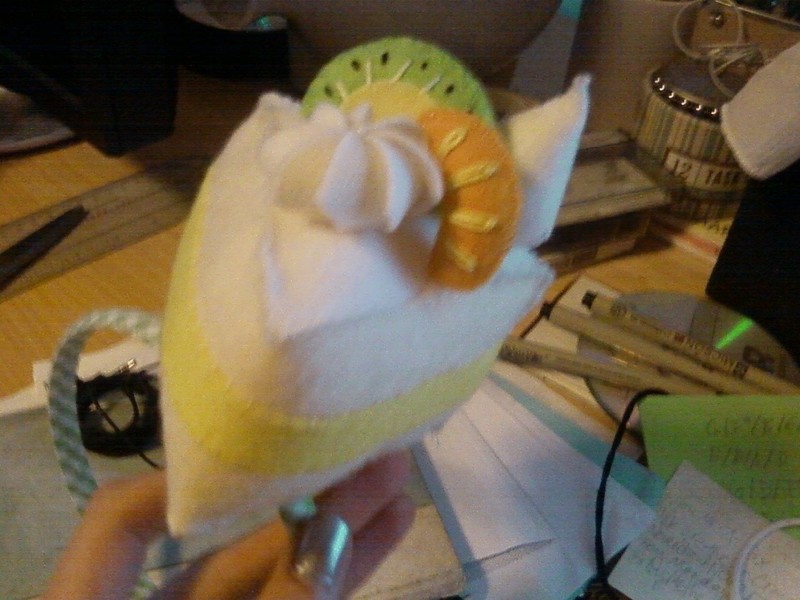
 Step 11
Now just create the embellishments.
I made half a kiwi, tangerine, a dollop of cream, and a icing twist.
YOU CAN SKIP THESE IF YOU'RE HAPPY WITH JUST A CAKE OR WANT TO DO SOMETHING ELSE. But I think these look cute. :3
-
 Step 12
For the kiwi you are going to need two green half circles, two yellow half circles that are half the size of the green ones, a strip of green felt, and black and white-ish yellow embroidery thread.
first sew the yellow bit on the green half circle in a way that makes the thread look like a sun (Only do this on the curved part, don't worry about the bottom yet). Then do little black stitches in between those to make the seeds.
Now do the same for the other side. -
 Step 13
Now you are going to sew the strip around one half of the kiwi. Do this again on the other side, leaving room for stuffing.
Stuff it.
Sew it shut.
Tada! -
 Step 14
Now time for the tangerine.
Cut out two bean shapes out of some orange felt into the desired size for your tangerine.
Now you are going to do petal stitches (I you don't know what that is just ask me or you can look it up, it's quite simple. :3) on each of your bean shapes. The full embroidery thread can be used here.(I didn't take a picture of doing this one but here's the picture of the fruits and what not again, sorry!)
Sew and stuff and done!
-
 Step 15
These little guys look harder then they are start with this shape, you only need to cut out one.
-
 Step 16
Now start sewing. You start in the center.
Pick up one of the, I guess I'll call them "petals," and sew from the inside out. Move onto the next to the same way until you've gone all the way around and set some cotton in the middle. -
 Step 17
Now pull it tight and knot it! I like knotting it with a bead but you don't have to.
Pretty fantastic little thing right?
-
 Step 18
Next is the dollop. This one is very simple. You can see everything you need to do in the picture.
Just cut it out like so, sew it, stuff it, and close it up! -
 Step 19
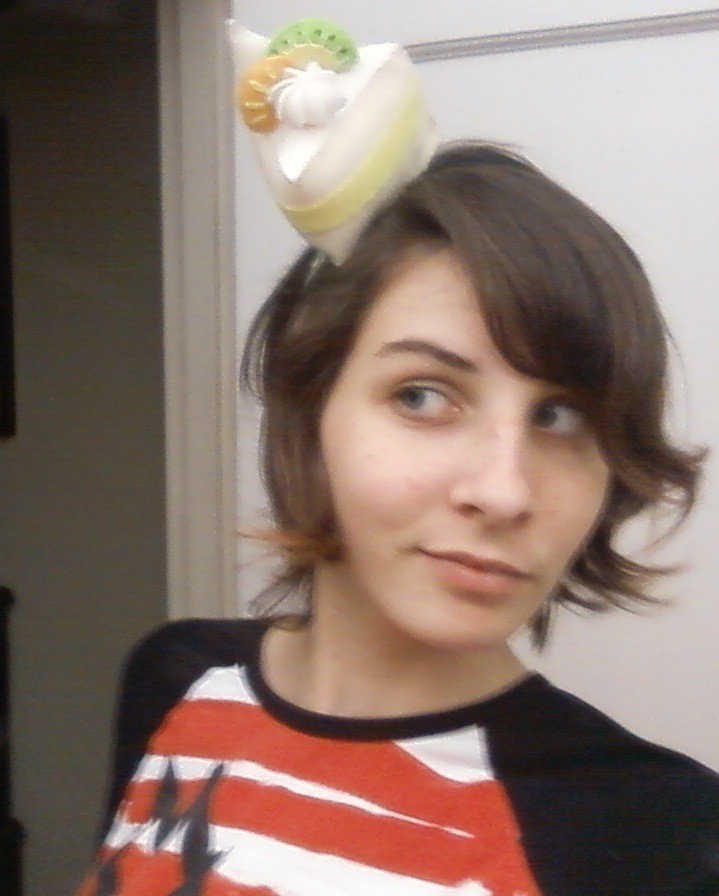
Now arrange, sew it together, put it on a head band, wear it, and oh my gosh aren't you cute?!
So there you have it, an adorable hat for all the adorable lolitas out there and for you. :3
Hope you enjoyed, feel free to ask any questions, and remember that you can do this with whatever you want, pineapple bits, strawberries, maybe make it a chocolate cake.Thank you for reading, have fun! :D


Versions


Comments


