About
Milla and the snowman - a unique Christmas decoration
The embroidery may take some time - but the rest of this Christmas stocking is super easy to sew!
Tags
Downloads
- nikolaus.pdf 62.9 KB [ Download ]
-
 Pam added Let's Sew A Christmas Stocking And Add A Unique Embroidery to Winter Holiday
09 Nov 22:27
Pam added Let's Sew A Christmas Stocking And Add A Unique Embroidery to Winter Holiday
09 Nov 22:27
-
 Jennifer W. favorited Let's Sew A Christmas Stocking And Add A Unique Embroidery
10 Dec 10:40
Jennifer W. favorited Let's Sew A Christmas Stocking And Add A Unique Embroidery
10 Dec 10:40
-
Ashleigh Y. favorited Let's Sew A Christmas Stocking And Add A Unique Embroidery
28 Nov 02:06
-
 Jessica A. favorited Let's Sew A Christmas Stocking And Add A Unique Embroidery
01 Jun 23:14
Jessica A. favorited Let's Sew A Christmas Stocking And Add A Unique Embroidery
01 Jun 23:14
-
 Vanessa B. added Let's Sew A Christmas Stocking And Add A Unique Embroidery to Home DIY
19 May 19:46
Vanessa B. added Let's Sew A Christmas Stocking And Add A Unique Embroidery to Home DIY
19 May 19:46
-
 Belle favorited Let's Sew A Christmas Stocking And Add A Unique Embroidery
12 Dec 08:19
Belle favorited Let's Sew A Christmas Stocking And Add A Unique Embroidery
12 Dec 08:19
-
 Xx13.CrowsxX added Let's Sew A Christmas Stocking And Add A Unique Embroidery to Xmas
04 Dec 14:07
Xx13.CrowsxX added Let's Sew A Christmas Stocking And Add A Unique Embroidery to Xmas
04 Dec 14:07
You Will Need
-
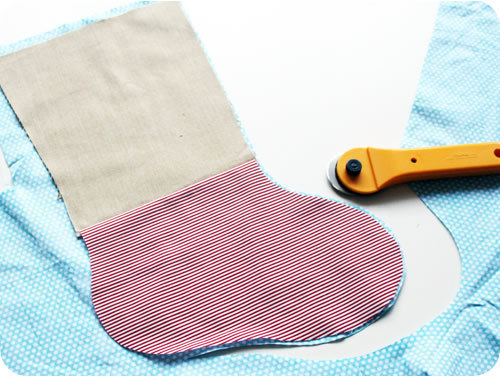
Step 1
Print the pattern, cut out, pin on the fabrics and cut them out. For the foot of the stocking you can use a fabric with nice patterns - but the part your embroidery will be has to be a plain fabric.
-
 Step 2
Sew together the foot and the leg.
-
 Step 3
Now the front of your stocking is the pattern for the back.
-
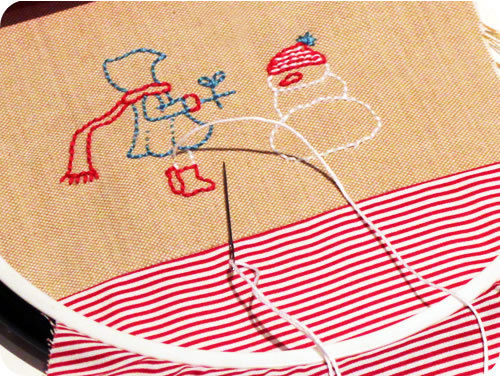
 Step 4
And now it's the time to embroider!
There are many ways to get the pattern on the fabric. I have my own way. So I print the pattern with an ink-jet printer on interfacing (Vlieseline in German) and iron it on the back of the fabric.
(please ignrore that on this photo there is already the red foldover sewn to the stocking - that was a mistake and I had to remove it later). -
 Step 5
Put the front of your stocking in your embroidery hoop - and start to embroider.
-
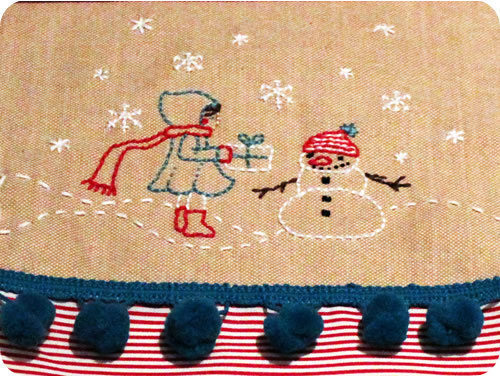
 Step 6
I used the backstitch and the running stitch.
-
 Step 7
And this is how your embroidery should look like. At least a bit, depending on the colors you chose.
You can add a nice ribbon or something like that on the seam between foot and leg of the stocking.
-
Step 8
Sew the front and the back of the stocking together.
-
 Step 9
And now it's time to sew the red foldover.
You sew the front and the back of the red parts together - so that you get a tube.Then fold-in the lower part of the tube, iron it and seam this part with a straight stitch.
You can decorate it with a zigzag ribbon as I did.Then fold-in the upper side, iron it and sew the red part with a straight stitch to your stocking.
-
 Step 10
Finally you sew a pretty ribbon on your stocking - to hang it wherever you want to have it.