

About
Make my fabulous version of Mod Podge!
I have seen many tutorials on making your own version of Mod Podge that I just had to try it myself. For those of you that don't know what Mod Podge is: It's a glue that is normally used for decoupaging, but a lot of crafters also use it for pretty much everything else, because it attaches on almost every surface giving a sheer finish.The down part of Mod Podge is, is that it's kinda expensive. It's not as expensive to not make me buy it, but for some projects I could use a cheaper version.
There are a lot of discussions going around saying that the homemade version is not the same thing as the 'real deal'. And let me just be clear by saying that this is not the same as Mod Podge. It's a formula that has similar qualities as the real recipe, but it's not the same. I've read that the homemade version can give a yellow glow after a couple of years and doesn't hold as long as the real podge.
This being sad, I still needed a cheap glue that's similar to Mod Podge for my smaller projects. I wouldn't use this for something that needs to stay intact for many years, but it would be great for experiments and low budget crafts.
And to finish it of, I made a fun label and gave it my own name;)
-
 Bek S. favorited Lana's Podge Diy
02 Aug 10:50
Bek S. favorited Lana's Podge Diy
02 Aug 10:50
-
Marie R. added Lana's Podge Diy to DIY's to do
12 Feb 18:46
-
 Chudames favorited Lana's Podge Diy
04 Apr 04:00
Chudames favorited Lana's Podge Diy
04 Apr 04:00
-
 Pimke added Lana's Podge Diy to Upcycling
03 Mar 12:24
Pimke added Lana's Podge Diy to Upcycling
03 Mar 12:24
-
 Lara L. favorited Lana's Podge Diy
27 Feb 14:07
Lara L. favorited Lana's Podge Diy
27 Feb 14:07
-
 Rose K. favorited Lana's Podge Diy
19 Aug 02:42
Rose K. favorited Lana's Podge Diy
19 Aug 02:42
-
Maxine M. added Lana's Podge Diy to To-make list
06 Apr 06:08
-
 Emma H. favorited Lana's Podge Diy
26 Jan 01:30
Emma H. favorited Lana's Podge Diy
26 Jan 01:30
-
 Alex B. favorited Lana's Podge Diy
25 Dec 22:27
Alex B. favorited Lana's Podge Diy
25 Dec 22:27
-
Denise L. favorited Lana's Podge Diy
17 Dec 04:57
You Will Need
-
 Step 1
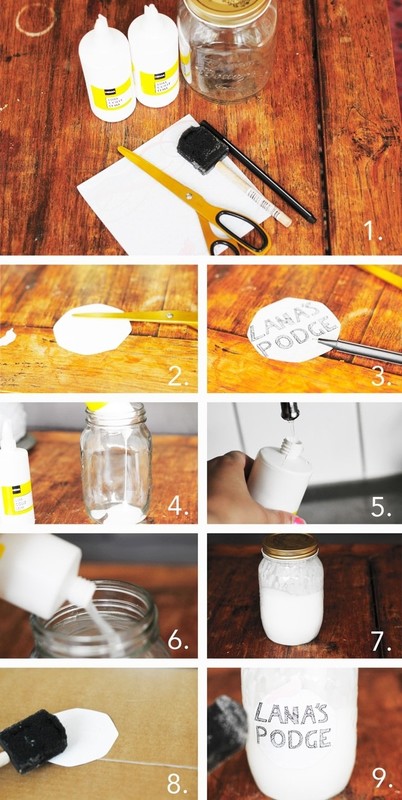
1. Get your supplies: white glue (which is children's glue, I bought it Hema); jar; paper with a fun pattern; paint brush or sponge; scissors; pen and some water.
2. Cut a fun shape out of the paper.
3. Write the name of your podge on the paper.
4. Making the podge: Take your white glue and put it in the jar.
5. Fill the glue container halfway with water.
6. Add the water to the glue.
7. Shake, shake, shake! And the podge is done!
8. Put some podge on the back of your label and paste it onto the jar, let it dry.
9. Apply a layer of the podge over the label to seal it.All done!

CO + K User