About
A no-sew vinyl bag base which you can play up to suit your style.
If you are coveting a unique transparent tote bag but are terrified at the thought of sewing up one, I guess this would be a perfect project for you!
With the eyelets, you will have the flexibility (and fun!) coming up with different lacing styles using materials of your choice. For my versions, I included a macrame focal panel on the tote bag and came up with a furoshiki style handle.
Downloads
- 104446_2F2014-09-28-171926-rhinestic_schematics_vinyltotebag.pdf 65.8 KB [ Download ]
- 104446_2F2014-09-28-171946-rhinestic_pattern_sheet_vinyltotebag.pdf 118 KB [ Download ]
-
 Becky favorited Laced Up Transparent Vinyl Tote Bag
16 May 10:15
Becky favorited Laced Up Transparent Vinyl Tote Bag
16 May 10:15
-
 Catalina T. favorited Laced Up Transparent Vinyl Tote Bag
29 Jun 06:51
Catalina T. favorited Laced Up Transparent Vinyl Tote Bag
29 Jun 06:51
-
 Xirimpi favorited Laced Up Transparent Vinyl Tote Bag
31 May 17:07
Xirimpi favorited Laced Up Transparent Vinyl Tote Bag
31 May 17:07
-
 TheSewingMaven favorited Laced Up Transparent Vinyl Tote Bag
12 May 22:23
TheSewingMaven favorited Laced Up Transparent Vinyl Tote Bag
12 May 22:23
-
 GreenAlice added Laced Up Transparent Vinyl Tote Bag to Marzia Bisognin
23 Mar 03:16
GreenAlice added Laced Up Transparent Vinyl Tote Bag to Marzia Bisognin
23 Mar 03:16
-
GreenAlice favorited Laced Up Transparent Vinyl Tote Bag
23 Mar 03:16
-
 Christine R. B. published her project Laced Up Transparent Vinyl Tote Bag
21 Sep 11:16
Christine R. B. published her project Laced Up Transparent Vinyl Tote Bag
21 Sep 11:16
You Will Need
-
 Step 1
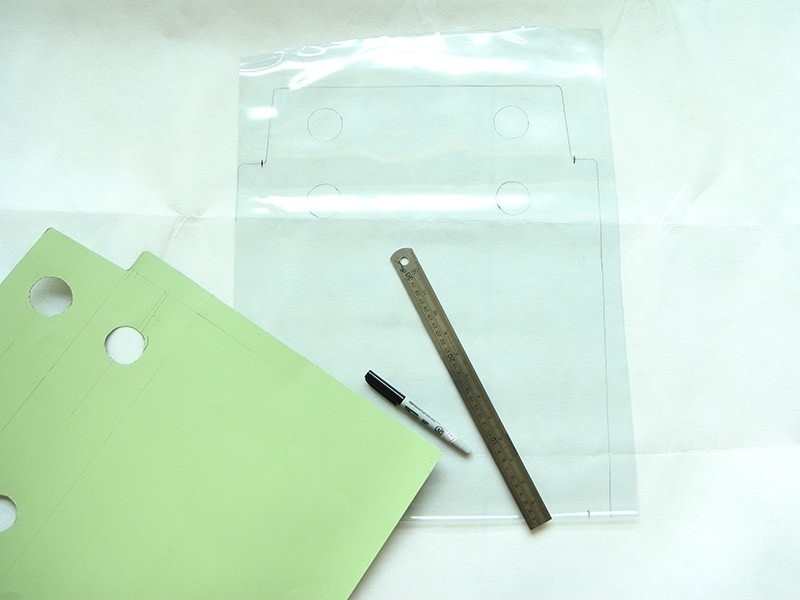
For the template, you can either download the pattern sheet PDF and assemble the pattern according to the assembly diagram; or download the schematics PDF and draw your own, following the dimensions in the diagram.
I suggest printing the pattern sheet on thicker weight papers as this will make tracing easier in the next step.
If you are drawing out your own template, I suggest a stiffer material like thin cardboard. (I used a piece of vanguard sheet that I already had on hand)
For both methods, redraw the circles to fit the inner circumference of your larger-sized eyelet (follow the size recommended by the manufacturer) if you are not using similar sized ones.
Cut out the template, including the circle cut-outs for the large eyelets.
-
 Step 2
Fold the vinyl in half. I recommend flattening the folded edge by pressing it with an iron at the lowest temperature with a pressing cloth.
Lay the template over the vinyl, with the bottom of the template flushed along the folded edge. Trace the pattern with a non-permanent marker, including the circle cut-outs and the 1-inch marks. (If you only have a permanent marker like sharpie, you would need to prepare some rubbing alcohol for cleaning up later)
-
 Step 3
With the vinyl still folded in half, carefully cut along the traced lines and circles (except the 1-inch marks) with the cutter and metal ruler. You might want to use scissors for the curved areas.
-
 Step 4
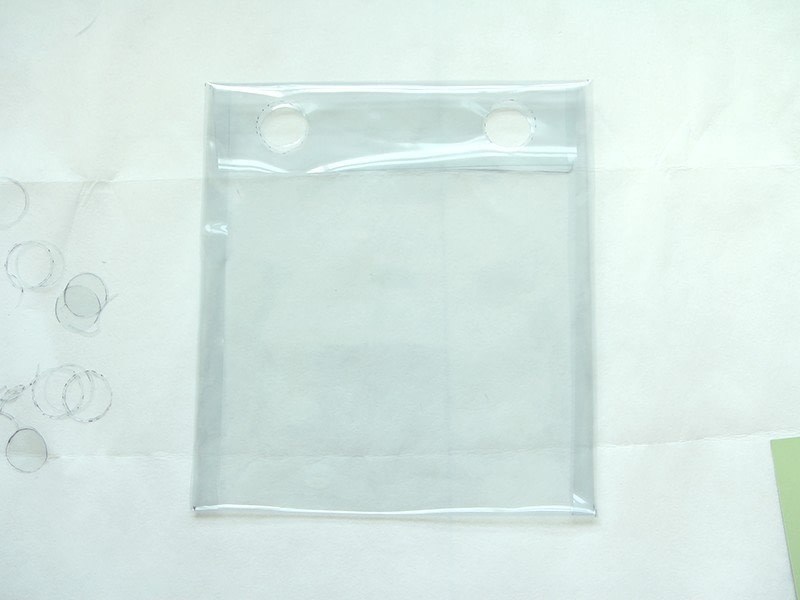
You will get something like this.
Next, you will need to fold the top flaps down inwards, making sure that the circle cut-outs on each flap overlap exactly with the circle cut-outs on the respective side of the bag. Then, fold the sides in at the 1-inch marks. It would be easier if you unfold the middle first.
-
 Step 5
Again, I recommend pressing the folds (at the lowest setting with a pressing cloth) for a cleaner and neater finish.
-
 Step 6
Once everything is folded like so, wipe off all the marker markings. (If you used a permanent marker, use some rubbing alcohol to get rid of the markings.)
-
 Step 7
Following the manufacturer's instructions, set the larger eyelets through both layers of circle cut-outs (flap and body) on each side of the tote-bag. For mine, I just need to snap the parts together.
-
 Step 8
Next, you will need to mark out the positions for the smaller eyelets.
From the bottom of the tote bag, measure 3/4" up and 1/2" from the edge, make a small mark with the marker. Make 14 more markings, 1" away from each other. The last marking should be about 3/4" away from the top.
Do the same for the other side.
-
 Step 9
Following the manufacturer's instructions, place and set a small eyelet on every marking, going through all the 4 layers.
If your eyelet setter does not come with a hole punch, you can possibly use a regular single hole puncher or an awl and scissors. However, this might take longer as you would most probably not be able to punch/cut out a hole through all four layers at a single time.
-
 Step 10
You now have the base of the vinyl bag to start lacing up and embellishing with!
-
 Step 11
These are the materials that I had decided to use to embellish my bag.
I decided to create a furoshiki look for the handles and do the lacing with some cords which I had hand-dyed a batch to match the color of my fabric.
I also spruced up my bag with a simple macrame decor using some cords, polymer clay geometric beads which I had made and a couple of hexnuts.
(For my second bag, I was very inspired by macrame wall hangings, and decided to incorporate that look into it.)
-
 Step 12
For the furoshiki-style handles, I just made 2 long strips from my fabric.
-
 Step 13
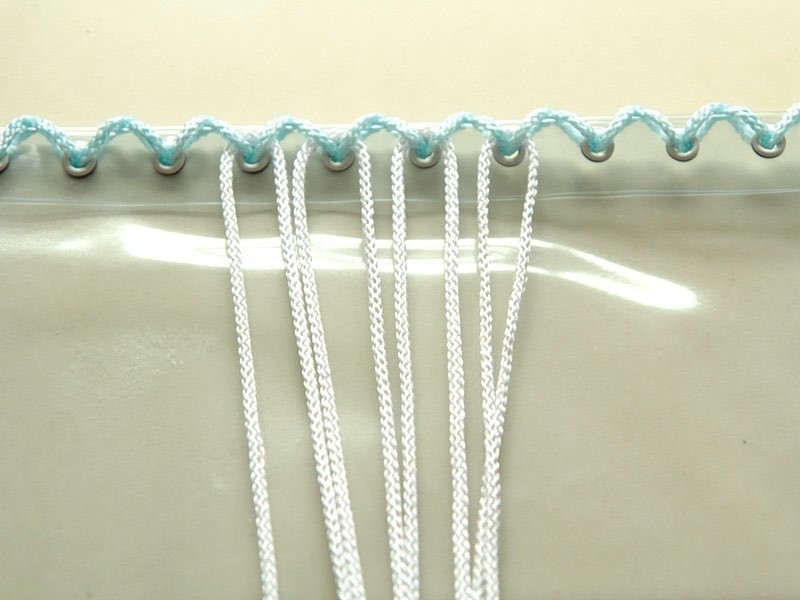
For the lacing on this bag, it was a straight-forward criss-cross pattern by passing the ends of the cord through each eyelet in the opposite direction. I started from the top of the bag.
-
 Step 14
Once I reached the last eyelet, I finished the lacing with a square knot, followed by some glue on the knot. I then trimmed off the tails.
-
 Step 15
For the macrame decor, I planned the design that I wanted. I needed 8 strands of cord from the middle of each side of my bag. To do so, I located the middle 4 eyelets on each side of my bag. I then threaded 4 long strands of cord through the lacing coming out from each eyelet. After which, I started doing my macrame design.
To learn more about macrame stitches, I suggest taking a look at this website: http://www.stonebrashcreative.com/MacrameTutorial.html
-
 Step 16
For my other version, I created a separate macrame panel using a thin brass rod to emulate a wall hanging. I then attached this panel to my bag with more cords.