

About
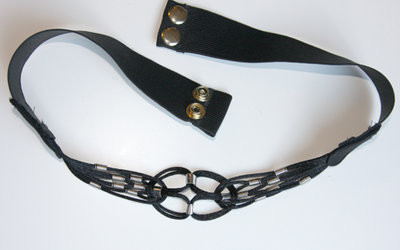
How To Make a Knotted Cord Belt
Summer is almost upon is, and style inspired by the African continent is in! Bold prints, bright colors, beads, and lacing: we're seeing it on the runways and on fashionable girls on the street. Create this knotted belt out of satin cord and add jewelry findings for a fashion-forward Moroccan infusion of style! (The lacing may look tricky, but once you get the hang of that, it's a piece of cake!)
-
 Key West Witch favorited Knotted Cord Belt
07 Aug 22:58
Key West Witch favorited Knotted Cord Belt
07 Aug 22:58
-
 zombieminna favorited Knotted Cord Belt
17 Oct 14:55
zombieminna favorited Knotted Cord Belt
17 Oct 14:55
-
 Question_Savvy favorited Knotted Cord Belt
30 Jul 03:05
Question_Savvy favorited Knotted Cord Belt
30 Jul 03:05
-
 breanna w. favorited Knotted Cord Belt
23 Jun 07:35
breanna w. favorited Knotted Cord Belt
23 Jun 07:35
-
 Kathy Gregson added Knotted Cord Belt to Ksenia Solo
01 Jun 23:28
Kathy Gregson added Knotted Cord Belt to Ksenia Solo
01 Jun 23:28
-
 Corvii added Knotted Cord Belt to To Check Out Later:
28 May 03:38
Corvii added Knotted Cord Belt to To Check Out Later:
28 May 03:38
-
 HylianWriter534 favorited Knotted Cord Belt
27 May 01:18
HylianWriter534 favorited Knotted Cord Belt
27 May 01:18
-
 cristinakilljoyway favorited Knotted Cord Belt
22 Nov 18:38
cristinakilljoyway favorited Knotted Cord Belt
22 Nov 18:38
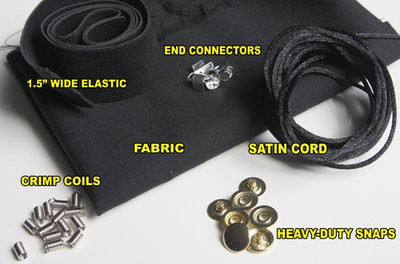
You Will Need
-
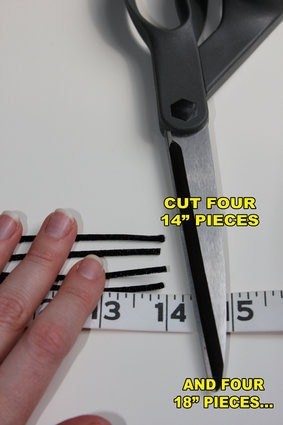
 Step 1
Cut satin cord into the following pieces:
*FOUR pieces 14" long (to make outer loop)
*FOUR pieces 18" long (to make center knot) -
 Step 2
Use pliers to press down the end coils of the crimp ends. Cut off the hangloops of the end connectors.
-
 Step 3
Cut 4 pieces from your fabric, measuring 4.25" wide by 3" high. Start Weaving: Outer Loop First
-
 Step 4
Thread 2 crimp ends onto a 14" piece of cord. Loop it over and tape down the ends.
-
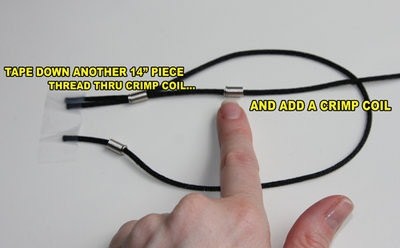
 Step 5
Tape down another 14" piece of cord. Thread it through the crimp coil from the previous piece of cord...and add a crimp coil onto the cord.
-
 Step 6
Add another crimp coil, and loop it around.
-
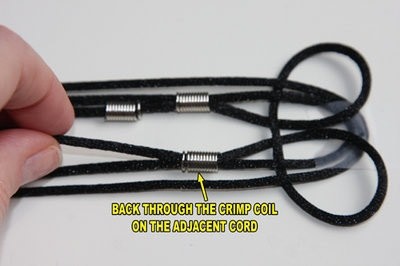
 Step 7
Thread it back through the remaining crimp coil on the first cord. Tape down the end.
-
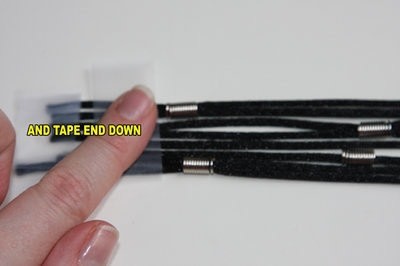
 Step 8
Secure the loop you just made with a piece of tape.
Keep Going: Inner Loop-and-Knot -
 Step 9
Put a crimp coil on one of the 18" cord pieces and tape down the end, placing it in the center and directly below the cord from the previous step.
-
 Step 10
Thread it through the crimp coil on the adjacent cord and loop it around to the right, then back under the first two cords, headcing downwards.
-
 Step 11
Thread it over itself, then downwards under the first two cords again.
-
 Step 12
Loop it to the right, back over the first two cords, and then to the left under itself again.
-
 Step 13
Thread it back through the crimp coil on the adjacent cord.
-
 Step 14
Add another crimp coil, and tack down the end with tape.
-
 Step 15
Time for the final cord! Tape down the end of another 18" piece of cord, and thread it to the right and through thr crimp coil on the adjacent cord.
-
 Step 16
Add a crimp coil, and weave the cord around the center loop in the same manner as the previous piece. (It will be to the outside of the previous cord. Go under the previous piece, to the right, over the taped-down outer loop, up and around, under the outer loop cords, over the center loop cords and down...)
-
 Step 17
Keep following the center loop of the previous cord. (Around and to the right, over the taped-down center loop, back to the left, under itself...) And finally, thread it back into the crimp coil you added to it in Step 15).
-
 Step 18
Then tape its end down.
-
 Step 19
Shift the ends of all your cords together, re-tape, and push the crimp coils further to the right, closer to your center loop-and-knot.
-
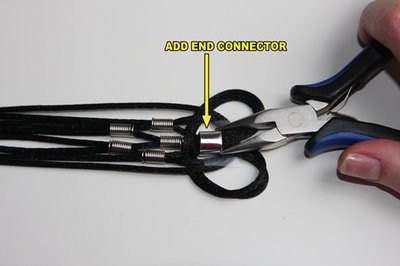
 Step 20
Use pliers to add an end connector to the center cords just to the left of the taped-down loop. Smooth out your cords - and congratulate yourself on a job well done!
Other Side & Finish Lacing -
 Step 21
Make one more group of looped cords in exactly the same manner. (See Steps 4) - 20)]
-
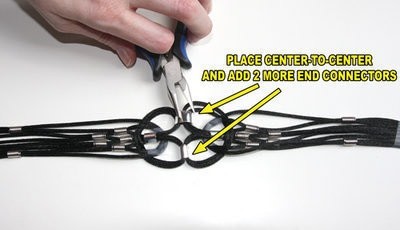
 Step 22
Place the two groups of cord side-by-side, matching up the centers. Add 2 more end connectors to the center loops to connect one side to the other. Now you're finished with all that lacing - which probably feels fabulous!
Make the Belt -
 Step 23
Tape both ends of the cord group on top of the ends of your piece of elastic. Make sure your cords are centered and each side overlaps the elastic the same amount.
-
 Step 24
Fold the elastic under itself, about 3/8", and stitch the cords down on top. (I went over the same area twice with a straight stitch, then zigzagged down it for strength.) Stitch down both sides to the elastic.
-
 Step 25
Trim off the cord ends on the other side of your stitching.
-
 Step 26
Cut your elastic piece in half.
-
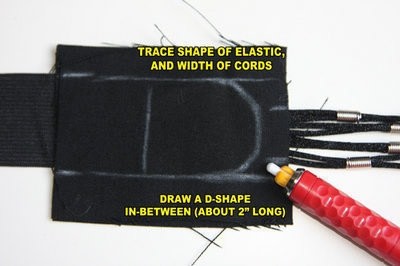
 Step 27
Place 2 fabric pieces right sides together, on top of where you've stitched the cords to the elastic. Trace the width of the elastic, and mark the width of the cords. Then draw a "D" shape between the elastic piece, about 2" long.
-
 Step 28
Do the same for the other 2 pieces of fabric.
-
 Step 29
Sew around the "D" on each pair of fabric pieces, just outside you markings. Leave a small area unsewn on the flat side in order to turn them right-side-out.
-
 Step 30
Trim fabric around the sewing at about 1/4".
-
 Step 31
Notch, then turn the pieces right side out. Tuck the unsewn areas' raw edges to the inside. Press both pieces with an iron to flatten.
-
 Step 32
Place one D piece over where the cords are sewn to the elastic, in order to cover them. (Rounded edge of D needs to cover the cords but hang off the edge of the elastic.) Topstitch around edge of D, about 1/8" from edge, to secure it to the elastic and the cords.
-
 Step 33
Try on belt, and center the knotted cord at your center front. Mark where the elastic meets at your center back. Cut elastic at that measurement.
-
 Step 34
Fold each end of elastic under about 3/4". Sew down about 1/2" from edge.
-
 Step 35
Set two sets of snaps in the elastic ends according to the instructions on your snap-setting pliers or die set.
-
 Step 36
Ta da! This tutorial looks complex, but doing it is incredibly rewarding - and the whole process is a lot faster than it looks! Tip: If you want to make more of a statement piece, use thicker cord or rope, and thread it through large-hole beads instead of jewelry findings. You could even wrap strips of embossing metal around the cords instead of threading them through beads at all!
-
 Step 37
Have fun and go tribal:-)
-
 Step 38
It also doubles as a cute necklace at this size!
-
 Step 39
And check out my blog Chic Steals for more DIY tutorials and belt-making projects! Thanks for reading - and if you have any questions, ask them in the Comments section below and I'll do my best to help you out:-)
xoxox
Carly J. Cais


xoxox
Carly
xoxox
Carly
Carly