
About
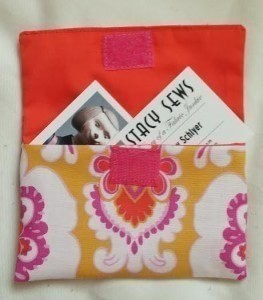
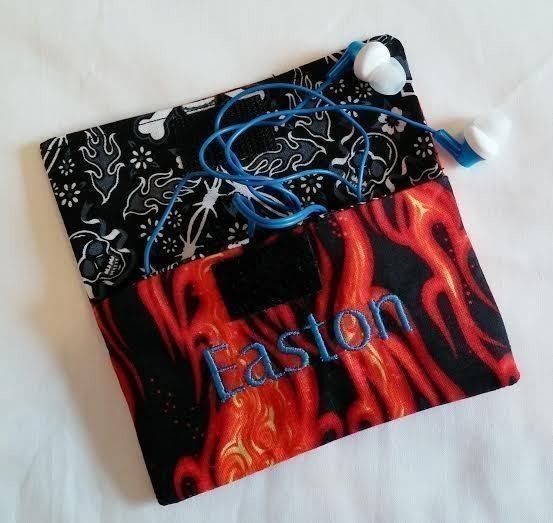
Keep earbuds, small trinkets, cards, and more in this Velcro closure pouch
Earbud pouches are a great way to keep your headphones clean, neat, and tidy. Unfortunately, most are too small for tiny hands…plus let’s face it, most kids aren't going to take the time to neatly coil the cords and zippers are just a potential disaster waiting to happen (I can foresee ‘cutting the wires’ with the zipper if you leave any part of the ear bud hanging out of the pouch because they’re in too big of a hurry to stuff it all inside). This pouch also features a lining that is separate from the exterior pouch for a professional looking finish.
-
 Miss_Fit favorited (Kid Friendly) Earbud Pouch
09 Jul 04:24
Miss_Fit favorited (Kid Friendly) Earbud Pouch
09 Jul 04:24
-
 Elizabeth PotterLover added (Kid Friendly) Earbud Pouch to To Do
24 Nov 22:39
Elizabeth PotterLover added (Kid Friendly) Earbud Pouch to To Do
24 Nov 22:39
-
 danaib1 favorited (Kid Friendly) Earbud Pouch
12 Nov 05:07
danaib1 favorited (Kid Friendly) Earbud Pouch
12 Nov 05:07
-
 Penny F. commented on (Kid Friendly) Earbud Pouch
30 Oct 18:15
Penny F. commented on (Kid Friendly) Earbud Pouch
30 Oct 18:15
-
Penny F. added (Kid Friendly) Earbud Pouch to SEWING
30 Oct 18:14
-
Penny F. favorited (Kid Friendly) Earbud Pouch
30 Oct 18:14
-
 sian d. added (Kid Friendly) Earbud Pouch to make me
18 Oct 06:41
sian d. added (Kid Friendly) Earbud Pouch to make me
18 Oct 06:41
-
 Stacy S. published her project (Kid Friendly) Earbud Pouch
19 Aug 19:25
Stacy S. published her project (Kid Friendly) Earbud Pouch
19 Aug 19:25
-
Step 1
From exterior fabric
Cut 1, 5 1/2 x 6″ rectangle
Cut 1, 5 1/2 x 3 1/2″ rectangleFrom lining fabric
Cut 1, 5 1/2 x 6″ rectangle
Cut 1, 5 1/2 x 3 1/2″ rectangle -
Step 2
(all seams are 1/4")
With right sides together, sew the top edge of the 5 1/2 x 3 1/2″ exterior and lining rectangles together (if you have a one-way design, name, or design, be sure that your material is facing the correct way!). This will be your front pouch.
-
Step 3
Turn right side out and press finished edge (topstitch if desired).
-
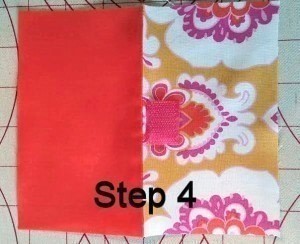
 Step 4
Open up front pouch, separating the exterior fabric from the lining. Center Velcro across the top of the exterior pouch piece, close to finished edge, and sew in place.
-
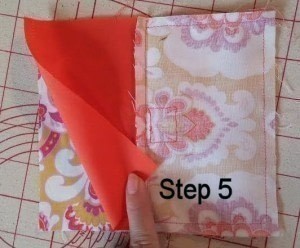
 Step 5
Keeping pouch sections open and with right sides together, place exterior pouch section on top of exterior flap piece (the 5 1/2 x 6″ rectangle). You will find that the lining section will hang over the flap piece just slightly. Sew from the top of the pouch seam, down the side, across the bottom, and back up the side (stopping at top seam).
-
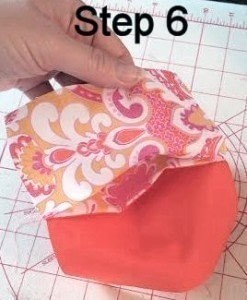
 Step 6
Repeat step #5 with the lining. Your end result will be the front pouch sandwiched between the exterior and lining flaps (which remain unsewn at the top).
-
 Step 7
Sew second piece of Velcro to the right side of lining. Velcro should be centered, 3/8″ down from top, raw edge of lining.
-
Step 8
With right sides together, place lining and exterior unsewn flap edges together and sew, leaving a 2″ opening for turning on top edge.
-
Step 9
Clip the corners of all pieces and turn right side out through opening on top edge. Poke corners out with a chopstick or point turner if necessary.
-
 Step 10
Stuff lining into pouch and press. Slipstitch opening closed or topstitch top edge with sewing machine.