


About
Make one as a gift or for your self! :D
I made one of these for my sister's christmas gift 2 years ago so i updated it a bit and decided to make my bestfriend one as her xmas gift this past christmas (she loved it ^_^)
*AHH! i checked my email today and saw alot of stuff from cutout+keep and i was like 'whaa?!' so i logged onto the site and i saw i was FEATUREDDD! >:D YESS! ahaha thanks for all the favs & comments erryone. ;)*
-
 Jen S. added Kawaii Tampon/Pad Pouch to stuff for me
18 Jul 19:28
Jen S. added Kawaii Tampon/Pad Pouch to stuff for me
18 Jul 19:28
-
 Kimya J. favorited Kawaii Tampon/Pad Pouch
30 May 01:25
Kimya J. favorited Kawaii Tampon/Pad Pouch
30 May 01:25
-
 FILOFAXNfool favorited Kawaii Tampon/Pad Pouch
09 Jul 03:48
FILOFAXNfool favorited Kawaii Tampon/Pad Pouch
09 Jul 03:48
-
 Roughwaters44 favorited Kawaii Tampon/Pad Pouch
08 Jul 04:19
Roughwaters44 favorited Kawaii Tampon/Pad Pouch
08 Jul 04:19
-
 ThatLittleWhiteRabbit favorited Kawaii Tampon/Pad Pouch
14 Apr 19:50
ThatLittleWhiteRabbit favorited Kawaii Tampon/Pad Pouch
14 Apr 19:50
-
 Cooki favorited Kawaii Tampon/Pad Pouch
23 Dec 03:27
Cooki favorited Kawaii Tampon/Pad Pouch
23 Dec 03:27
-
 Amanda Stewart favorited Kawaii Tampon/Pad Pouch
17 Dec 08:41
Amanda Stewart favorited Kawaii Tampon/Pad Pouch
17 Dec 08:41
-
Annie J. added Kawaii Tampon/Pad Pouch to Bathroom
06 Dec 03:05
-
Annie J. favorited Kawaii Tampon/Pad Pouch
06 Dec 03:05
-
 kiddo added Kawaii Tampon/Pad Pouch to swap ideas
27 Nov 09:19
kiddo added Kawaii Tampon/Pad Pouch to swap ideas
27 Nov 09:19
-
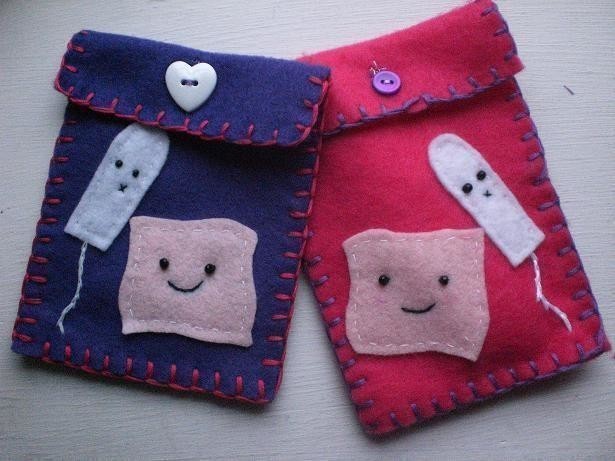
 Step 1
Draw out a template of how big you want your pouch to be. making the back piece the same width as the front one but a little longer then it(so it can close with a flap) Then trace it onto the felt and cut it out. draw a little pad and a tampon and do the same.
*I plan on adding a template that you can print out later.*
-
Step 2
I got a little carried away and skipped a step on taking a picture to show you (sorry!) but next you want to figure out how you want the pad & tampon to be placed on the pouch. Once you've done that grab your needle and white thread and sew the pad and tampon on the front piece of the pouch using a running stitch.
-
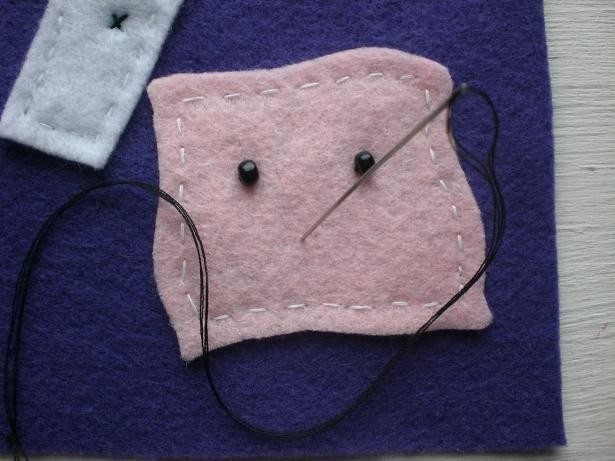
 Step 3
Now get out your black seed beeds and sew the 'eyes' onto both the pad & tampon.
After you do that take your black embroidery floss and sew the mouths for the tampon & pad (small backstitches)
-
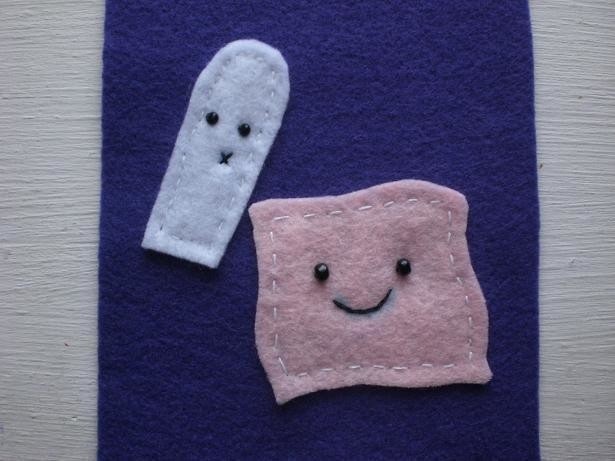
 Step 4
Awh, now you got some cute lil guys ;D lol
(ignore the fact that my pad got blue on his smile :/ i used a 'DISSPEARING' ink pen -__-)
-
 Step 5
Get yo white embroidery floss and sew yo self a little white tampon string lol ;D (Backstitch)
-
 Step 6
Now go find your back piece and a cute button. Lay the 2 pouch pieces together and fold the flap over and figure out where you wanna put yo button ;D make a little mark on the front piece and the back piece.
-
 Step 7
Once you've figured out how big you need to make the button hole grab yo scissors and cut yo' self a hole on the flap of the back piece. hehe ^_^
-
 Step 8
(i should of done this ahead of time but i forgot, sew the button on the front of the pouch)
After you've done that you can start sewing the pouch together using pink embroidery floss and doing a blanket stitch.
-
 Step 9
asdfghjkl;
You're almost done! :D :D Get excited! lol
Last step, take some thread and sew around your buttonhole using a blanket stitch so the hole doesnt get frayed and stretched out. ;)
-
 Step 10
*OPTIONAL*
Find a matte pink eyeshadow (no shimmer or glitter) and using a q-tip pick up some shadow and rub it under the eyes of the tampon & pad to add cute little pink cheeks. ^-^
AH! i hope you find my tutorial easy to understand, i confused myself typing it up because i accidentally deleted like 2 pictures. :/


Versions

Posted by
Cptn Awesomesausage

Posted by
Jelly Peanut Butter

Posted by
Alygator


No need to be embarrassed, everyone knows what it is and has to deal with it, its part of nature!