


About
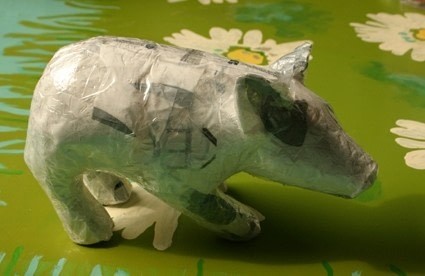
plastic fuesed recycled bags around a model
I must clean a lot of my materials-S But the reason isn't so bad. i will move next year to a brand new appartment.;-D
so i tought i must do something with my plastic bags which i had saved for many years to do some cool project with.
i saw on a site , don't know from whom? some plastic doll made of plastic bags, she didn't fuesed them, i read, so i thought that makes them much stronger.
so i thought that 's great to experiment and learn how you can fuesed the plastic around the mold allready.
so i had tryed it out and came with this tute, hope you will like it too;-D
hope you all like it to try this out too.
some importend notes:
- little flat-irons will be heath too, so watch out for burning your fingers and workingplace.
-ooooh , don't do this in a not ventilated room, i did this outside.
-always put between the plastic and the flat iron a piece of baking paper
not of all the steps i have made pictures but with the directions i will given you , it must work too.
i've you don't understand it or have questions, please feel free to ask them;-D
much crafting fun with this adventure;-D
Tags
-
 Sarah Sylvia S. favorited Just A Fuesed Plastic Bag Plushie Without Sewing
24 Jul 04:35
Sarah Sylvia S. favorited Just A Fuesed Plastic Bag Plushie Without Sewing
24 Jul 04:35
-
 samallamaa favorited Just A Fuesed Plastic Bag Plushie Without Sewing
08 Dec 08:39
samallamaa favorited Just A Fuesed Plastic Bag Plushie Without Sewing
08 Dec 08:39
-
 Caitie Marie added Just A Fuesed Plastic Bag Plushie Without Sewing to Dolls/Plushies
03 Apr 20:34
Caitie Marie added Just A Fuesed Plastic Bag Plushie Without Sewing to Dolls/Plushies
03 Apr 20:34
-
 Vanessa B. added Just A Fuesed Plastic Bag Plushie Without Sewing to Bag, Purses, and Scarfs Oh my!
02 Feb 14:54
Vanessa B. added Just A Fuesed Plastic Bag Plushie Without Sewing to Bag, Purses, and Scarfs Oh my!
02 Feb 14:54
-
Tessie B. favorited Just A Fuesed Plastic Bag Plushie Without Sewing
12 Sep 19:20
-
 Step 1
all the bags must be clean, so i've not wash them in a little handwash with soap and water and let them dry.!!!
this is importend because with the fuesing the bags will be smelly of dirt too.
it will be smelly anyway.!
cut the bags in strips. -
Step 2
wrap the mold in tin foil ,i've you don't want to damaged the mold. I had this piggy it was broken so i didn't care toooo much to damage it a little more.
but i wasn't sure how the fuesed plastic will react on the surface of the mold.
Stroke the tin foild smooth on the surface so you don't see any more bumbings, or only tiny ones.;-D -
Step 3
take a piece of baking paper and cut of some little piece of it, not all of them, only some, so you can use the pieces that are more handy to use on some parts of the proces.
-
 Step 4
cut of little pieces of the strips of plastic.
You can better round of the ends that works better in the fuesing process;-Det on your tiny flat-iron.
Mine was standing on the middle high position for fuesing the plastic pieces. But it's depending of which kind of plastic bags you will use.
the normal crogery bags that are more thinner, then you must set the stand a little bit lower.
but for the more stronger ones of the plastic you need more heath. -
 Step 5
the fuesing.
take first some long strips to wrap them around the mold for just a start.
take a piece of paper to cover the plastic and start to iron the plastic, it take a little while but don't stop with moving the flat iron, otherwise you will become holes of melting plastic.
i think you don't like that, when this will happen,
you can set you flat -iron a little bit lower and add a patch of plastic over those holes.;-D -
 Step 6
On the picture you see that the fuesed piece are having wrinkels that's the sign that the plastic is fuesed together, you can see too that some of the edges of the stroke didn't fuesed .
Later on i thought i must cut them in round shapes , and that is working much better.After one layer add 2 layer above it, so you become a strong material.
You can use the same strokes or and i prefer that even more, use a large piece of plastic to fuesing it on the fabric you are making, on some points you must make cuts in the plastic or cut some parts away , otherwise you will got too much thickness wrinkels on some places. -
Step 7
when the whole mold or statue is covered .
you must look were it will be a smart place to cut the material in the two.
On that part you must make the material stronger with some extra layer of plastic fuesing.
cut the fuesing fabric careful off your mold, and with connecting those cutting-sets again with some clair tape of yours. -
 Step 8
fill the pieces with some plastic airwrapping.
and make the part with the tape together,, and add some more wrapping plastic for your plushie.
and close the the cutting seam with some more clear tape.
(i had wraped the whole plushie which i ironed, so that's why he became so shiny;-D)note, you can iron this tape too , or add some pieces of plastic that you will fuesed to the plushie by ironing.;-D
and then your recycled plushie is ready .you can use on the top layer the design of your bags, or the text that is on the bags.
i did t his with this plushie on his back i used the note that he can be recycled.LOL
and i add some coloured patches on some of his body, like i did with his eyes and eyers be creative and have fun..;-Dhope you like it and have fun with this recyling project , my friends loved the plushie so i think it's a perfect gift too;-D.


Tthat was a good idea because when i'm hold him out of my bagsack he was broken. (They had wrapped him badly in my bagsack when i asked for help-S) so i wasn't tooo sorry for the broken piggy after all.
It's a kind of polyester, very hard and stands the heat of the ironing.
i have broken him a lot of times so i wasn't worry of damaging him more.;-D
but you can use more things just try out that it can stand the heat of the ironing for the melting of plastic.
you can use as well a plant trough or a stone statue but fist test of it's good .
and when you cut the plastic of the mold be careful for damagings or use as a layer in between tin foil. But i have allready explained that in the how to.
I think you can use a doll as well but try it out on an place where you can 't see it when it's a dear one.
I hope i have answered all your questions;-D
Hope you will show your version , be creative and have fun;-D
it's really a tiny flat iron, it's from the brand clover, there is now a new model that has more tools to use at the top.
It's expensive but i use mine always for small things to ironing.
it's more look alike upon a soldering iron, but this one is more sophisticcated.LOL
because you can set the hight of the temperture on it.
hope this is a helpfull answer?
just let me know if not.;-D
the site where you can find it is www.clover.com
or try other shops of crafting suplies in your own country.
thank you all for your interrest of this project and the faves and comment, have fun like i had;-D