


About
fuesed recycled plastig bags on a mold and then making a baggy of it.
i must clean a lot of my materials-S But the reason isn't so bad. i will move next year to a brand new appartment.;-D
so i tought i must do something with my plastic bags which i had saved for many years to do some cool project with.
i saw on a site , don't know from whom? some plastic doll made of plastic bags, she didn't fuesed the plasic only glueing the pastac by using clear tape.When i saw tthe doll i thought why not fuesing him and make the dolls or plushie a lot stronger.!
You know i like to make things durerable.LOL
After all i thought this is a great project to share with you all, so you can learn how you can fuesing plastic bags around a mold as well;-D
hope you all like it to try this out too.
Importend notes!!!!:
-little flat-irons will be heath too, so watch out for burning your fingers and workingplace.
-ooooh , don't do this in a not ventilated room, i did this outside.
-don’t use to much differend kind of plastic bags (they have all other melting points by heathing.them)
-and always ironing the the right side of the plastic on the right side, because the fuesing will be more quicker and easier.
-when you have done one layer with those strips you can use better the whole bag piece by ironing that in shape on your mold.
-always use between the plastic and your flat-iron a piece of baking paper!!!
not of all the steps i have made pictures but with the directions i will given you , it must work too.
i've you don't understand it or have questions, please feel free to ask them;-D
much crafting fun with this adventure;-D
-
 artpanda18 favorited I'm Just A Recycled Plastic Baggy; D
06 Mar 02:05
artpanda18 favorited I'm Just A Recycled Plastic Baggy; D
06 Mar 02:05
-
 Hester A. favorited I'm Just A Recycled Plastic Baggy; D
30 Sep 18:15
Hester A. favorited I'm Just A Recycled Plastic Baggy; D
30 Sep 18:15
-
 Millie H. added I'm Just A Recycled Plastic Baggy; D to cool ideas
26 Mar 00:31
Millie H. added I'm Just A Recycled Plastic Baggy; D to cool ideas
26 Mar 00:31
-
 Vanessa B. added I'm Just A Recycled Plastic Baggy; D to Bag, Purses, and Scarfs Oh my!
02 Feb 14:54
Vanessa B. added I'm Just A Recycled Plastic Baggy; D to Bag, Purses, and Scarfs Oh my!
02 Feb 14:54
-
 Lauren favorited I'm Just A Recycled Plastic Baggy; D
18 Dec 15:07
Lauren favorited I'm Just A Recycled Plastic Baggy; D
18 Dec 15:07
-
 Kim T. favorited I'm Just A Recycled Plastic Baggy; D
27 Nov 05:48
Kim T. favorited I'm Just A Recycled Plastic Baggy; D
27 Nov 05:48
-
 MissDragon71 favorited I'm Just A Recycled Plastic Baggy; D
20 Jun 17:04
MissDragon71 favorited I'm Just A Recycled Plastic Baggy; D
20 Jun 17:04
-
 Step 1
all the bags must be clean, so i've not wash them in a little handwash with soap and water and let them dry.!!!
this is importend because with the fuesing the bags will be smelly of dirt too.
it will be smelly anyway.!
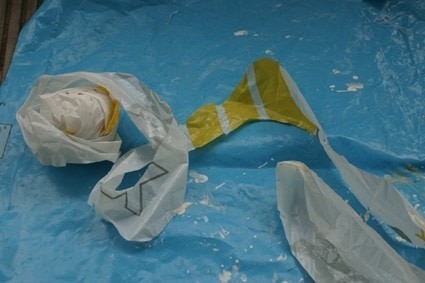
cut the bags in strips. and of course your mold too.;-D -
Step 2
wrap the mold in tin,i've you don't want to damaged the mold, I had this piggy it was broken so i didn't care toooo much to damage it a little more.
but i wasn't sure how the fuesed plastic will react on the surface of the mold.
Stroke the tin foild smooth on the surface so you don't see any more bumbings, or only tiny ones.;-D -
Step 3
take a piece of baking paper and cut of some little piece of it, not all of them, only some, so you can use the pieces that are more handy to use on some parts of the proces.
-
Step 4
cut of little pieces of the strips of plastic.
-
 Step 5
set on your tiny flat-iron.
Mine was standing on the middle high position for fuesing the plastic pieces. But it's depending of which kind of plastic bags you will use.
the normal crogery bags that are more thinner, then you must set the stand on low.
but for the more stronger ones of the plastic you need more heath. -
 Step 6
the fuesing.
take first some long strips to wrap them around the mold for just a start.
take a piece of paper to cover the plastic and start to iron the plastic, it take a little while but don't stop with moving the flat iron, otherwise you will become holes of melting plastic.
i think you don't like that, when this will happen,
you can set you flat -iron a little bit lower and add a patch of plastic over the hole.;-D -
 Step 7
cover the whole mold with those piece of plastic and add two new layers on it , so it will become a stong bag at the end.;-D
then endly the fun part.!!!;-D
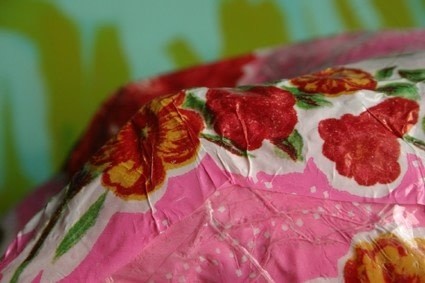
Using the beautiful and pretty bags for the outside:_D
i have cut the bags careful open to be more economic using them;-D
and at first look how you can wrap it on the best point to get starting with the fuesing!
by my model the smart point was by his mouth.NOTES:
on some points you will become more wrinkles then you must make some cuts with your scissor or when you must fuesing to much thick wrinkles together cut some parts away to reduce the thickness.
And play with the design of your bags when you are fuesing the top layer, i did this with his head and ears.;-D
and on the middle of his bag by using the brand of the store;-D It's a joke, i don't like brands and never wanted to advertise for shops but this is more a joke because it's no more the same bag and no more the brand of a shop , but more like a name for the piggy;-D
be creative and play with your design;-D Have fun!!!Importend:
the parts you must cut to remove the fuesing fabric of your mold need some extra fuesing layers. -
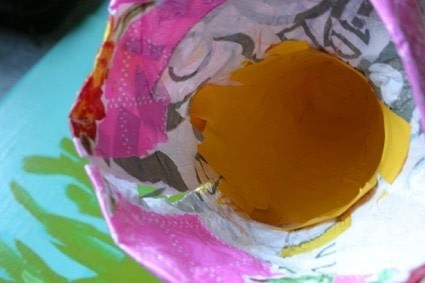
Step 8
cut the fuesed fabric of the mold, be careful do this with a sharp knife.
-
 Step 9
make the cutes closed with clear tape
-
 Step 10
search for a piece of plastic with the same design on it (like a patch) and fuesing this together by ironing this;-D
don't forget to use you paper in between them;-D -
Step 11
glue clear tape on the whole body outside to make it stronger and shiny;-D And fuesing this by ironing .
-
 Step 12
For making the inside stonger you must use the duct tape. i have them inside the legs and the ears covered with duct tape as well;-D
-
 Step 13
fill the ears and the legs with thin plastic or wrappings of the mail. or air bubble plastic pieces ;-D
-
Step 14
close those filling up part by using some duct tapes.
now you have two parts of your mold that are strong. -
 Step 15
the interfacing:
look careful how the shape is of your bag, and measuring the length and the width.
cut those two shapes out of the fabric. I don't give you measurings because you all have other molds;-D
when you use the same satin thin fabric interfacing like i did, it is a smart idea to zigzaged all the part before you will start with them;-D
I forgot that, and i had a real struggle with all the rafflings.LOL
Don't act like me , be smart , mayby a little bit extra work but you have less problems with your mood.LOLAnd cut a little piece too for the small pocket inside the pocket with a zipper.
i had this old used one and becauce it is inside the bag, and because the bag is for myself i thought i don't care i've he hasn't the same colour;-D -
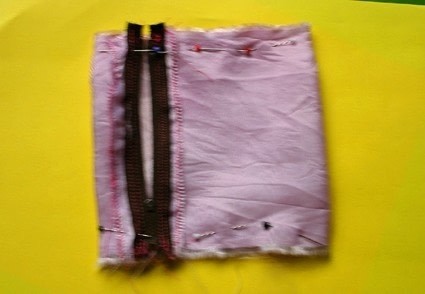
 Step 16
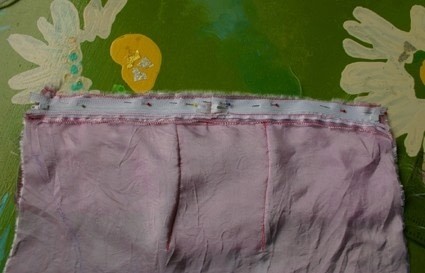
sew the zipper with the right side on the right side on one end of the bag. Like the picture showing you.;-D and sew the zipper and seam down together.
-
 Step 17
sew the other end on the zipper and turn it inside out, like this and sewing this side the seam and the zipper down together as well.
-
 Step 18
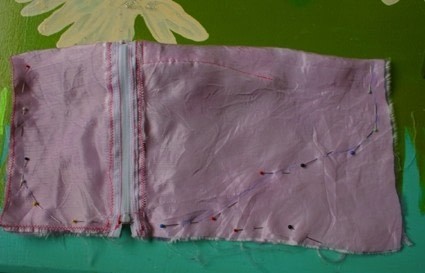
turn this shape again inside and form a bag shape with some pins , like the picture.
-
 Step 19
sew both sides and zigzag them;-D OOOOH don't forget to let the zipper half open before you will sew the pocket , other wise you can't turn it over.LOL
-
 Step 20
turn the inside out of your pocket
-
Step 21
pin in the middle of the top just 1 inch of the top (3 cm ) of one of the sides of your bag interface part your pocket.
-
 Step 22
sew this , (i only sew 3 sides of the pocket) togehter , i thought that will be enough for this pocket;-D
-
 Step 23
sew both ending of the two zipper together.
DON'T SEW THE RIGHT SIDE ON THE RIGHT SIDE, BUT !!!!!! THE LEFT SIDE ON THE LEFT SIDE!!!
On the pict you see it wrong but you see what i try to tell you;-D -
 Step 24
sew the first side of the two zipper on the top of the side of the interface with the pocket.
You must sew the zipper on the left side on the right side of the interfacing;-D
DON'T DO IT LIKE I DID. ( when i was finished i noticed that i couldn't use the zippers because they were inside of the bag-S!!!!
I've you following the text you will end perfect.!!;-D
and sew the zipper and seam down too. You can sew on the top of the zipper a patch on the middle of the seam of the zippers to give your middle a more neat finishing look;-D I did this too late because of my problems.;-D -
 Step 25
pin the other interlacing part on the other side of the zippers. and sew the patch direcly with it along. The zipper is on your project on the left side down to the right side of the interfacing. (so you must think the opposite of the picture , then you're right0.LOL
-
 Step 26
Fold the now one piece of the interface in two.
and with the pins you must make the shape of the interface finishing. -
 Step 27
By the sewing on this line, be sure that you have a open part of one of the zippers for the turing the inside out. and zig zag the whole piece. and trim the outside in shape, then turining the inside out.
-
 Step 28
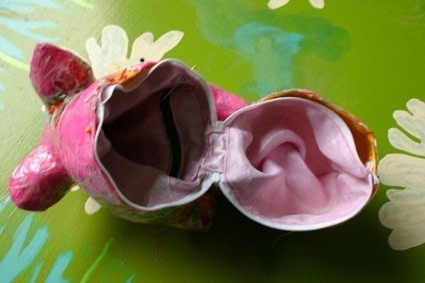
make both zipper with open.
now you must look to the middle of both part and give them both a mark do this too with your piggy parts.
pin on the middle the interfacing in the piggy. so that both parts are correct fitting to the shape of the pig.
by mine i had to be sure that his legs were correctly standing and the bag too. -
 Step 29
now... you must sew by hand with the stich the interface in the piggy , use the sewing line of the zipper inside as a nice line.
i used the backstich on the outside. -
 Step 30
on the inside you will see you will have a stem stich.
i used for the sewing on hand for this, a double string of sewing yarn and a normal sewing needle with a sharp pin. -
 Step 31
Making the sling:
i had a very large plastic used clean bag, (with this measurings: 57 cm x 45 cm or 22inch x 17.5 inches.)
and remove the extra layers of the handles.
cut the bag in the the long outsides , so you become a very large retangle.
Wolfje was thinking and checking out which toy i have made for her, she is steeling a lot of my materials and knitting part still the little thief .LOL -
 Step 32
old the long retangle in two. and with a normal iron board and flat iron (heating position is the lowest one!!!)
and with sandwitching in baking paper fuesing this part.
This step must you do twice, so you become a 3 times folded and fuesed smaller sling looking piece. -
 Step 33
trim the sling on the measuring of 3 cm or 1 inch.
-
 Step 34
now fuesing some plastic of your good nice pretty bags on this on both sides.
-
 Step 35
fold this with pins down to 2 cm or all most 1inch.
-
 Step 36
sew the sling 3 times, one in the middle and on boths sides.and you're ready.;-D
-
 Step 37
sew the sling ends with two buttons on both parts of your piggy.I used the buttons because though the fabric is strong it's still plastic so it's more secure. On on the insde and the other on the oudside to connect the sling.
and sew the sling with some stiches too. Note i made a little joke with the sling to make him on the backside a little longer so my piggy had again a tail.LOL -
 Step 38
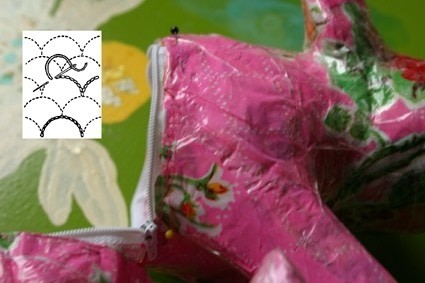
you're almost finished, i liked it to make my plastic piggy bag a more kitschy, so i glued some fake rhinestones on the pretty buttons, that i have got of Sheila;-D
and some heart shapes on the tongue of the zipper.
And he was ready to be used like a real handbag.;-D
Hope you like this and like to try this out too, when you want to ask me some questions, please feel free to ask them;-D
hope it will helps you to make and finding your own molds to fuesing them with your old plastic fabric.
and use your imagination and creativity to make your bag of it;-D
but most importend having fun!!!
no done


you see a better one, but when i bought mine this was all they had. and i was very pleased with it.
you can allways find a store where you can buy it too in your own neighbourhood by using google.
At that time i didn't know that, but now i'm much better in internet and surfing.LOL tooo good-SLOL
thank you all for the favourings and the nice sweet lovely comments;-D
How rad.
It looks so great and cute.I see you have been
very busy..smile..i need a little iron like that, hope to find one so I can try this , its really very interesting..huggs xoxoxo