![[using stained paint sticks] . Free tutorial with pictures on how to make a bookcase / cubby in under 60 minutes by decorating with paint, wood stain, and liquid nails. Inspired by ikea. How To posted by Amy_Krist. in the Home + DIY section Difficulty: Easy. Cost: Absolutley free. Steps: 10](https://images.coplusk.net/project_images/169858/image/2014-03-12-190908-ikea_20hack.jpg)
![[using stained paint sticks] . Free tutorial with pictures on how to make a bookcase / cubby in under 60 minutes by decorating with paint, wood stain, and liquid nails. Inspired by ikea. How To posted by Amy_Krist. in the Home + DIY section Difficulty: Easy. Cost: Absolutley free. Steps: 10](https://images.coplusk.net/project_images/169859/image/2014-03-12-191043-straight-on.jpg)

About
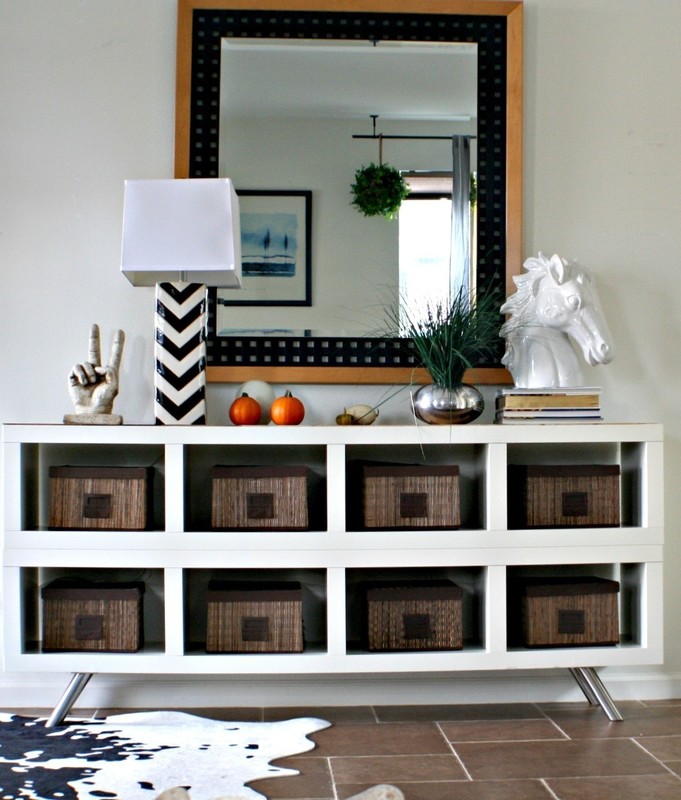
[using stained paint sticks]
Who doesn't have at least 15 IKEA pieces in their home? While our kiddos are still pretty young I cannot justify buying "real grown up" expensive furniture [nor is it me]. So I wanted to funky-ify our current entry way piece [two Expedits secured together] and used a bunch of stained paint sticks!
Tags
-
 Ruthie T. added Ikea Hack to Ellen & Portia's Master Bedroom
24 Aug 02:55
Ruthie T. added Ikea Hack to Ellen & Portia's Master Bedroom
24 Aug 02:55
-
 Ama R. added Ikea Hack to Jennifer Aniston's Room
25 Aug 22:56
Ama R. added Ikea Hack to Jennifer Aniston's Room
25 Aug 22:56
-
Pandora v. favorited Ikea Hack
18 Apr 08:42
-
 Smile-Lei-girl favorited Ikea Hack
29 Mar 23:37
Smile-Lei-girl favorited Ikea Hack
29 Mar 23:37
-
 Sarah B. added Ikea Hack to Housewares
28 Mar 03:15
Sarah B. added Ikea Hack to Housewares
28 Mar 03:15
-
 Zombie Babe favorited Ikea Hack
26 Mar 00:23
Zombie Babe favorited Ikea Hack
26 Mar 00:23
-
 Amy_Krist published her project Ikea Hack
12 Mar 19:08
Amy_Krist published her project Ikea Hack
12 Mar 19:08
-
Step 1
First you want to wipe down the top of your IKEA piece with soap and water. Let it dry (apx. 30 mins)
-
 Step 2
Next you want to start sawing off the "handles" of the paint sticks
-
 Step 3
You should have a pile of these after you're done
-
 Step 4
Since I used 4 different stains, I made 4 piles and started to stain (be sure to wear those rubber gloves!)
They will dry pretty quick (I was impatient and started gluing them on within an hour after staining)
Just follow the drying time on the back of the can (if you're the patient-type) -
 Step 5
Time to add the glue...grab one of the millions of paint brushes on hand in your kids' play room and brush on a line of Liquid Nails on the back of each stick.
-
 Step 6
Start in a corner of the shelf and place one stick at a time down the "front" edge. This will give you a straight edge to work from. Be sure to alternate your colors for a "random" look. When you're done with one row, move to the next row and be sure to stagger your paint sticks (or however looks best to you).
-
Step 7
Once you're satisfied with the look and all the paint sticks are straight and butting up next to each other, time to place some heavy objects on them while they dry (at least overnight). I used a bunch of cook books. You don't need too much pressure on these sticks, as you don't want to break them, just enough weight to be sure they stick to your piece.
-
Step 8
You will have some gaps on the ends where your paint sticks didn't quite make the full length of your shelf. That is why I picked up some extra paint sticks so I could use for the open gaps. Just measure the length of the open space on your piece, cut your paint stick to length and repeat steps 4-7.
-
 Step 9
Once the glue has set now it's time to seal it with a nice poly. I like using a clear satin finish, water-base poly. The sheen is noticeable, but it's not too glossy.
-
 Step 10
Let dry completely and enjoy all the "oohs" and "aahhs" from everybody!