

About
A quirky carrier for your monthly necessities!
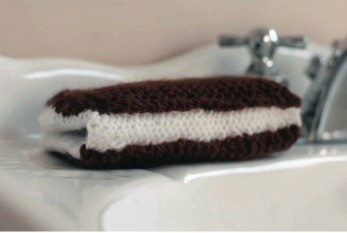
This ice cream sandwich cleverly hides your tampons, making it easier to open your purse without fear of embarrassment.
This is an easy project for any newbie knitter. Basic garter and stockinette stitch construction on larger needles make this project fun to whip up! Fair warning, this yummy project might just increase those ice cream cravings!
SPECIFICATIONS
FINISHED MEASUREMENTS
Width: 3¾” (closed)
Length: 5¾”
GAUGE
16 sts and 22 rows = 4" inches in St st
16 sts and 32 rows = 4" in garter st
-
 Jessie D. added Ice Cream Sandwich Tampon Holder to To Do Yarn Crafts
19 Nov 05:10
Jessie D. added Ice Cream Sandwich Tampon Holder to To Do Yarn Crafts
19 Nov 05:10
-
Jenny S. favorited Ice Cream Sandwich Tampon Holder
09 Jan 00:16
-
Jenny S. commented on Ice Cream Sandwich Tampon Holder
08 Jan 13:55
-
 Kelsey B. favorited Ice Cream Sandwich Tampon Holder
13 Sep 22:37
Kelsey B. favorited Ice Cream Sandwich Tampon Holder
13 Sep 22:37
-
Step 1
FIRST COOKIE
With MC, CO 14 sts.
Work in garter st for 6".
BO.
Weave in ends. -
Step 2
SECOND COOKIE
With MC, CO 14 sts.
Work in garter stitch for 3".
Next row (buttonhole row): K1, BO 2 sts, knit to end.
Next row: K11, use backward loop method to CO 2 sts over gap, k1.
Work even until cookie measures 6" from CO edge.
BO.
Weave in ends. -
Step 3
ICE CREAM LINING
With CC, pick up and knit 14 sts from the BO row of the first cookie. Do not turn. Use backward loop method to CO 3 sts, then pick up and knit 14 sts from the BO row of the
second cookie—31 sts. As you pick up stitches from the second cookie, make sure you have the buttonhole on the left, outside edge (see schematic).
Work in St st, beg with a purl (WS) row, until lining measures 6".
BO. -
 Step 4
FINISHING
With CC, seam the bottom edge of the ice cream lining to the bottom edge of the cookies. With CC, stitch the cookies to the lining along the inner edges only, to create pockets. There will be approximately ½" of lining visible between the cookies.Attach the button to the outer edge of the first cookie, opposite the buttonhole. Be sure to attach the button to the WS of the cookie—that is the side of the cookie that will be on the inside of the case, once closed.
Weave in ends.
Fold the whole thing in half, fill it up, and button it
to secure. Tasty.
You can get creative with your color
combinations: dark brown cookie with
a green liner for mint chocolate, or
light brown cookie with a pink liner for
strawberry.


if only I would be courageous enough to use tampons n___n'