


About
Adult-sized Professional Hula Hoop Tutorial
In this tutorial, we'll be going over the basics of creating your own custom adult-sized hula hoop, used in hoop dance for recreation or exercise.
Did you know that an hour of hoop dance will burn 600+ calories an hour? Plus, they're fun and exciting, and you know you already want one!
Let's get right to it, shall we?
Materials:
Poly tubing, from 3/4"-1" outside diameter, between 100 psi and 160 psi
Internal barbed tubing connector for the size of tubing you're using
Utility knife
Sand paper, 200 grit
Hair dryer
Gaffer's tape in your color selection
Electrical, metallic, or any other thin decorative tape in contrasting colors to gaffer's tape
Optional: Helper Cat
-
 Sandy J. favorited Hula Hoop
20 Sep 07:46
Sandy J. favorited Hula Hoop
20 Sep 07:46
-
 Allen P. favorited Hula Hoop
24 Jun 10:09
Allen P. favorited Hula Hoop
24 Jun 10:09
-
 Dyson S. favorited Hula Hoop
26 May 17:31
Dyson S. favorited Hula Hoop
26 May 17:31
-
 darryl c. favorited Hula Hoop
12 May 07:27
darryl c. favorited Hula Hoop
12 May 07:27
-
 miki j. favorited Hula Hoop
30 Mar 15:59
miki j. favorited Hula Hoop
30 Mar 15:59
-
 cha favorited Hula Hoop
14 Mar 06:23
cha favorited Hula Hoop
14 Mar 06:23
-
 emily s. favorited Hula Hoop
25 Feb 10:45
emily s. favorited Hula Hoop
25 Feb 10:45
-
 mica f. favorited Hula Hoop
20 Feb 07:58
mica f. favorited Hula Hoop
20 Feb 07:58
-
 frankie e. favorited Hula Hoop
13 Feb 06:58
frankie e. favorited Hula Hoop
13 Feb 06:58
-
 jin k. favorited Hula Hoop
19 Jan 16:45
jin k. favorited Hula Hoop
19 Jan 16:45
-
 Step 1
First, let's talk a little about tubing. You have a lot of options in this department once you get the idea of what works, but you're going to want to start off with poly irrigation tubing until you have the hang of it. Irrigation tubing is slightly more rigid than drip irrigation tubing, be sure to not mix up these two.
The bigger the diameter of the tubing and the higher the pressure per square inch (psi) rating, the heavier the final hoop will be. Be aware, a heavier tube is great for exercising, but you may see a little bruising on your hands and legs as you adjust to it.
In this tutorial, I'm using tubing with a 3/4" outside diameter, 100 psi. This makes for a slightly lighter hoop, but it really is a personal preference and what works best for you.
Hoops can be cut to custom fit your height and diameter. Smaller hoops require a bit more effort to keep up, while a larger hoop can be a bit easier to learn on in the beginning. Most people will be comfortable with a hoop between 132" and 134", though I have hoops that I use that are as small as 130" and as large as 136". If you are a taller person, lean toward the 134" mark or even a bit higher. Children's hoops can be made to fit as well.
Measure out your desired length of tubing, then cut cleanly with a sharp utility blade. Watch your fingers, and work away from your body!
-
 Step 2
Using a medium-to-fine-weight sand paper, even the ends of the tubing. Sand both ends.
-
 Step 3
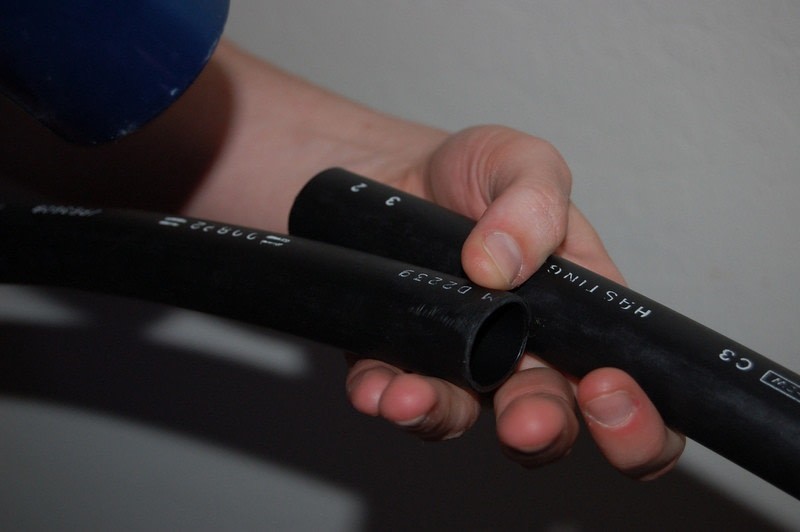
Sand the very center posts of the barbed connector so they are flat on the top instead of rounded. This makes it easier to smooth out the connection point on the hoop later on. Don't sand the barbs on the ends, just the center.
-
 Step 4
Holding the ends of the tubing in one hand, begin heating up the ends with a hair dryer. Keep the heat moving, and be careful not to burn your fingers! Once the tube is sufficiently heated, we'll be inserting the barbed connector into the ends.
-
 Step 5
Moving quickly, insert the connector into one end of the tubing. Ready? Now push, quick, quick!
Try to keep the connector centered between the tubing ends. If the tubing cools down, heat it up around the outside edges with the hair dryer for a few seconds.
-
 Step 6
Here's how the ends will look once we get them put together. See the raised edges where the tube is covering the center barbs? Flatten them out flush by sanding with medium-to-fine-weighted sand paper. Take a little time to do this step, it makes for a much prettier base for wrapping the tape if it's nice and even.
-
 Step 7
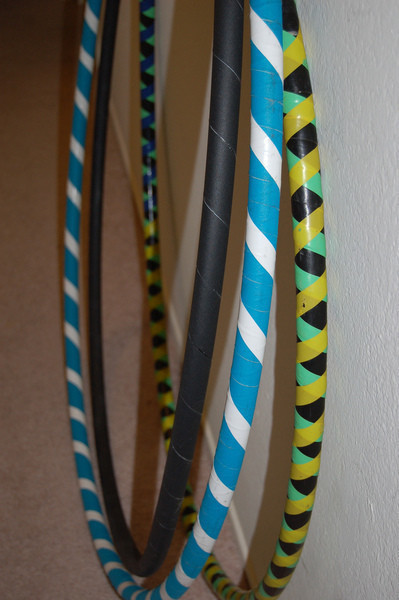
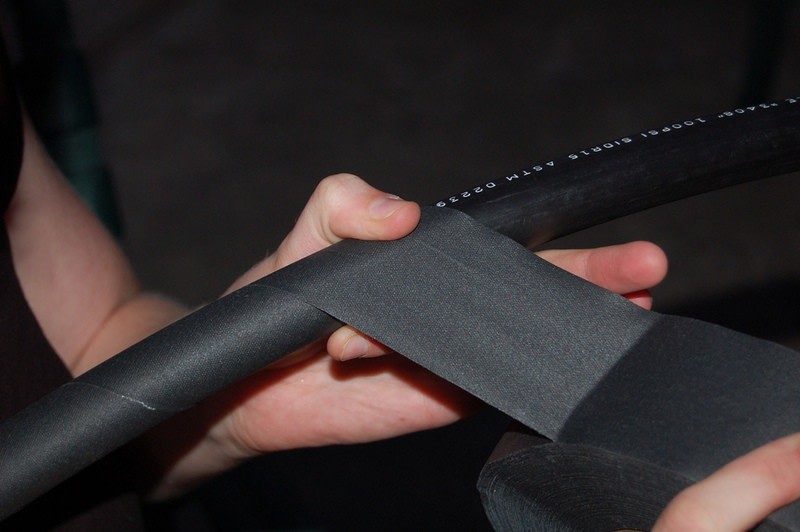
Using gaffer's tape in your choice of color, place tape at an angle over the edges of the tubing. You want to make sure you're using gaffer's tape, as it has the right texture on the outside to help the hoop grip. Don't substitute with duct tape! You'll not only be really mad by the time you finish, but the resulting wrap won't be as smooth or fitting either. Gaffer's tape is made from fabric, so retains a flexibility that duct tape cannot. Gaffer's is used in theater though, so it's available in lots of colors!
This initial angle is very important, so take your time in getting it right! You want the edges of the tape to just barely touch as you go around, but not overlap or gap. If you're overlapping as you go around, the area overlapping will get larger and larger until you can't get your tape going at an angle anymore at all.
Take your time, because laying down a smooth gaffer's tape wrap will make the difference between an ok hoop and a great hoop!
If you want a little extra weight, wrap another layer in the opposite direction as the first.
-
 Step 8
Wrap base-taped hoop with electrical, metallic, glitter, or any other decorative tape in any manner you choose. Or, leave plain. You may want to ask you helper cat for suggestions here.
Enjoy your new hoop! Practicing for 30 minutes, 4 times a week is enough to help you burn calories, get in shape, have fun, and feel sexy!


If I get the time im totaly making one