About
Videogame craft = win #2
I’m going to show you how to make a Triforce necklace because let’s face it, The Legend of Zelda series is amazing and who wouldn’t want to a piece of Zelda awesomeness hanging around their neck…
The number of hours this project takes really depends on drying time of clay. Usually you will need to leave the clay overnight!
...................................................................
Whats an ‘Eye pin’?
A bare pin with a loop on the end.
Whats a ‘Jump ring’?
Wire in the shape of a ring which has an opening.
Tags
-
 e p. favorited How To: Triforce Necklace
28 Dec 21:52
e p. favorited How To: Triforce Necklace
28 Dec 21:52
-
 Mad Hatter8976 added How To: Triforce Necklace to Geek Jewelry
18 Oct 02:11
Mad Hatter8976 added How To: Triforce Necklace to Geek Jewelry
18 Oct 02:11
-
 Conner W. added How To: Triforce Necklace to fashion
28 Jun 18:39
Conner W. added How To: Triforce Necklace to fashion
28 Jun 18:39
-
Conner W. favorited How To: Triforce Necklace
26 Jun 21:48
-
 Emmy S. favorited How To: Triforce Necklace
14 Feb 20:10
Emmy S. favorited How To: Triforce Necklace
14 Feb 20:10
-
 stephanie.goodsell.54 added How To: Triforce Necklace to Clothing
04 Feb 16:58
stephanie.goodsell.54 added How To: Triforce Necklace to Clothing
04 Feb 16:58
-
 Chemical Kid favorited How To: Triforce Necklace
19 Dec 18:17
Chemical Kid favorited How To: Triforce Necklace
19 Dec 18:17
-
 Rachel D. favorited How To: Triforce Necklace
11 Dec 13:36
Rachel D. favorited How To: Triforce Necklace
11 Dec 13:36
-
 Amanda B. favorited How To: Triforce Necklace
09 Oct 04:06
Amanda B. favorited How To: Triforce Necklace
09 Oct 04:06
-
 Kinhime Dragon added How To: Triforce Necklace to things to make
05 Sep 21:09
Kinhime Dragon added How To: Triforce Necklace to things to make
05 Sep 21:09
-
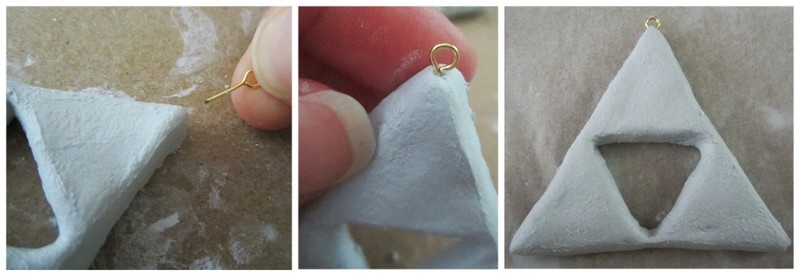
 Step 1
Use the jewellery cutters to snip the loop ends off 3 of the Eye pins. With the 4th Eye pin snip it so that the loop still has about 1cm of pin left (this is for the top of the necklace)
-
 Step 2
Take a small piece of air dry clay and roll it into a ball, squash it in the palm of your hand and mould it into a triangle. Do this two more times so you end up with 3 flat triangles.
-
 Step 3
Place the eye pins along the edges of the triangles and push them into the clay. This will help strengthen the joins. Use your finger to smooth out clay, you can put some water on your finger to help smooth over joins. Make sure the back is smooth as well and there are no cracks.
-
 Step 4
Take the Eye pin that still has the loop and push it into the top point of the clay. Make sure the hole is facing the front. Put the clay onto some baking paper (so it doesn’t stick to surface when drying). Leave somewhere mid temperature to dry overnight. If you put it in front of the heater or hairdryer it will dry too fast and may crack, if you find once it’s dry some cracks have still formed you can put a little wet clay over them and smooth it over.
-
 Step 5
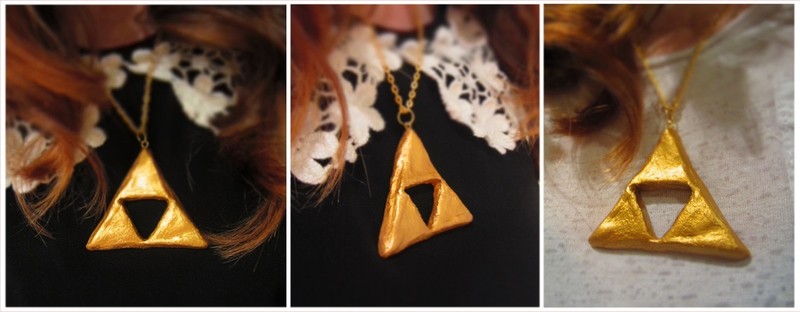
When the clay is dry paint it all gold, including the back. I used the paint ‘Jo Sonja's, Acrylic Rich Gold’ because I know it’s a really strong colour and a good quality paint so will look nice.
-
 Step 6
After the paint was dry I used a satin varnish to finish off the necklace, this will help protect the paint and prevent it from chipping off, it will also give the Triforce a nice shine. If you don’t want to buy Varnish you can just give the necklace a second coat instead. It will help protect the necklace a little.
.....................................
Open the jump ring using the pliers and thread it through the eye pin, put the necklace in the jump ring and then close it.
-
 Step 7
Now you can take over Hyrule!
Stands out the best on black, but fine against white and other colours too!