


About
Videogame craft = win #4
With the announcement of the new Smash Brothers in development I thought it was the perfect time for some Smash Bros craft.
Peach is my favourite character in Smash Brothers. The Stitchface turnip that she can pull up is freaking awesome.
Tags
Downloads
- 3.jpg 888 KB [ Download ]
-
 mrbnatural10 favorited How To: Stitchface Turnip
09 Dec 20:08
mrbnatural10 favorited How To: Stitchface Turnip
09 Dec 20:08
-
 Heather M. favorited How To: Stitchface Turnip
19 Jun 17:23
Heather M. favorited How To: Stitchface Turnip
19 Jun 17:23
-
Hazel F. favorited How To: Stitchface Turnip
23 Feb 22:12
-
 Stephanie H. added How To: Stitchface Turnip to Projects
23 Jan 07:12
Stephanie H. added How To: Stitchface Turnip to Projects
23 Jan 07:12
-
Rin Q. added How To: Stitchface Turnip to Stuff
24 Sep 13:13
-
 Jennifer B. commented on How To: Stitchface Turnip
04 Jul 00:22
Jennifer B. commented on How To: Stitchface Turnip
04 Jul 00:22
-
Jennifer B. favorited How To: Stitchface Turnip
03 Jul 17:40
-
 Gata N. favorited How To: Stitchface Turnip
15 Jun 22:29
Gata N. favorited How To: Stitchface Turnip
15 Jun 22:29
-
 Neko-San K. favorited How To: Stitchface Turnip
31 May 20:52
Neko-San K. favorited How To: Stitchface Turnip
31 May 20:52
-
Aisha K. favorited How To: Stitchface Turnip
28 Apr 23:08
-
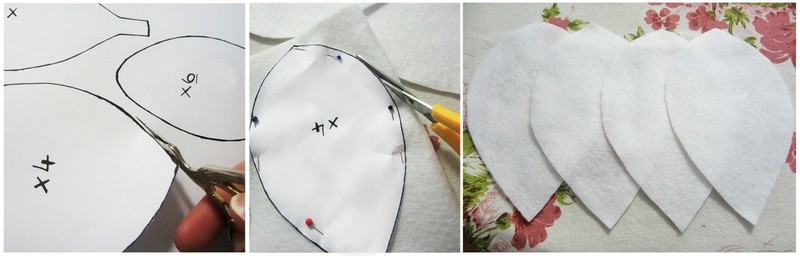
 Step 1
Download my pattern to print out, you can make it bigger or smaller if you like but it’s easier to sew when larger!
Cut out pattern and pin to white felt using berry pins, cut around the pattern (you need to cut out 4 pieces from the white felt) -
 Step 2
Using the same technique from my Pokéball tutorial, Sew all the sides of the white pieces to one another, you can hand sew the pieces or you can use a sewing machine. Using a sewing machine is a lot quicker and you will also get a nicer edge.
If using a sewing machine, set the stitch to a small ‘zigzag stich’ so that it seals the corners.
Make sure the thread and bobbin are white.
You can pin the sides together with berry pins so they don’t come apart when sewing, the sewing machine will go over the pins but just make sure the needle doesn’t hit them.Start at the longer point and sew up. Sew right on the edge for a smooth finish.
As you come to the other end leave 1cm unsewn. -
 Step 3
Trim threads.
Flip turnip inside out.
Stuff with stuffing making sure it’s firm. -
 Step 4
Thread black DMC through big needle; tie a knot in one end.
It may help to mark the face out first with a grey lead pencil so it’s easier to follow with the thread.Push needle into hole at top of turnip and through to the bottom left or right hand side. Pull thread tight and stitch a line going to the other side (for the mouth).
Make little knots on the ‘mouth’ making each one higher than the next, once in the middle descend again. This is so you can shape the mouth into a frown and it will stay in place.Next, thread 3 vertical lines through the frown to form the ‘stitches’.
Move the needle up and thread diagonal lines going down to make the eyes.
Repeat eyes on other side.
Pull thread back through hole and tie off. Cut excess thread. -
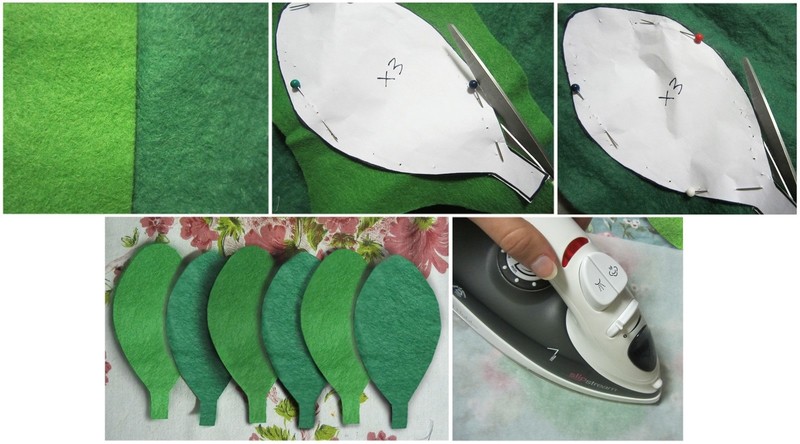
 Step 5
I used a light and dark green felt as I wanted ‘shading’ for my leaves.
If using two colours of green felt pin small leaf pattern to light green felt, cut out 3, then pin to dark green and cut another 3. If using just one colour pin and cut out 6 pieces.Pin larger leaf pattern to light green felt and cut out 6 pieces.
If the felt has creases in it you can cover with baking paper and iron on high setting. -
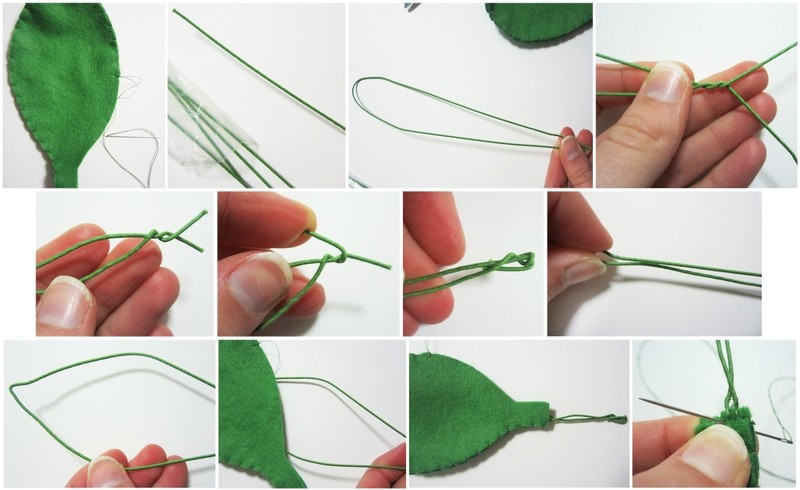
 Step 6
Thread small needle with green cotton and tie ends together to create a double thread, trim end. Doubling the thread this way will make it stronger and less likely to snap.
Pair small leaves and larger leaves together with their same size sides.
-
 Step 7
I used a blanket stitch to sew the leaves, it gives a nicer finish than just a basic stitch.
-
 Step 8
Leave half of the leaf unsewn. Take florist wire and bend in half, twist end, pull ends back on themselves so they are not sharp.
Push wire together making the top pointy; bend sides out to create a ‘leaf’ shape.
Push into opening of leaf and sew up rest.
Sew around the bottom really well so the wire doesn’t slip out. -
 Step 9
Your leaves should look like this!
-
 Step 10
Attaching the leaves onto the turnip.
I used a strong glue to help keep them in place. You do not want a PVA or other water based glue as the felt will just suck it up and won’t stick. Find a clear glue as they are quick drying and strong!Squeeze glue into top of turnip. Start by pushing the smaller leaves (darker side down) into the turnip, making sure they are equal lengths apart.
Push the larger leaves in-between the smaller ones so they are overlapping them.Thread needle with white and start sewing the turnip opening up.
Go close to the leaves to make sure it seals properly so no opening remains.
Tie knot and cut off excess thread. -
 Step 11
You’re done!
Go throw it at someone you don't like that much and watch them take all that sweet sweet damage.


Versions


Comments

