About
How to make diy adjustable bracelet
I don’t know how you make your own bracelet, but here is some practical guidance on how to make bracelet patterns with beads. You can make this diy adjustable bracelet to yourself or send it as a gift others as well.
Tags
-
 Shandy W. favorited How To Make Diy Adjustable Bracelet
22 Jul 16:20
Shandy W. favorited How To Make Diy Adjustable Bracelet
22 Jul 16:20
-
 Kathy J. favorited How To Make Diy Adjustable Bracelet
30 Mar 15:33
Kathy J. favorited How To Make Diy Adjustable Bracelet
30 Mar 15:33
-
 zoegirl221 added How To Make Diy Adjustable Bracelet to Jewelry
17 Sep 23:32
zoegirl221 added How To Make Diy Adjustable Bracelet to Jewelry
17 Sep 23:32
-
 Alice N. added How To Make Diy Adjustable Bracelet to Accessories
02 Sep 12:00
Alice N. added How To Make Diy Adjustable Bracelet to Accessories
02 Sep 12:00
-
 Dougle B. favorited How To Make Diy Adjustable Bracelet
03 Aug 14:14
Dougle B. favorited How To Make Diy Adjustable Bracelet
03 Aug 14:14
-
 bondsamantha07 favorited How To Make Diy Adjustable Bracelet
13 Jul 06:34
bondsamantha07 favorited How To Make Diy Adjustable Bracelet
13 Jul 06:34
-
sherri k. favorited How To Make Diy Adjustable Bracelet
10 Jul 14:04
-
Anett E. favorited How To Make Diy Adjustable Bracelet
04 Jul 08:59
You Will Need
-
 Step 1
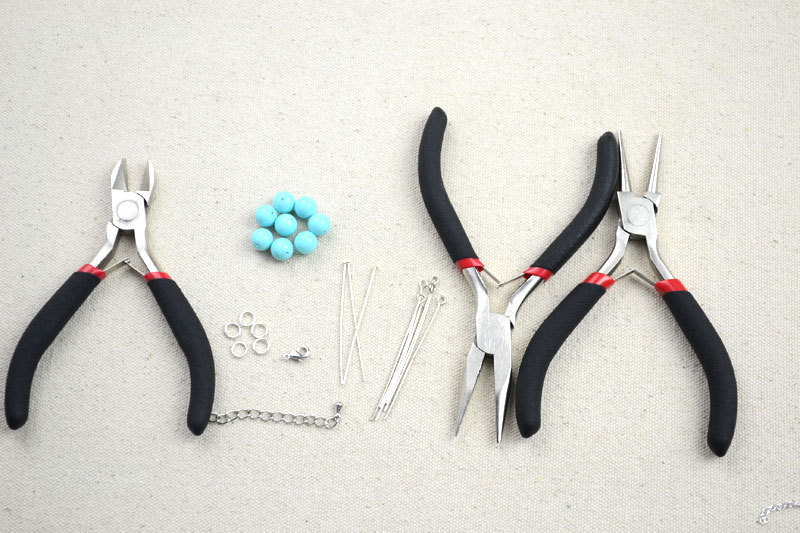
Materials and tools you will need while you are making bracelet patterns with beads:
8mm turquoise beads
Headpins
Eyepins
Jumprings
Lobster claw clasp
Silvery end chain
Flat nose plier
Side cutting plier
Round nose plier
-
 Step 2
Step1: make units for the bracelet:
1. Thread a bead on the headpin, leave a short distance that can make a loop and snip off the extra part, make a loop with the round nose plier. We can call it unit1.
-
 Step 3
2. String a bead on eyepin and make a loop too. This is unit2
-
 Step 4
3, now you should make more of the two kind units.
-
Step 5
Step2: link unit2 together
1. By using jumprings, you can link the whole unit2 together. Hang the unit1 between each of the two units2
-
 Step 6
Step3: add on clasp and chain
Add on the clasp and chain; remember to hang a unit1 on the end of the chain.
Now the whole bracelet patterns with beads have been done! You can transfer size of the diy adjustable bracelet according to the size of your wrist. It is a good design right? I hope you can try and make it!