

About
Lovely blossoms to wear without ever stepping foot in the garden!
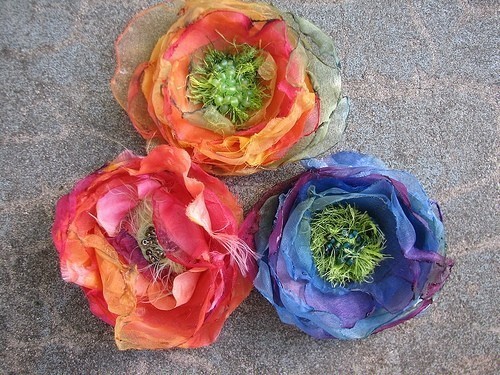
To make beautiful flowers to wear as pins or use to decorate packages, hats, bags, or dolls I use between 8 and 15 layers of chiffon, silk, tulle, organza or any other fabric to create full and fluffy blossoms.
I like to scrunch and wad them up in my sweaty little hands to create wrinkles and texture before I burn the edges with a candle or long lighter.
Please be advised that this is stinky and should be done in a well ventilated area.
It also can be dangerous and should be supervised by adults or firemen due to sudden bursts of flaming tulle melting the skin from your hands or singing the drapes!
I am not liable or responsible for any damages to you or your home or trailer park!
Please create these flowers at your own risk!
There, now, You have been warned!
-
 Key West Witch favorited How To Make Chiffon Flowers
29 Jun 00:12
Key West Witch favorited How To Make Chiffon Flowers
29 Jun 00:12
-
 Rhonda W. favorited How To Make Chiffon Flowers
07 Mar 23:26
Rhonda W. favorited How To Make Chiffon Flowers
07 Mar 23:26
-
 Miranda B. favorited How To Make Chiffon Flowers
20 Mar 23:57
Miranda B. favorited How To Make Chiffon Flowers
20 Mar 23:57
-
 Alice N. added How To Make Chiffon Flowers to Technique
19 Dec 13:50
Alice N. added How To Make Chiffon Flowers to Technique
19 Dec 13:50
-
 Johana99 favorited How To Make Chiffon Flowers
29 Aug 21:52
Johana99 favorited How To Make Chiffon Flowers
29 Aug 21:52
-
 Rachel B. favorited How To Make Chiffon Flowers
15 Aug 18:14
Rachel B. favorited How To Make Chiffon Flowers
15 Aug 18:14
-
 Alan P. favorited How To Make Chiffon Flowers
06 Jul 05:49
Alan P. favorited How To Make Chiffon Flowers
06 Jul 05:49
-
Sue F. favorited How To Make Chiffon Flowers
21 May 12:26
-
 Wendy V. added How To Make Chiffon Flowers to Favorites
21 Feb 01:26
Wendy V. added How To Make Chiffon Flowers to Favorites
21 Feb 01:26
-
Wendy V. favorited How To Make Chiffon Flowers
21 Feb 01:26
-
 Step 1
Begin by cutting small circles from chiffon, tulle, organza and silk. I start with the center circle and melt the edges over a candle flame while holding it with hemostats so that I don't burn my fingers! I myself am a pyromaniac and I admit it freely. (But that doesn't mean I want to burn down the house!)
I love to watch the edges curl and puff and melt and the more distressed the better!
The key is to not have perfect circles to begin with- cut them in degrees of sizes and make the edges irregular.
When the edges get near the flame they begin to curl under and this creates the cupped shape that you want your flowers to have. Keep in mind that nylon and polyester will burn and melt quickly- I suggest holding it close to the flame and pulling back when it actually catches on fire. You want to just heat it up and allow it to start to pull in and not actually burn it. It's a good idea to keep an old damp towel near in case you want to put it out quickly. -
 Step 2
As you create each layer you will be stacking them one inside the next and holding the new circle of organza near the flame to make it's edges curl and cup next to the preceding layer. This will make them actually look more realistic.
With each layer the circles should be cut out a bit larger until the flower reaches the desired maximum size. I make small 2" ones and have made them up to 10" across. -
 Step 3
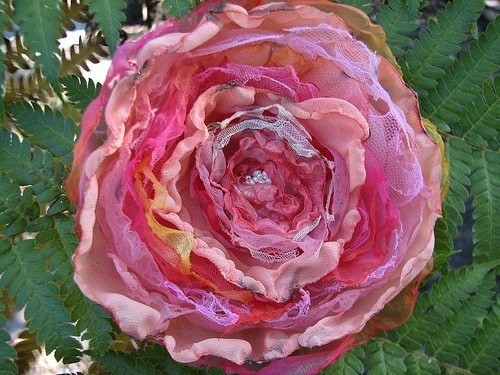
These flowers are meant to be a bit distressed and ragged. I use a metal cat brush to fray the edges of the silk and often tea dye lace and fabrics to add to the overall drama of old flowers. They have faded, gone off their bloom, but still hold on, caught forever in time. Edges turning brown and petals uneven and torn. Beautiful in their decay.
-
 Step 4
This is a great way to re-purpose old sheer curtains and dresses that are no longer in style. Dupioni silks add a nice richness and luster while crepe chiffon adds a nice opaque factor. Layering should be done with thought to a different texture each time so that the finished flower is more complex. Just using one color of the same material will make a flat flower without any depth.
-
 Step 5
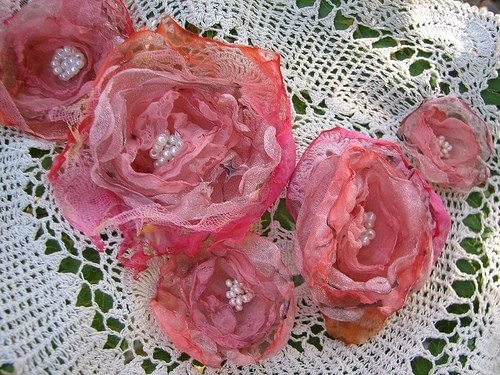
Once you have created the size flower you desire then hold it together with a straight pin in the center while you thread a needle with some embroidery floss (2 strands) or perle cotton in a color to match the beads and begin making stitches from back to the front, through all layers of your flower. Place several beads on each time you come through the center and fill entire "stamen" area with beads. I often use a tiny bit of fuzzy yarn under the beads for a more realistic look.
-
 Step 6
You may also use vintage hat millinery to create a nice center for your flower. Once you have filled up the center it's time to choose your pin back. I use standard pin backs in the longest size available to fit flower and remove any sticky backing as it is not strong enough to use.
Cut a small circle of felt in green or match the color to your flower and using hot glue, attach to the back completely covering any stitches or knots from sewing on beads. Place a thin line of hot glue on pin bar and fasten to center of felt. Cut a small rectangle of felt and glue over bar to conceal the metal and give a more professional appearance. -
 Step 7
These flowers are lovely as wearable art and can be made in themes such as Jane Austen, Alice in Wonderland or Stevie Nicks in her white witch phase by using brass charms inside flower centers, miniature china tea cups or rosery beads and crosses. You are only limited by your own imagination so go see what you can make.
and be sure to tell them Calamity Kim told you how on Cut Out & Keep!


Comments


