About
It doesn't need to come out of a box to be a beautiful wood floor!
The only reason we did not opt for the plywood-cut-into-strips-option was because we do not own a table saw to cut it ourselves and it still would have been about twice the cost of what we ended up paying. This inexpensive wood floor cost us less then $300.
Tags
-
 Brianna E. favorited How To: Install An Inexpensive Wood Floor That Looks Like A Million Dollars
10 Nov 19:38
Brianna E. favorited How To: Install An Inexpensive Wood Floor That Looks Like A Million Dollars
10 Nov 19:38
-
 Jaide H. favorited How To: Install An Inexpensive Wood Floor That Looks Like A Million Dollars
08 Oct 01:11
Jaide H. favorited How To: Install An Inexpensive Wood Floor That Looks Like A Million Dollars
08 Oct 01:11
-
 sqzl favorited How To: Install An Inexpensive Wood Floor That Looks Like A Million Dollars
03 Oct 06:58
sqzl favorited How To: Install An Inexpensive Wood Floor That Looks Like A Million Dollars
03 Oct 06:58
-
 Alison S. favorited How To: Install An Inexpensive Wood Floor That Looks Like A Million Dollars
16 Sep 09:19
Alison S. favorited How To: Install An Inexpensive Wood Floor That Looks Like A Million Dollars
16 Sep 09:19
-
 Henry M. favorited How To: Install An Inexpensive Wood Floor That Looks Like A Million Dollars
03 Sep 10:26
Henry M. favorited How To: Install An Inexpensive Wood Floor That Looks Like A Million Dollars
03 Sep 10:26
-
 Cruz Ella favorited How To: Install An Inexpensive Wood Floor That Looks Like A Million Dollars
27 Aug 05:32
Cruz Ella favorited How To: Install An Inexpensive Wood Floor That Looks Like A Million Dollars
27 Aug 05:32
-
 tanya b. favorited How To: Install An Inexpensive Wood Floor That Looks Like A Million Dollars
26 Aug 09:30
tanya b. favorited How To: Install An Inexpensive Wood Floor That Looks Like A Million Dollars
26 Aug 09:30
-
 Crafterella featured How To: Install An Inexpensive Wood Floor That Looks Like A Million Dollars
17 Aug 23:00
Crafterella featured How To: Install An Inexpensive Wood Floor That Looks Like A Million Dollars
17 Aug 23:00
-
 Alissa B. favorited How To: Install An Inexpensive Wood Floor That Looks Like A Million Dollars
14 Aug 18:48
Alissa B. favorited How To: Install An Inexpensive Wood Floor That Looks Like A Million Dollars
14 Aug 18:48
-
 GrandmasHouseDIY published her project How To: Install An Inexpensive Wood Floor That Looks Like A Million Dollars
13 Aug 11:10
GrandmasHouseDIY published her project How To: Install An Inexpensive Wood Floor That Looks Like A Million Dollars
13 Aug 11:10
You Will Need
-
 Step 1
We ended up buying 1x4s (of the cheapest pine available) at Menards for $1.80 a board. So this floor cost us less then $300 for 500 square feet and that makes me very happy.
-
 Step 2
Squeaks fit right in around here and we wanted no gaps between the boards because the original floor boards had no space between them. To eliminate squeaks and groans you can put down a pad/underlayment between the sub floor and your new wood floor, you can also glue the floor down as well and you can also use some kind of spacer between your boards. These are all things that we chose to skip and all things that would eliminate the squeaking, groaning and shifting. For us having the floors look (and sound) like they’ve been here for 100 years was more important to us then living with squeaks.
-
 Step 3
Question I will undoubtedly be asked: Aren’t you supposed to run your new floor the opposite direction the sub floor is run? Yes, that is how you are supposed to do it and no that is not how we did it. In only about 1/4 of the flooring the old sub floor for the screened in porch remained, the rest was plywood so we just went ahead and did wrong. We regret nothing.
-
 Step 4
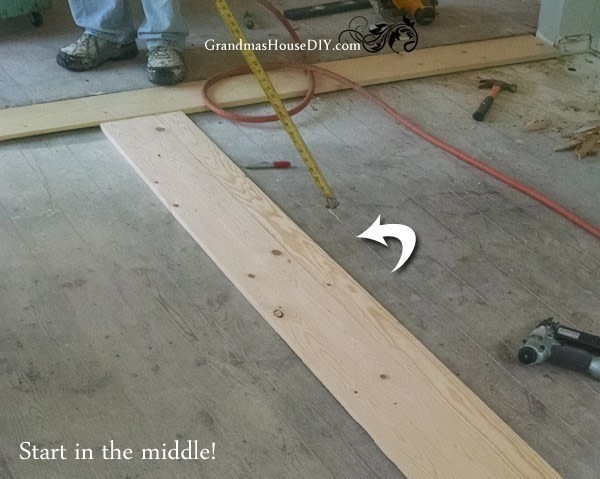
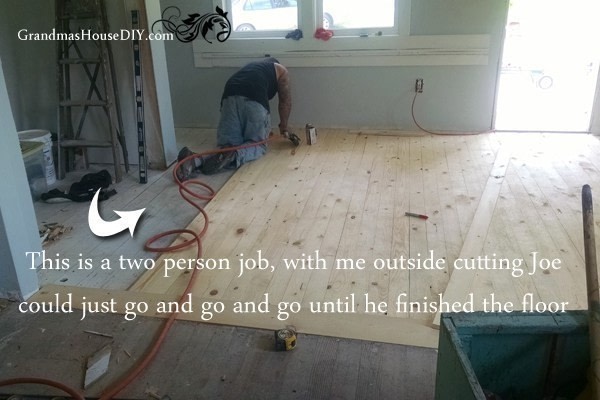
We bought 12 foot long 1x4s so they spanned the distance of the entire room – 8 foot long 1x4s would have been cheaper and would have made little to no waste but would have created lots of seams. This is one of those jobs that one person can do but is so much quicker and easier with two people that you really should have two people. With me cutting the boards outside and Joe nailing them down we laid all of the floor in under 3 hours. Other tools we used were a jigsaw and a skill saw for the tedious cuts.
-
 Step 5
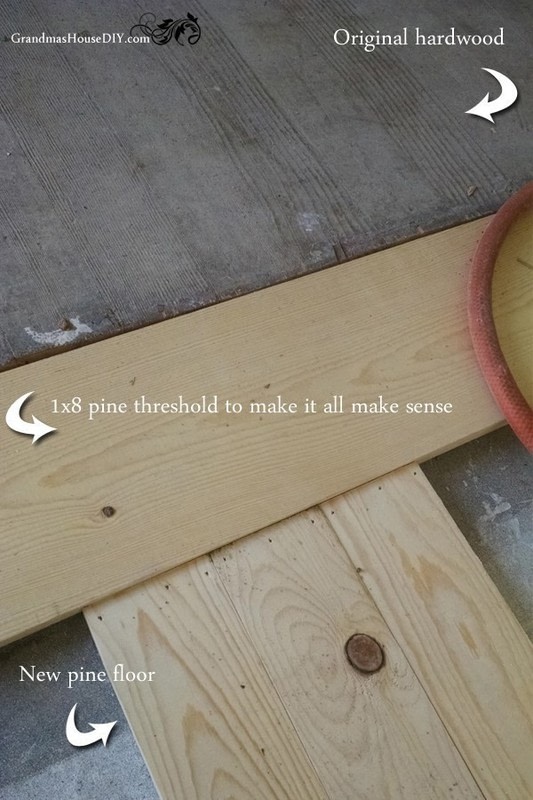
We used a pine 1×8 to cover the uneven threshold between our dining room and our kitchen, I did not want the two floors butting up to each other to be compared as they are very different types of wood as well as slightly different in size. The threshold creates the stopping point that makes the two different woods/floors make a lot more sense to the eye. We sanded the floors together, using a far rougher grit sandpaper (35) on the original wood floor then we used out here (60). From there I applied one coat of stain to all of it by hand with a paint brush, laid it on there thick, let the floor soak up as much as it wanted and then, after about twenty minutes, wiped up the excess with old t shirts. From there we did two coats of a sealant with no sanding between coats, letting it be as rough as we could so they would look like they’ve been here forever.
-
 Step 6
All in this project of 500 square foot of wood flooring cost us less then $300.