
About
This hippy headband or circlet will leave your friends envious at its scrappy, boho appearance until you show them how its done!
If you are like me, you love things for your hair. But they are so expensive! I keep seeing these circlets around, and I love them. So, I finally bought this one from Forever21 for 8 dollars.
As I inspected it upon my return home, I realized that it looks rather easy to make--and fun! Also, why not make it out of different fabrics? And add lace? Thus inspired, I set about creating my own headband
Downloads
- DSC_0264.JPG 65.6 KB [ Download ]
-
 jen s. favorited How To Create Your Own Stylish Braided Headband
06 Oct 13:38
jen s. favorited How To Create Your Own Stylish Braided Headband
06 Oct 13:38
-
 amanda.harris.16144 favorited How To Create Your Own Stylish Braided Headband
17 Sep 04:17
amanda.harris.16144 favorited How To Create Your Own Stylish Braided Headband
17 Sep 04:17
-
 TheGreenSprite favorited How To Create Your Own Stylish Braided Headband
06 Sep 16:02
TheGreenSprite favorited How To Create Your Own Stylish Braided Headband
06 Sep 16:02
-
Edith P. favorited How To Create Your Own Stylish Braided Headband
12 Aug 03:39
-
 Tiffany S. favorited How To Create Your Own Stylish Braided Headband
24 Jun 19:22
Tiffany S. favorited How To Create Your Own Stylish Braided Headband
24 Jun 19:22
-
 Carolynn B. entered her project How To Create Your Own Stylish Braided Headband to The Ultimate DIY Competition
05 Sep 14:12
Carolynn B. entered her project How To Create Your Own Stylish Braided Headband to The Ultimate DIY Competition
05 Sep 14:12
-
 Step 1
This works best with fabric with a small print, since the strips are a small width.
Turn your strips, right sides on the outside, and sew down the side with a straight stitch. We aren't going to flip them, the headband I made has a nice, scrappy look.
-
 Step 2
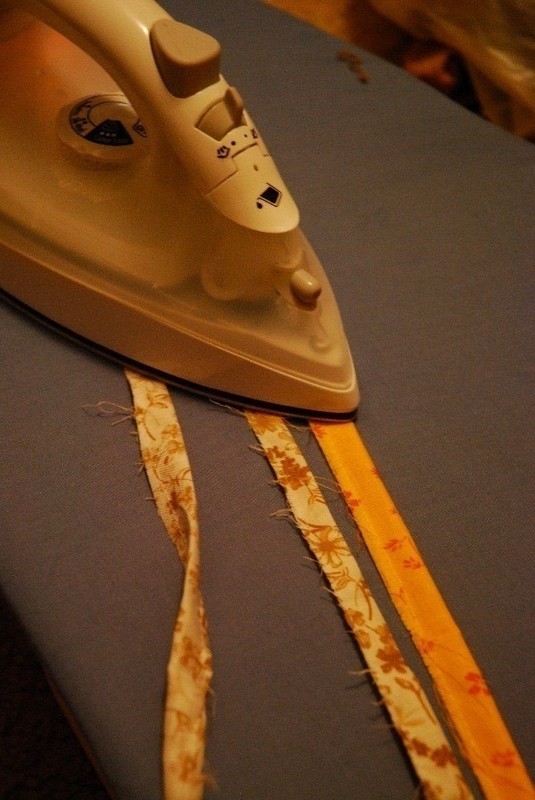
Press your tubes.
-
 Step 3
Sew all three tubes together. I put the two brown on bottom and the yellow on top.
-
 Step 4
Secure tubes to something that won't move if you pull on it. I used a pin and my ironing board.
-
 Step 5
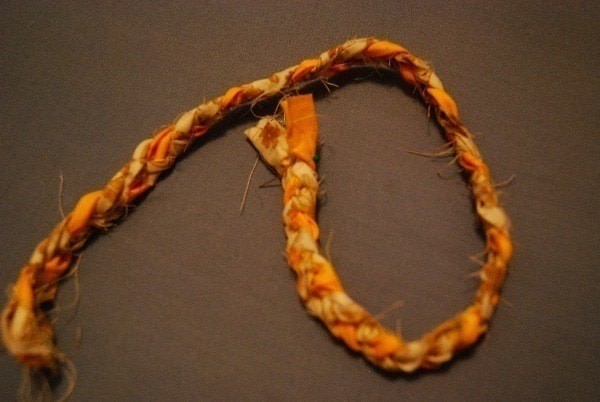
Braid! Then sew the other end closed.
-
 Step 6
cut your ribbon into two four-inch pieces. fold the corners in, and press. Then fold the ribbon in half, and press.
-
 Step 7
secure the ends inside the ribbon, and pin. secure the elastic inside, pin. Try it on (be careful of the pins) to make sure it fits. If not, re-pin until it does, then and sew down both sides with a straight stitch.
-
 Step 8
Yay, a handmade scrappy circlet! Wear, enjoy, and share with your friends.