

About
How to add a lace trim to a Peter Pan collar
This is a straight forward tutorial for adding a lace trim to a Peter Pan collar. The result is ssoo pretty!
You'll need to start with a pattern for a Peter Pan style collar. I'm using a pattern which has separate front and back collar pieces (some patterns may have the collar as one piece.) Follow the pattern instructions for the very first stages of making your collar. In my case, this comprised cutting out the pattern pieces, transferring markings, fusing interfacing to the collar pieces and sewing the front and back collar pieces together. We're going to start the tutorial from this point, so make sure you've done all your prep work beforehand.
-
 Key West Witch added How To Add A Lace Trim To A Peter Pan Collar to Jewelry
30 Jun 02:05
Key West Witch added How To Add A Lace Trim To A Peter Pan Collar to Jewelry
30 Jun 02:05
-
 Leia B. favorited How To Add A Lace Trim To A Peter Pan Collar
20 Mar 02:08
Leia B. favorited How To Add A Lace Trim To A Peter Pan Collar
20 Mar 02:08
-
 Xfluffy_unitatoX favorited How To Add A Lace Trim To A Peter Pan Collar
19 Nov 23:24
Xfluffy_unitatoX favorited How To Add A Lace Trim To A Peter Pan Collar
19 Nov 23:24
-
 bemeself favorited How To Add A Lace Trim To A Peter Pan Collar
14 Dec 20:18
bemeself favorited How To Add A Lace Trim To A Peter Pan Collar
14 Dec 20:18
-
 Belle W. favorited How To Add A Lace Trim To A Peter Pan Collar
02 Jul 12:41
Belle W. favorited How To Add A Lace Trim To A Peter Pan Collar
02 Jul 12:41
-
 Sayaka Y. favorited How To Add A Lace Trim To A Peter Pan Collar
23 Jun 21:05
Sayaka Y. favorited How To Add A Lace Trim To A Peter Pan Collar
23 Jun 21:05
-
 Momokocrafts favorited How To Add A Lace Trim To A Peter Pan Collar
01 Jun 10:57
Momokocrafts favorited How To Add A Lace Trim To A Peter Pan Collar
01 Jun 10:57
-
 Emma H. favorited How To Add A Lace Trim To A Peter Pan Collar
23 May 23:28
Emma H. favorited How To Add A Lace Trim To A Peter Pan Collar
23 May 23:28
-
 Chloe A. added How To Add A Lace Trim To A Peter Pan Collar to Ginger Rogers
23 Apr 16:20
Chloe A. added How To Add A Lace Trim To A Peter Pan Collar to Ginger Rogers
23 Apr 16:20
-
Chloe A. favorited How To Add A Lace Trim To A Peter Pan Collar
18 Apr 20:59
You Will Need
-
 Step 1
You will need:
Prepared pieces of your preferred collar pattern (see above).
1 to 1.5 metres of lace trim depending on the size of your collar. My collar required almost exactly a metre, but it's always worth buying more than you need for contingency.
First you're going to measure the width of our lace trimming. Mine is 6/8ths of an inch at the highest point. -
 Step 2
Then you need to decide how much of the lace trim you want to peep out along the edge of the collar. I decided I just wanted the top scalloped layer to show. Measure this distance - mine was 2/8ths of an inch (or a quarter of an inch if you prefer).
Now for a teeny tiny bit of maths. Subtract the second measurement from the first measurement. In my case it was 6/8ths minus 2/8ths = 4/8ths (or half an inch). That's it! That's all the maths you'll need to do. So my seam allowance for when we get to step seven is half an inch. IMPORTANT point, you only need this seam allowance for step eight and NOT before. -
 Step 3
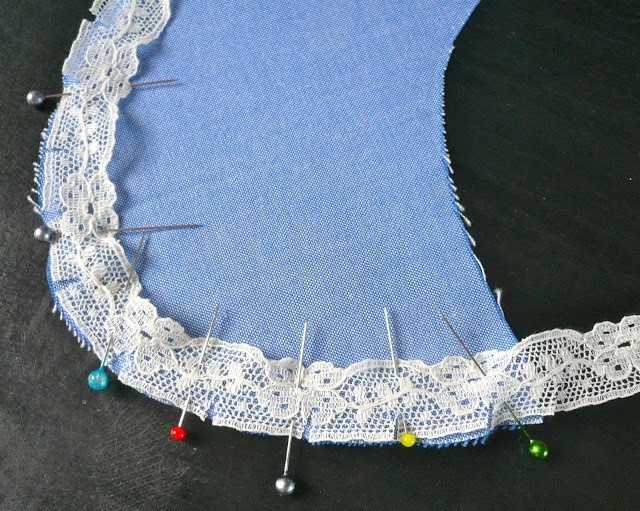
Right, back to the collar. Start by making tiny snips in the lace trim at half inch intervals. Do this along the entire length of your lace.
This will make the lace much more pliable when you're placing it around curves. Remember, Peter Pan collars are VERY curvy! -
 Step 4
With RIGHT sides together, pin the lace trim right around the outer edge of the TOP collar, making sure that the snipped edge of the lace is flush with the edge of the collar.
-
 Step 5
Use as many pins as you need.
-
 Step 6
Sew the lace trimming to the collar using a small seam allowance.
I used the width of my presser foot which is about a quarter of an inch. -
 Step 7
Now we're going to make a collar and lace sandwich. Place the under collar (or collar facing, depending on what your pattern calls it) RIGHT SIDES TOGETHER with the top collar that you've just attached your lace to. Pin it carefully all the way round.
-
 Step 8
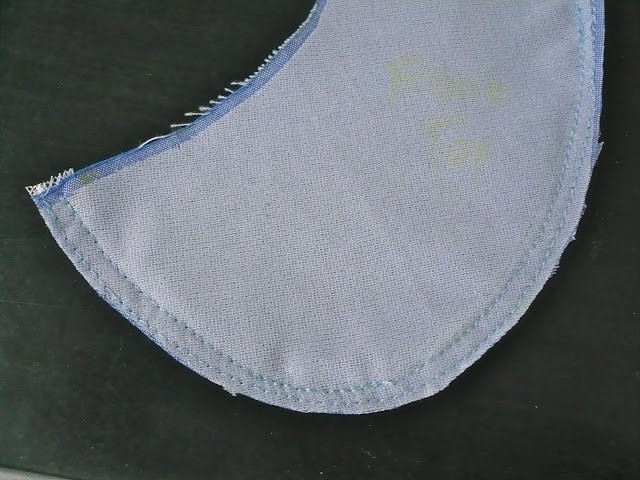
This is the point where you need to apply the seam allowance you worked out earlier. In my case it's half an inch. Sew the two layers together, right round the edge, using the correct seam allowance.
You'll see that you now have two lines of stitching: one from when you attached the lace and the second from sewing the front and back collar pieces together. -
 Step 9
Pattern instructions always tell you to notch around a collar edge for a smooth line, but I've always preferred to trim the seam allowance right down. In my experience it gives a much cleaner, angle-free line. It's entirely up to you which route you choose. If you do decide to trim the seam allowance right down, make sure you don't cut through any of the lines of stitching!
-
 Step 10
Now for the exciting bit! Turn the collar the right way round and press carefully, paying particular attention to the curved edges. Use a pointed object to ease out all those curves. You should end up with a lovely, lace trimmed collar like this.
-
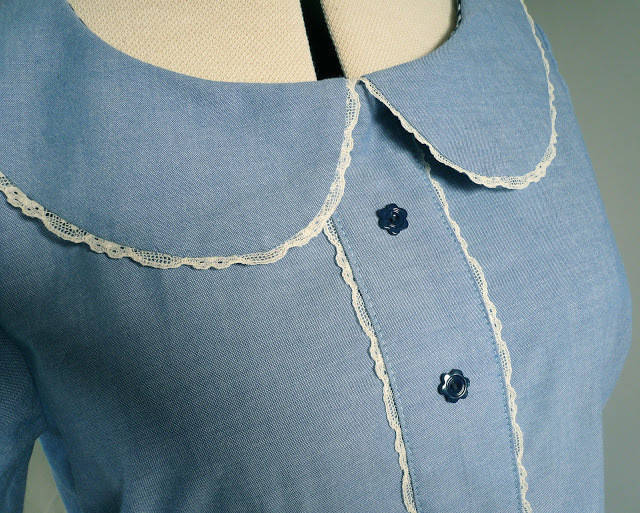
 Step 11
You can now attach it to the rest of your garment as per your pattern instructions. Here's mine attached to my Alma blouse....


...................................................................... .
Hannah.
http://surfjewels.tumblr.com/